EDITOR'S NOTE
This is a guest post by alwaysAI – a company that builds tools for deploying computer vision models on edge devices.
We invite guest posts by companies and individuals in the OpenCV ecosystem with the goal of educating community members about the latest frameworks, tools, algorithms, and hardware.
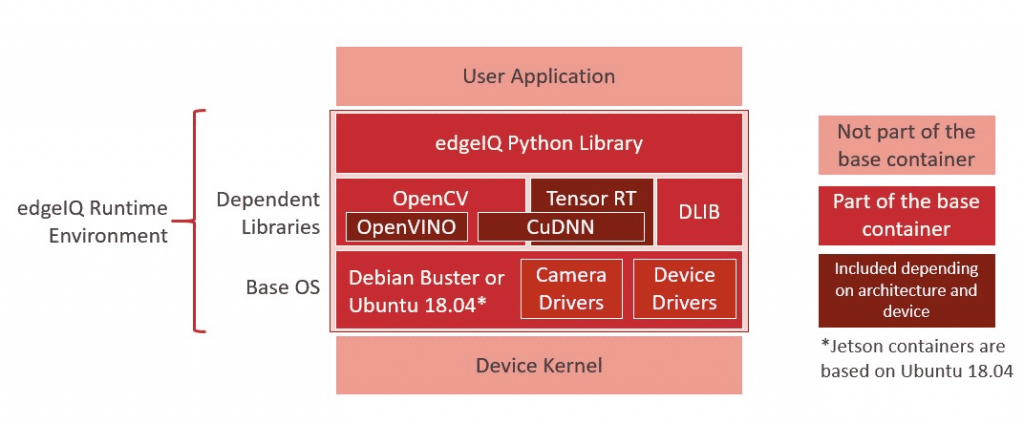
At alwaysAI we have the singular mission of making the process of building and deploying computer vision apps to edge devices as easy as possible. That includes training your model, building your app, and deploying your app to edge devices such as the Raspberry Pi, Jetson Nano, and many others. alwaysAI apps are built in Python and can run natively on Mac and Windows, and in our containerized edge runtime environment optimized for different architectures commonly used in edge devices, such as 32 and 64 bit ARM architectures.

Since we at alwaysAI love to use OpenCV, we’ve built it in as a core piece of our edge runtime environment. That means in every alwaysAI application you can add import cv2 and use OpenCV in your app. We’ve built a suite of tools around OpenCV to make the end-to-end process seamless and to help solve some of the common pain points unique to working with edge devices. It’s free to sign up for alwaysAI, and we have a bunch of example apps and pre-trained models to get you up and running quickly. Once you sign up, the dashboard has resources to help you get your first app running, and you can find app development guides and the edgeIQ Python API in the docs. In the next sections, I’ll walk through how alwaysAI can help you build your computer vision applications more easily, test your app on edge devices to get the desired performance, and finally how you can deploy and manage a fleet of edge devices running your alwaysAI app. Let’s dive in!
Build your app for the edge
Building applications for edge devices can take many forms, depending on the capabilities of the device and the developer’s preferences. Personally, I prefer to develop on my laptop where my IDE is set up the way I like it and I don’t have to worry about having too many Stack Overflow tabs open. Some devices, such as the Raspberry Pi 4 are powerful enough to be used as a development machine, and alwaysAI makes both approaches straightforward. The rest of this guide will be focused on developing on Mac or Windows. Simply run the desktop installer which will set up your alwaysAI development environment, including installing the alwaysAI CLI and a python environment with our Python API, edgeiq.
The alwaysAI CLI takes care of installing Python dependencies from the requirements.txt file, and running the app using the alwaysAI Python installation. Once you have your app set up, installing and running it are as simple as:
$ aai app install
$ aai app start
In your app you can get images or video from a file, webcam, or IP stream and perform inferencing on a model from our model catalog or one that you’ve trained, and display the results in a web browser using our visual debugging tool, the Streamer.

Once the app is working the way you like, it’s time to take it to the edge!
Test your app on the edge
With alwaysAI, running your application is as simple as setting up your edge device and then using the CLI to select a new target.
$ aai app configure
✔ Found alwaysai.app.json
✔ What is the destination? › Remote device
? Select choice: Use saved device
? Select a device: (Use arrow keys)
❯ nano
  tx2
  pi4
The edgeIQ Python API is designed to keep your code consistent across many different devices. Often, only changing the engine or accelerator is required to, for example, build an app that runs on a Pi 4 with Intel Neural Compute Stick 2 (NCS2) and also on an NVIDIA Jetson Nano on CUDA. Here’s an example of the code required to perform object detection:
obj_detect = edgeiq.ObjectDetection("alwaysai/mobilenet_ssd")

if edgeiq.find_ncs2():
  # Load for Pi + NCS2: DNN_OPENVINO inference engine performs inference on NCS2
  engine = edgeiq.Engine.DNN_OPENVINO
elif edgeiq.is_jetson():
  # Load for Jetson Nano: DNN_CUDA inference engine performs inference on NVIDIA GPU
  engine = edgeiq.Engine.DNN_CUDA
else:
  # Load to DNN inference engine for all other devices
  engine = edgeiq.Engine.DNN

obj_detect.local(engine=engine)

video_stream = edgeiq.WebcamVideoStream(cam=0).start()
frame = video_stream.read()
results = obj_detect.detect_objects(frame, confidence_level=.5)
With the alwaysAI CLI you can add new devices and switch the target device, accelerating testing across several devices.
Analyzing the performance of your app
Some edge devices don’t have a desktop or GUI, so this is where the Streamer becomes really useful. The Streamer gives you the ability to attach text data to your frame, which can be helpful to show detections and performance indicators along with the frame they correspond to. Two key factors in the performance of your app are the inference time and the overall frames-per-second (FPS). The inference time is the time it takes to perform the forward pass on the model you’re using. The size and complexity of the model, as well as the engine and accelerator have an impact on the inference time. The inference time is returned for each inference from our basic CV service classes: Classification, ObjectDetection, SemanticSegmentation, and PoseEstimation. Here’s an example of getting the inference time from an object detection inference and printing it to the Streamer:
obj_detect = edgeiq.ObjectDetection("alwaysai/mobilenet_ssd")
obj_detect.load(engine=edgeiq.Engine.DNN)
video_stream = edgeiq.WebcamVideoStream(cam=0).start()
streamer = edgeiq.Streamer().setup()
frame = video_stream.read()
results = obj_detect.detect_objects(frame, confidence_level=.5)

streamer.send_data(frame, "Inference time: {:1.3f} s".format(results.duration))
The overall FPS metric includes the inference time, but also any other processing that your application is doing. It can be greatly impacted by how inferencing is done on incoming video frames or images. For example, inferencing can be done synchronously on each frame, only displaying the frame once inferencing has completed, or it can be done asynchronously where inferences are queued and frames are shown as soon as they become available. The Streamer is a great tool to visually observe the FPS but also impacts the FPS, since running a server and encoding and streaming video is processing-intensive. Depending on the requirements of your app, you may decide to save logs to a file in order to have a smaller performance footprint. You can track the FPS of your app with the FPS class:
fps = edgeiq.FPS().start()

while True:
  <main loop processing>
  fps.update()

fps.stop()
print("elapsed time: {:.2f}".format(fps.get_elapsed_seconds()))
print("approx. FPS: {:.2f}".format(fps.compute_fps()))
Deploy your app to the edge
After building and testing your app on an edge device, you’ll probably want to deploy it to run on a device or fleet of devices. Since our edge runtime environment is Docker based, it’s straightforward to package your app and use Docker-based tools to manage it. First, choose a target device for your app docker image using aai app configure. This is important since your docker image can only be built for one device. For example, if you build your image on a Raspberry Pi, it won’t work on a Jetson Nano. Once your target device is selected, install the app and dependencies on the device with aai app install. Once that completes, run aai app package –tag <name> where your docker image name follows the Docker Hub naming convention of <docker-hub-username>/<image-name>:<version>, for example alwaysai/snapshot-security-camera:armvhf-latest.
Using the Docker CLI you can start and stop your app on a device:
$ docker run --network=host --privileged -d -v /dev:/dev <name>- The –network==host flag tells docker to map the device’s network interfaces into the container. This enables access to the internet and the Streamer from outside the container.
- The –privileged flag is needed when working with USB devices.
- The -d flag runs the container detached from the CLI.
- The -v /dev:/dev flag mounts the devices directory into the container so that cameras and USB devices can be accessed.
To learn more about these options, visit the Docker Run reference page.
To build your app as a service, Docker Compose is a great tool to manage multiple containers running as a single app. This method is useful if your CV app needs to interact with other containerized services such as a database or server.

To manage fleets of devices, tools such as balena, Kubernetes, and Docker Swarm all work with docker, so they can all be used to manage your alwaysAI edge deployment!
alwaysAI <3 OpenCV
Here at alwaysAI, we recognize the immense value that developers receive from using OpenCV. OpenCV enables developers to access over 2500 algorithms to support the development of Computer Vision applications. With OpenCV and alwaysAI you can seamlessly take your computer vision applications to the edge, enabling your application to be efficient, network independent, and cost-effective!
Contributions to the article by Komal Devjani and Steve Griset. alwaysAI, based in San Diego, California, is a deep learning computer vision developer platform. alwaysAI provides developers with a simple and flexible way to deliver computer vision to a wide variety of edge devices. With alwaysAI, you can get going quickly on Object Detection, Object Tracking, Image Classification, Semantic Segmentation & Pose Estimation.

About the author:
Eric VanBuhler joined the alwaysAI engineering team in March 2019 after 8 years at Qualcomm, and works primarily on the edgeIQ Python library and runtime environment. Eric received his BS in Electrical Engineering from University of Michigan and his MS in Electrical Engineering from University of California, San Diego. He has co-authored a book and holds a patent, both in the field of distributed network optimization.


5K+ Learners
Join Free VLM Bootcamp3 Hours of Learning