Image resizing and rescaling are fundamental operations in computer vision, essential for optimizing performance, preparing data for machine learning, and enhancing visualization. OpenCV, one of the most powerful and widely used computer vision libraries, provides efficient methods to resize images while maintaining quality. This guide covers image resizing in OpenCV using Python and C++, explaining key functions, interpolation techniques, and best practices. Whether you’re working on high-performance applications in C++ or need quick prototyping in Python, this article provides hands-on examples and in-depth insights to help you master image scaling with OpenCV.
If you’re new to Python and OpenCV, our free bootcamp is the perfect launchpad. Explore curated content to help you build a solid foundation.
So, let’s dive in and scale our way to perfectly sized images!
Table of contents
Import cv2
Before using any OpenCV functions, we must first import the library. This is the essential first step to access all OpenCV functionalities.
Python
# import the cv2 library
import cv2
C++
//Include Libraries
#include<opencv2/opencv.hpp>
#include<iostream>
We are assuming that you have already installed OpenCV on your device.
If not please refer the relevant links below:
OpenCV Function to Resize Images
resize(src, dsize[, dst[, fx[, fy[, interpolation]]]])The resize function in OpenCV is a versatile and efficient method for resizing or rescaling images to a desired dimension. Whether you need to reduce the size of an image for faster processing or enlarge it while maintaining quality, this function provides multiple interpolation techniques to achieve optimal results. It allows resizing based on absolute dimensions (width and height) or scaling factors (fx and fy), making it adaptable for various applications
Example Image

Resize an Image in OpenCV
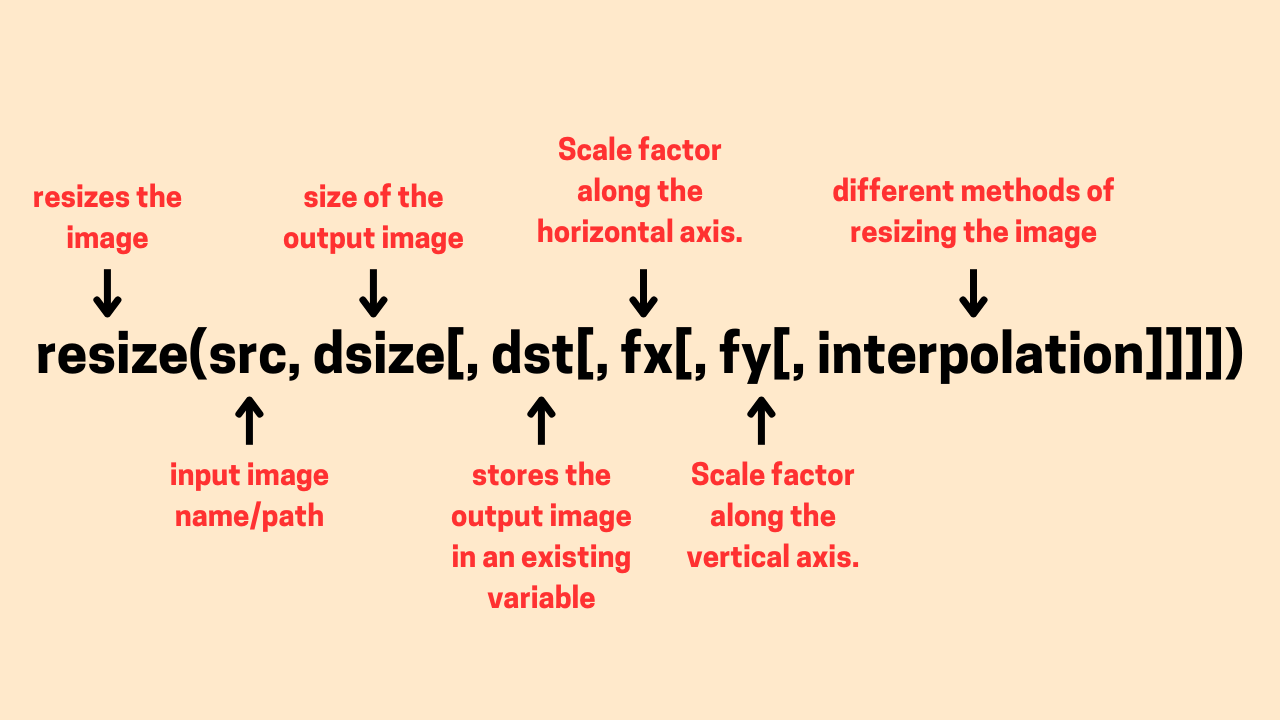
When resizing an image with OpenCV, the resize() function makes sure that the image is carefully reshaped while preserving as much detail as possible. Let’s break down its syntax
- src (Source Image) – This is the input image that you want to resize.
- dsize (Destination Size) – Here, you specify the exact (width, height) you want and the resize function reshapes the image to that shape.
- dst (Destination Image – Optional) – While not commonly used, this argument can store the output image in an existing variable instead of creating a new one.
- fx & fy (Scaling Factors – Optional) – Instead of specifying a fixed size, you can tell OpenCV to scale the image by a certain factor in the x (fx) and y (fy) directions. These arguments are responsible for stretching or shrinking of the images. If dsize is set, these are ignored—because OpenCV already knows the exact dimensions to use.
- interpolation (Interpolation Method – Optional) – This determines how OpenCV fills in missing pixels when enlarging or merges them when shrinking.
Syntax for Resizing an Image
Below are the syntaxes for resizing images in OpenCV using Python and C++, allowing you to scale images by specifying dimensions or scaling factors while choosing the appropriate interpolation method.
Python Syntax
resized_image = cv2.resize(src, dsize, dst=None, fx=None, fy=None, interpolation=cv2.INTER_LINEAR)
C++ Syntax
cv::resize(src, dst, dsize, fx, fy, interpolation);
Display an Image without Resizing
Before applying any resizing operations, let’s first read and display the original image to understand its dimensions.
Python Syntax
import cv2

# Load the image
image = cv2.imread("C:/Users/ssabb/Downloads/japan1.jpg")

# Display the original image
cv2.imshow("Original Image", image)
cv2.waitKey(0)
cv2.destroyAllWindows()
C++ Syntax
#include <opencv2/opencv.hpp>
#include <iostream>

int main() {

    // Load the image
    cv::Mat image = cv::imread("C:/Users/ssabb/Downloads/japan1.jpg
");

    // Check if the image is loaded successfully
    if (image.empty()) {
        std::cout << "Could not open or find the image!" << std::endl;
        return -1;
    }

    // Display the original image
    cv::imshow("Original Image", image);
    cv::waitKey(0);
    return 0;
}
Visualizing the output

Sometimes, high-resolution images, like the above, don’t fit well on the screen. Now, let’s explore different resizing methods to scale the image properly and view it without issues.
Image Resizing using the Width and Height
Before resizing an image, it’s essential to know its original dimensions. In OpenCV, images are represented as NumPy arrays in Python and as cv::Mat objects in C++. Interestingly, OpenCV follows a height × width × channels format, unlike some libraries (such as PIL) that use width × height.
This is because images in OpenCV behave like 2D arrays, where rows correspond to height and columns to width. You can retrieve these dimensions using image.shape in Python or image.rows and image.cols in C++. Understanding this structure ensures accurate resizing, preventing unexpected distortions in your final output.
Python Code for Resizing an Image
import cv2

# Load the image
image = cv2.imread("C:/Users/ssabb/Downloads/japan1.jpg")

# Define new width and height
new_width = 600
new_height = 500

# Resize the image
resized_image = cv2.resize(image, (new_width, new_height))

# Display the resized image
cv2.imshow("Resized Image", resized_image)
cv2.waitKey(0)
cv2.destroyAllWindows()
C++ Code for Resizing an Image
#include <opencv2/opencv.hpp>
#include <iostream>

int main() {

    // Load the image
    cv::Mat image = cv::imread("C:/Users/ssabb/Downloads/japan1.jpg");

    // Check if the image is loaded successfully
    if (image.empty()) {
        std::cout << "Could not open or find the image!" << std::endl;
        return -1;
    }

    // Define new width and height
    int new_width = 600;
    int new_height = 500;

    // Create an empty Mat object for the resized image
    cv::Mat resized_image;

    // Resize the image
    cv::resize(image, resized_image, cv::Size(new_width, new_height));

    // Display the resized image
    cv::imshow("Resized Image", resized_image);
    cv::waitKey(0);
    return 0;
}
You may have noticed that we skipped the dst argument in the Python code but used it in the C++ code. This difference arises from how variables are handled in each language.
In Python, we can dynamically assign the resized image to a new variable without explicitly creating it beforehand. However, in C++, we must first declare a cv::Mat variable before passing it to the resize function.


Visualizing the output

The image has been resized using arbitrary width and height values without considering its aspect ratio (width-to-height proportion). As a result, the resizing process has distorted the image. To preserve the original proportions and prevent such distortions, it is essential to maintain the aspect ratio during resizing.
Python Code
import cv2

# Load the image
image = cv2.imread("C:/Users/ssabb/Downloads/japan1.jpg")

# Get the original dimensions
original_height, original_width = image.shape[:2]

# Define new width while maintaining the aspect ratio
new_width = 600
aspect_ratio = new_width / original_width
new_height = int(original_height * aspect_ratio)  # Compute height based on aspect ratio

# Resize the image
resized_image = cv2.resize(image, (new_width, new_height))

# Display the resized image
cv2.imshow("Resized Image", resized_image)
cv2.waitKey(0)
cv2.destroyAllWindows()
C++ Code
#include <opencv2/opencv.hpp>
#include <iostream>

int main() {

    // Load the image
    cv::Mat image = cv::imread("C:/Users/ssabb/Downloads/japan1.jpg
");

    // Check if the image is loaded successfully
    if (image.empty()) {
        std::cout << "Could not open or find the image!" << std::endl;
        return -1;
    }

    // Get the original dimensions
    int original_width = image.cols;
    int original_height = image.rows;

    // Define new width while maintaining the aspect ratio
    int new_width = 400;
    double aspect_ratio = static_cast<double>(new_width) / original_width;
    int new_height = static_cast<int>(original_height * aspect_ratio);  // Compute height based on aspect ratio

    // Create an empty Mat object for the resized image
    cv::Mat resized_image;

    // Resize the image
    cv::resize(image, resized_image, cv::Size(new_width, new_height));

    // Display the resized image
    cv::imshow("Resized Image", resized_image);
    cv::waitKey(0);
    return 0;
}
Instead of defining both width and height manually, we only specify the new width and calculate the corresponding height. This ensures that the image scales proportionally, maintaining its original look.
If you want to practice these resizing techniques and many other core computer vision concepts, our Free OpenCV course gives you step-by-step exercises to master them.
Visualizing the output
Resizing with a Scaling Factor
Instead of manually specifying width and height, we can scale the image up or down using the fx and fy parameters. Setting fx = fy ensures the aspect ratio is preserved.
- If fx, fy < 1, the image is scaled down (shrunk).
- If fx, fy > 1, the image is scaled up (enlarged).
Python Code for Resizing an Image
import cv2

# Load the image
image = cv2.imread("C:/Users/ssabb/Downloads/japan1.jpg")

# Scaling factors for resizing
scale_down = 0.077
scale_up = 0.088

# Resize the image (scaling down)
resized_down = cv2.resize(image, None, fx=scale_down, fy=scale_down, interpolation=cv2.INTER_LINEAR)

# Resize the image (scaling up)
resized_up = cv2.resize(image, None, fx=scale_up, fy=scale_up, interpolation=cv2.INTER_LINEAR)

# Display the images
cv2.imshow("Original Image", image)
cv2.imshow("Scaled Down Image", resized_down)
cv2.imshow("Scaled Up Image", resized_up)
cv2.waitKey(0)
cv2.destroyAllWindows()
C++ Code for Resizing an Image
#include <opencv2/opencv.hpp>
#include <iostream>

int main() {

    // Load the image
    cv::Mat image = cv::imread("C:/Users/ssabb/Downloads/japan1.jpg");

    // Check if the image is loaded successfully
    if (image.empty()) {
        std::cout << "Could not open or find the image!" << std::endl;
        return -1;
    }

    // Scaling factors
    double scale_down = 0.077;
    double scale_up = 0.088;

    // Create Mat objects for the resized images
    cv::Mat resized_down, resized_up;

    // Resize the image (scaling down)
    cv::resize(image, resized_down, cv::Size(), scale_down, scale_down, cv::INTER_LINEAR);

    // Resize the image (scaling up)
    cv::resize(image, resized_up, cv::Size(), scale_up, scale_up, cv::INTER_LINEAR);

    // Display the images
    cv::imshow("Original Image", image);
    cv::imshow("Scaled Down Image", resized_down);
    cv::imshow("Scaled Up Image", resized_up);
    cv::waitKey(0);
    return 0;
}
Visualizing the output
Resizing with Different Interpolation Methods
Interpolation methods determine how new pixel values are calculated when resizing an image. Different methods have varying effects on image quality, sharpness, and smoothness.
In this case, instead of keeping equal scaling factors for width (fx) and height (fy), we will use different scaling values to see how interpolation behaves when the aspect ratio is altered. This will make the transformation more noticeable, especially in cases where stretching or shrinking occurs.
Take a quick look into some commonly used interpolation methods:
| Method | Description | Best Used For |
| INTER_NEAREST | Nearest-neighbor interpolation (fastest, but low quality) | Simple, fast resizing (e.g., pixel art, binary images) |
| INTER_LINEAR | Bilinear interpolation (default method) | General-purpose resizing (good balance of speed & quality) |
| INTER_CUBIC | Bicubic interpolation (uses 4×4 pixel neighborhood) | High-quality upscaling, smoother results |
| INTER_AREA | Resampling using pixel area relation | Best for shrinking images (avoids aliasing) |
| INTER_LANCZOS4 | Lanczos interpolation using 8×8 pixel neighborhood | High-quality upscaling & downscaling (preserves fine details) |
We’ll be demonstrating INTER_LINEAR, INTER_CUBIC, INTER_NEAREST, and INTER_AREA in this article, but feel free to explore the INTER_LANCZOS4 method and others, and see how they compare!
Python Code for Resizing an Image
import cv2

# Load the image
image = cv2.imread("C:/Users/ssabb/Downloads/japan1.jpg")

# Define different scaling factors for width and height
fx = 0.088
fy = 0.066

# Apply different interpolation methods
resized_area = cv2.resize(image, None, fx=fx, fy=fy, interpolation=cv2.INTER_AREA)
resized_linear = cv2.resize(image, None, fx=fx, fy=fy, interpolation=cv2.INTER_LINEAR)
resized_cubic = cv2.resize(image, None, fx=fx, fy=fy, interpolation=cv2.INTER_CUBIC)
resized_nearest = cv2.resize(image, None, fx=fx, fy=fy, interpolation=cv2.INTER_NEAREST)

# Display the resized images
cv2.imshow("Original Image", image)
cv2.imshow("Resized with INTER_AREA", resized_area)
cv2.imshow("Resized with INTER_LINEAR", resized_linear)
cv2.imshow("Resized with INTER_CUBIC", resized_cubic)
cv2.imshow("Resized with INTER_NEAREST", resized_nearest)
cv2.waitKey(0)
cv2.destroyAllWindows()
C++ Code for Resizing an Image
#include <opencv2/opencv.hpp>
#include <iostream>

int main() {

    // Load the image
    cv::Mat image = cv::imread("input.jpg");

    // Check if the image is loaded successfully
    if (image.empty()) {
        std::cout << "Could not open or find the image!" << std::endl;
        return -1;
    }

    // Define different scaling factors for width and height
    double fx = 0.088;
    double fy = 0.066;

    // Create Mat objects for the resized images
    cv::Mat resized_area, resized_linear, resized_cubic, resized_nearest;

    // Apply different interpolation methods
    cv::resize(image, resized_area, cv::Size(), fx, fy, cv::INTER_AREA);
    cv::resize(image, resized_linear, cv::Size(), fx, fy, cv::INTER_LINEAR);
    cv::resize(image, resized_cubic, cv::Size(), fx, fy, cv::INTER_CUBIC);
    cv::resize(image, resized_nearest, cv::Size(), fx, fy, cv::INTER_NEAREST);

    // Display the resized images
    cv::imshow("Original Image", image);
    cv::imshow("Resized with INTER_AREA", resized_area);
    cv::imshow("Resized with INTER_LINEAR", resized_linear);
    cv::imshow("Resized with INTER_CUBIC", resized_cubic);
    cv::imshow("Resized with INTER_NEAREST", resized_nearest);
    cv::waitKey(0);
    return 0;
}
Visualizing the output
While the differences between interpolation methods may not be easily noticeable in the video, you can observe subtle variations in image quality when experimenting on your own device.
Ready to take your skills to the next level? Our Comprehensive CVDL Program walks you through advanced OpenCV and deep learning applications, including real-world projects in computer vision and PyTorch.
Summary
In this article, we explored various image resizing techniques using OpenCV in both Python and C++. We learned how to resize images efficiently while preserving their aspect ratio and also observed the effects of distortion and stretching when the aspect ratio was not maintained.
Now that you’ve mastered image resizing, why stop there? Try applying these techniques to videos and webcam feeds -scale, stretch, and experiment in real-time to see the magic of OpenCV in action!


5K+ Learners
Join Free VLM Bootcamp3 Hours of Learning