

In this article, we explore different methods for detecting text in images using OpenCV’s built-in models and discuss text removal techniques using image inpainting. OpenCV, one of the most powerful and widely used open-source computer vision libraries, provides several deep-learning-based models for text detection, including EAST, DB50, and DB18. We will compare the performance of these text detection models along with manual text annotation and discuss OpenCV’s inpainting technique for text removal. By evaluating these methods, we aim to provide insights into their strengths and limitations, helping users determine the most suitable approach for their specific needs.
Table of contents
Real time Applications
The techniques discussed in this article have several real-world applications, including:
- Document Preprocessing – Removing unwanted text or noise from scanned documents to enhance readability and automate data extraction.
- License Plate Anonymization – Automatically detecting and removing license plate numbers for privacy in surveillance footage.
- Watermark Removal – Erasing watermarks from images and videos while preserving background details.
- Forensic Analysis – Enhancing forensic images by removing obstructing text or annotations for clearer evidence interpretation.
- Camera Branding and Metadata Removal – Automatically removing “Shot on iPhone” or “Shot on OnePlus” labels from images, as well as cleaning up unwanted timestamps, camera details, and metadata from dashcam datasets for further processing.
- Confidential Information Removal – Using machine learning and NLP models to automatically detect and remove sensitive text, such as confidential data, personal identifiers, or classified content, ensuring privacy and security.
Prerequisites
To follow this tutorial, ensure you have Python 3.x installed on your system.
For Jupyter Notebook Users
If you are using Jupyter Notebook, install the required libraries by running the following command inside a notebook cell:
!pip install opencv-python numpy os
or
%pip install opencv-python numpy
For Visual Studio Code & Command Prompt Users
If you are using Visual Studio Code or running the code in a standard Command Prompt or Terminal, install the required libraries using:
pip install opencv-python numpy
For Google Colab Users
If you are using Google Colab, you can run the code directly without additional setup, as the required libraries are pre-installed in the Colab environment. Make sure you have all the models and dataset uploaded in the project directory.
Downloading the Pre-Trained Models
To perform text detection, we will use three pre-trained models. Download the required models from the following links
- EAST (Efficient and Accurate Scene Text Detector): Download
- DB50 (Differentiable Binarization with ResNet-50 backbone): Download
- DB18 (Differentiable Binarization with ResNet-18 backbone): Download
Dataset
For this tutorial, we will be using three example images that contain text in different styles and backgrounds. You can use your own images or download the sample images. With these images, we will test how well the EAST, DB50, and DB18 models detect text and how effectively OpenCV’s inpainting technique removes it.


Text Detection Models in OpenCV
In this section, we will explore three text detection models available in OpenCV: EAST, DB50, and DB18. Below is a brief overview along with the syntax of each model and how they work.
Each model has unique strengths and is suited for different types of text detection tasks.
EAST (Efficient and Accurate Scene Text Detector)
The EAST (Efficient and Accurate Scene Text Detector) model is a deep-learning-based text detection method designed for real-time applications. It uses a fully convolutional neural network (FCN) and a feature pyramid network (FPN) to detect text in natural scenes with high accuracy. EAST produces both axis-aligned and rotated bounding boxes, making it effective for detecting text in arbitrary orientations.
Pros:
- Fast and efficient for real-time applications.
- Can detect rotated text.
- Provides quadrilateral bounding boxes.
Cons:
- May struggle with small or low-contrast text.
- Can produce false positives in cluttered backgrounds.
DB50 (Differentiable Binarization with ResNet-50 Backbone)
The DB50 model is based on the Differentiable Binarization (DB) approach, which generates accurate text boundaries by refining feature maps. This model uses a ResNet-50 backbone, making it more powerful in detecting text with high precision. The DB50 model is well-suited for detecting dense and irregularly shaped text regions.
Pros:
- High detection accuracy.
- Works well with complex text layouts.
- Suitable for detecting small and curved text.
Cons:
- Slower than EAST due to a deeper architecture.
- Computationally heavier.
DB18 (Differentiable Binarization with ResNet-18 Backbone)
The DB18 model is a lighter version of DB50, using a ResNet-18 backbone. While it follows the same differentiable binarization approach, it is optimized for speed, making it a better choice for resource-limited environments. It offers a balance between detection accuracy and computational efficiency.
Pros:
- Faster than DB50.
- Suitable for real-time applications.
- Works well with moderately complex text layouts.
Cons:
- Slightly lower accuracy compared to DB50.
- May struggle with highly complex text regions.
Syntax for Each Model
Below are the syntax and explanations for initializing and using the EAST, DB50, and DB18 models in OpenCV for text detection.
EAST Model
Syntax
textDetectorEAST= cv2.dnn_TextDetectionModel_EAST(modelPath)
textDetectorEAST.setConfidenceThreshold(conf_thresh)
textDetectorEAST.setNMSThreshold(nms_thresh)
textDetectorEAST.setInputParams(scale, inputSize, mean, swapRB)
boxes, confidences = textDetectorEAST.detect(image)
Parameters Explanation
- modelPath – Path to the pre-trained EAST model (.pb file).
- setConfidenceThreshold(conf_thresh) – Minimum confidence score to consider a detection valid.
- setNMSThreshold(nms_thresh) – Non-Maximum Suppression (NMS) threshold for filtering overlapping text boxes.
- setInputParams(scale, inputSize, mean, swapRB) – Preprocessing parameters:
- scale – Scaling factor for image normalization (e.g., 1.0).
- inputSize – Input size expected by the model (e.g., (320, 320)).
- mean – Mean values for normalization (e.g., (123.68, 116.78, 103.94)).
- swapRB – Boolean flag for swapping red and blue channels (usually True for OpenCV).
- detect(image) – Performs text detection on the input image, returning detected text boxes and confidence scores.
DB50 Model (Differentiable Binarization with ResNet-50)
Syntax
textDetectorDB50= cv2.dnn_TextDetectionModel_DB(modelPath)
textDetectorDB50.setBinaryThreshold(bin_thresh)
textDetectorDB50.setPolygonThreshold(poly_thresh)
textDetectorDB50.setInputParams(scale, inputSize, mean, swapRB)
boxes, confidences = textDetectorDB50.detect(image)
Parameters Explanation
- modelPath – Path to the DB50 model (.onnx file).
- setBinaryThreshold(bin_thresh) – Binarization threshold for text segmentation.
- setPolygonThreshold(poly_thresh) – Threshold to determine polygon shape for detected text.
- setInputParams(scale, inputSize, mean, swapRB) – Same as EAST model preprocessing parameters.
- detect(image) – Runs text detection and returns text bounding boxes.
DB18 Model (Differentiable Binarization with ResNet-18)
Syntax
textDetectorDB18= cv2.dnn_TextDetectionModel_DB(modelPath)
textDetectorDB18.setBinaryThreshold(bin_thresh)
textDetectorDB18.setPolygonThreshold(poly_thresh)
textDetectorDB18.setInputParams(scale, inputSize, mean, swapRB)
boxes, confidences = textDetectorDB18.detect(image)
Parameters Explanation
- modelPath – Path to the DB18 model (.onnx file).
- setBinaryThreshold(bin_thresh) – Defines threshold for binarization during text detection.
- setPolygonThreshold(poly_thresh) – Defines how polygonal text regions are determined.
- setInputParams(scale, inputSize, mean, swapRB) – Same as EAST and DB50 models.
- detect(image) – Performs text detection and returns detected text boxes.
Text Removal Using OpenCV
OpenCV provides two primary inpainting algorithms:


- Navier-Stokes Inpainting (cv2.INPAINT_NS) – This method propagates image information from surrounding areas using fluid dynamics principles, making it effective for small, smooth, or homogeneous regions but less suitable for complex textures.
- Telea’s Inpainting (cv2.INPAINT_TELEA) – Uses fast marching algorithms to iteratively fill missing areas by considering pixel gradients, producing more natural-looking results, especially in regions with complex textures and edges.
In this article we will be demonstrating the Tealea’s Inpainting algorithm.
Syntax
inpainted_image = cv2.inpaint(src, mask, inpaintRadius, flags)
Parameters Explanation
- src – The input image from which text is to be removed.
- mask – A binary mask of the same size as src, where white (255) pixels indicate text regions to be removed.
- inpaintRadius – Defines the neighborhood size (in pixels) for filling missing areas. A value of 3-5 usually works well.
- flags – Specifies the inpainting algorithm:
- cv2.INPAINT_NS – Uses the Navier-Stokes method.
- cv2.INPAINT_TELEA – Uses Telea’s method (preferred for text removal).
Implementing Text Detection and Removal
We will implement text detection using three models: EAST, DB50, and DB18, and then remove the detected text using inpainting with OpenCV.
Syntax
import cv2
import numpy as np

# Load the input image
image_path = "C:/Users/ssabb/Downloads/test2.png"
image1 = cv2.imread(image_path)
image = cv2.resize(image1, (320, 320))

# Create copies for different models
annotated_image = image.copy()  # For all models
annotated_db50_image = image.copy()  # For DB50
annotated_db18_image = image.copy()  # For DB18
annotated_east_image = image.copy()  # For EAST
orig_image = image.copy()  # For inpainting (all models)
orig_db50_image = image.copy()  # For DB50
orig_db18_image = image.copy()  # For DB18
orig_east_image = image.copy()  # For EAST

# Set input image size
inputSize = (320, 320)

# Load pre-trained models
textDetectorEAST = cv2.dnn_TextDetectionModel_EAST("C:/Users/ssabb/Desktop/opencv_courses/c0/Text_Det/resources/frozen_east_text_detection.pb")
textDetectorDB50 = cv2.dnn_TextDetectionModel_DB("C:/Users/ssabb/Desktop/opencv_courses/c0/Text_Det/resources/DB_TD500_resnet50.onnx")
textDetectorDB18 = cv2.dnn_TextDetectionModel_DB("C:/Users/ssabb/Desktop/opencv_courses/c0/Text_Det/resources/DB_TD500_resnet18.onnx")

# Set parameters for the models
conf_thresh = 0.8
nms_thresh = 0.4
bin_thresh = 0.3
poly_thresh = 0.5
mean = (122.67891434, 116.66876762, 104.00698793)
textDetectorEAST.setConfidenceThreshold(conf_thresh).setNMSThreshold(nms_thresh)
textDetectorEAST.setInputParams(1.0, inputSize, (123.68, 116.78, 103.94), True)
textDetectorDB18.setBinaryThreshold(bin_thresh).setPolygonThreshold(poly_thresh)
textDetectorDB18.setInputParams(1.0/255, inputSize, mean, True)
textDetectorDB50.setBinaryThreshold(bin_thresh).setPolygonThreshold(poly_thresh)
textDetectorDB50.setInputParams(1.0/255, inputSize, mean, True)

# Create inpainting masks
inpaint_mask = np.zeros(image.shape[:2], dtype=np.uint8)  # Mask for all models
inpaint_mask_db50 = np.zeros(image.shape[:2], dtype=np.uint8)  # Mask for DB50 only
inpaint_mask_db18 = np.zeros(image.shape[:2], dtype=np.uint8)  # Mask for DB18 only
inpaint_mask_east = np.zeros(image.shape[:2], dtype=np.uint8)  # Mask for EAST only

# Detect text using the models
boxesEAST, _ = textDetectorEAST.detect(image)
boxesDB18, _ = textDetectorDB18.detect(image)
boxesDB50, _ = textDetectorDB50.detect(image)

# Process all detected boxes
for box in boxesEAST + boxesDB18 + boxesDB50:
    cv2.fillPoly(inpaint_mask, [np.array(box, np.int32)], 255)  # Full mask
    cv2.polylines(annotated_image, [np.array(box, np.int32)], isClosed=True, color=(0, 255, 0), thickness=1)  # Annotate all models (Green)

# Process DB50 detected boxes
for box in boxesDB50:
    cv2.fillPoly(inpaint_mask_db50, [np.array(box, np.int32)], 255)  # DB50 mask
    cv2.polylines(annotated_db50_image, [np.array(box, np.int32)], isClosed=True, color=(0, 0, 255), thickness=1)  # Annotate DB50 (Red)

# Process DB18 detected boxes
for box in boxesDB18:
    cv2.fillPoly(inpaint_mask_db18, [np.array(box, np.int32)], 255)  # DB18 mask
    cv2.polylines(annotated_db18_image, [np.array(box, np.int32)], isClosed=True, color=(255, 0, 0), thickness=1)  # Annotate DB18 (Blue)

# Process EAST detected boxes
for box in boxesEAST:
    cv2.fillPoly(inpaint_mask_east, [np.array(box, np.int32)], 255)  # EAST mask
    cv2.polylines(annotated_east_image, [np.array(box, np.int32)], isClosed=True, color=(0, 255, 255), thickness=1)  # Annotate EAST (Cyan)

# Perform inpainting
inpainted_image = cv2.inpaint(orig_image, inpaint_mask, inpaintRadius=5, flags=cv2.INPAINT_NS)  # All models
inpainted_db50_image = cv2.inpaint(orig_db50_image, inpaint_mask_db50, inpaintRadius=5, flags=cv2.INPAINT_NS)  # DB50 only
inpainted_db18_image = cv2.inpaint(orig_db18_image, inpaint_mask_db18, inpaintRadius=5, flags=cv2.INPAINT_NS)  # DB18 only
inpainted_east_image = cv2.inpaint(orig_east_image, inpaint_mask_east, inpaintRadius=5, flags=cv2.INPAINT_NS)  # EAST only

# Show results
cv2.imshow('Original', image)
cv2.imshow('Annotated (All Models)', annotated_image)
cv2.imshow('Inpainted (All Models)', inpainted_image)
cv2.imshow('Annotated (DB50 Only)', annotated_db50_image)
cv2.imshow('Inpainted (DB50 Only)', inpainted_db50_image)
cv2.imshow('Annotated (DB18 Only)', annotated_db18_image)
cv2.imshow('Inpainted (DB18 Only)', inpainted_db18_image)
cv2.imshow('Annotated (EAST Only)', annotated_east_image)
cv2.imshow('Inpainted (EAST Only)', inpainted_east_image)
cv2.waitKey(0)
cv2.destroyAllWindows()
This implementation effectively detects and removes text using multiple deep learning models of OpenCV. The detected text regions are filled using the inpainting technique
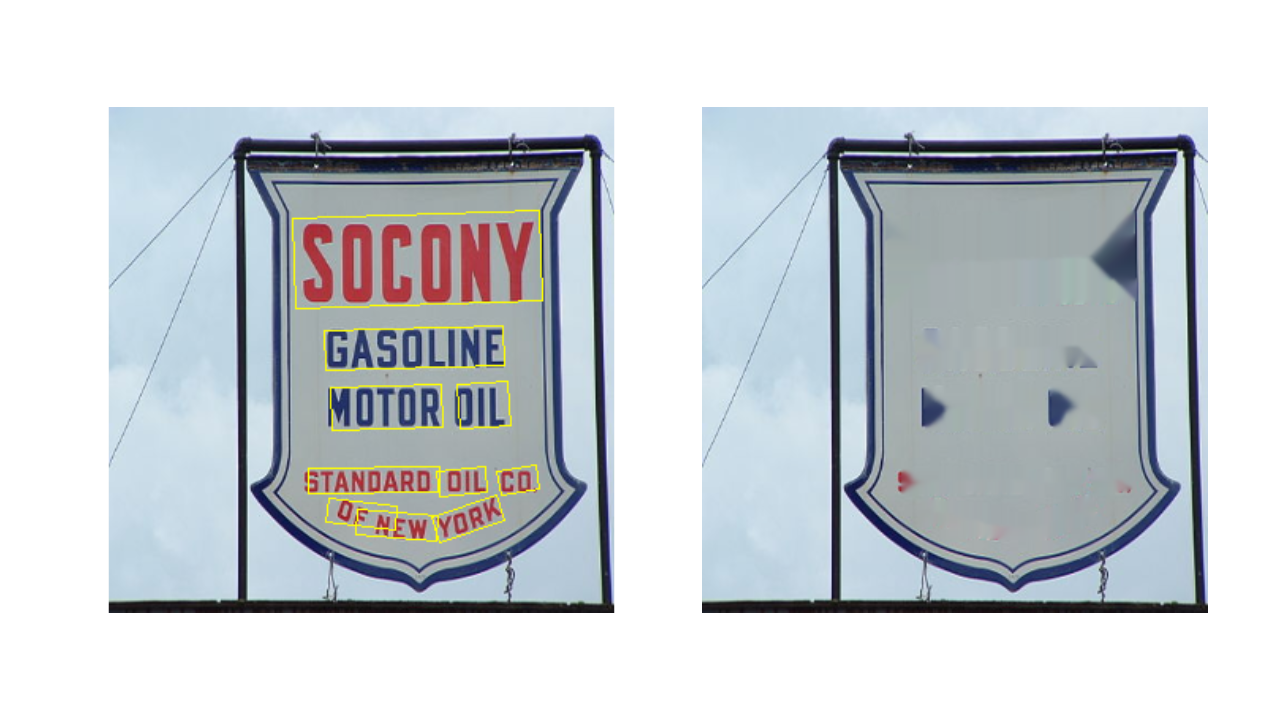
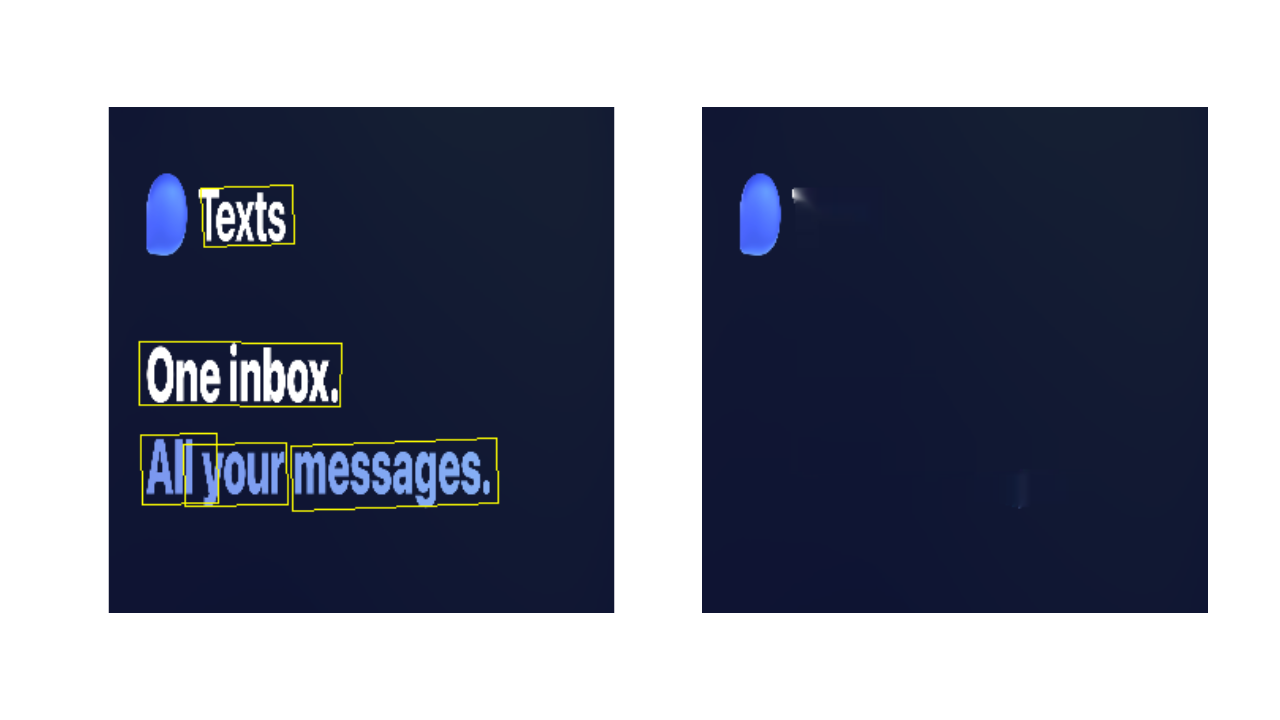
Example Output 1
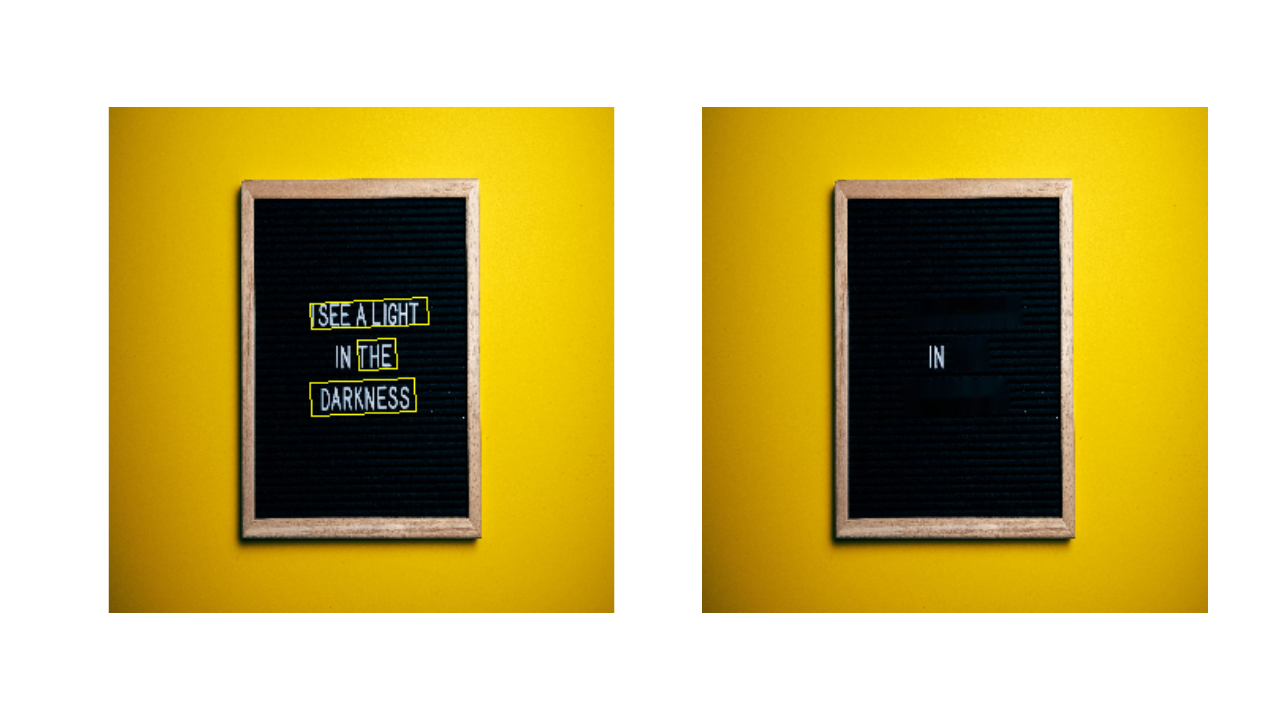
The EAST model demonstrates its ability to detect individual words rather than entire text blocks. However, in this example, it failed to accurately detect all the words. On the other hand, the DB50 and DB18 models performed well in detecting all the text. The inpainting method effectively removed the text, but the removal is noticeable due to the varying background texture, making it evident that something was previously there. To achieve seamless results, more advanced AI and deep learning models could be explored.
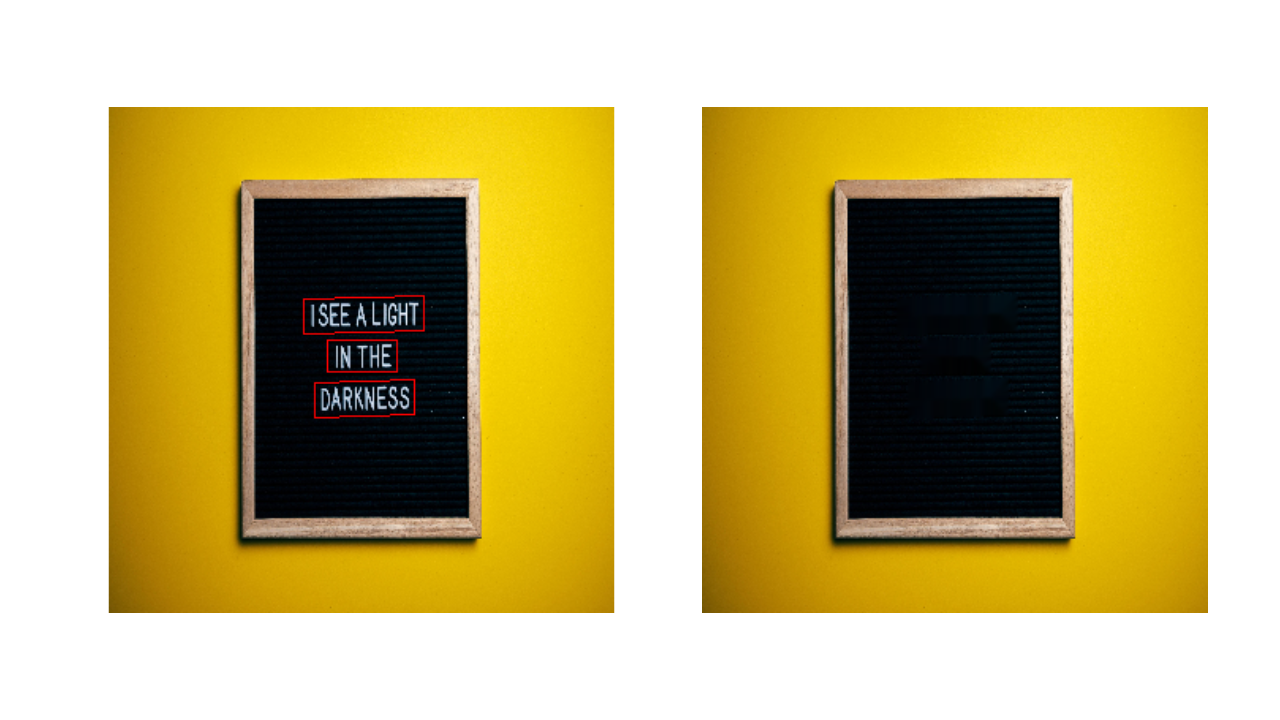
Example Output 2
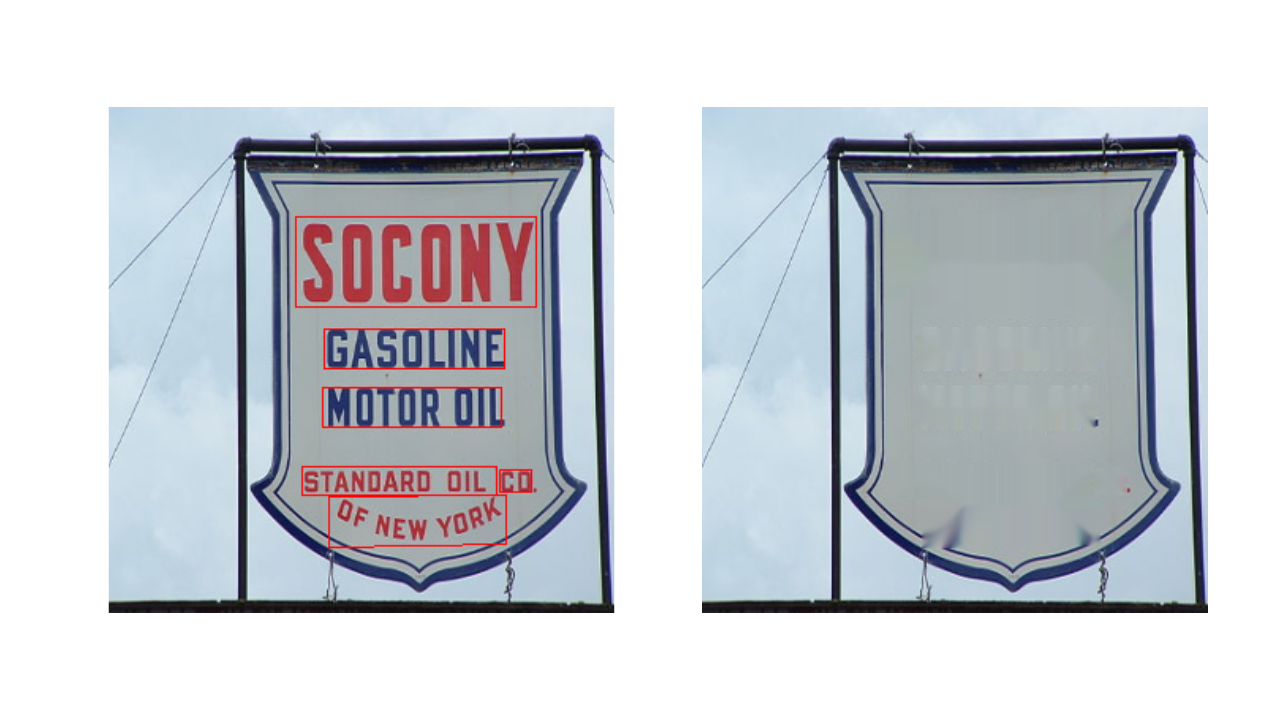
Here, you can clearly see how the EAST model detects individual words rather than entire text blocks. While all models performed well in detecting text, the inpainted images, especially those from EAST and DB18, exhibit noticeable distortions. This occurs because the bounding boxes extend beyond the text area into regions with different background colors. As a result, the inpainting process struggles to seamlessly blend the removed text with the surrounding textures.
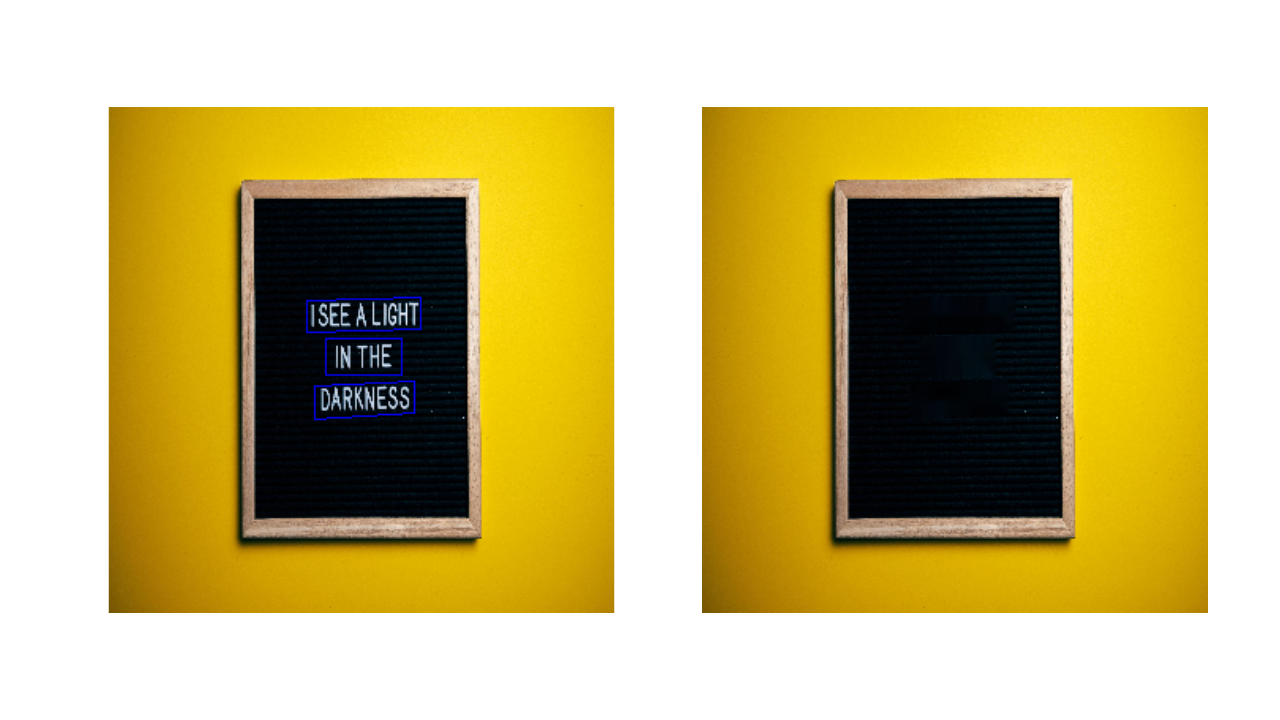
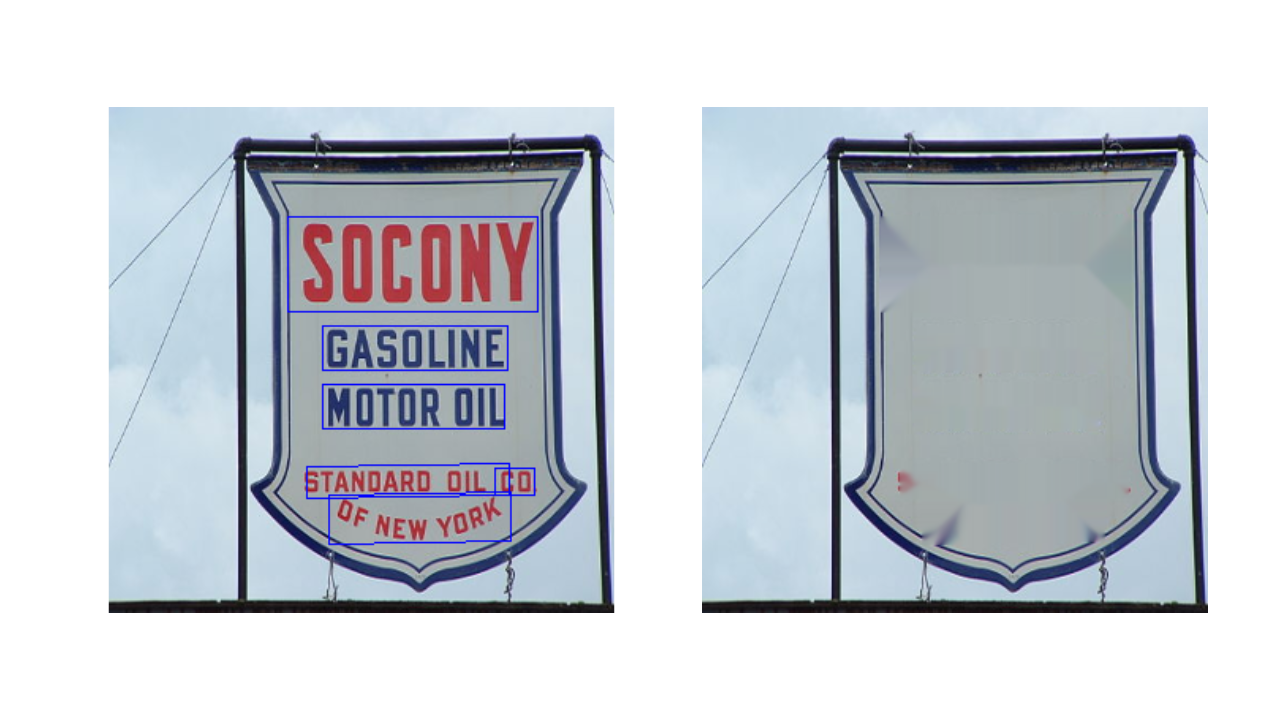
Example Output 3
All models detected the text effectively, but distortions appear during inpainting due to inconsistencies in the bounding boxes—some extend beyond the text, while others are too tight and cut into the letters.
The results may vary depending on the images used, so it is recommended to test with different images and explore other advanced text detection models.
Manual Annotation and removal
In some cases, automatic text detection models may not perform optimally, especially when dealing with complex backgrounds, overlapping text, or irregular fonts. To address such scenarios, manual annotation can be used to precisely mark the text areas for removal. This involves manually selecting the regions containing text and applying inpainting or other image restoration techniques to seamlessly remove them. While this method requires more effort, it provides greater control over the text removal process, ensuring better accuracy and minimal distortion in the final output.
Syntax
import cv2
import numpy as np
import os

# Load the input image
image_path = "C:/Users/ssabb/Desktop/opencv_courses/articles/Text Removal/Data/Images/Train/img513.jpg"
image1 = cv2.imread(image_path)
image = cv2.resize(image1, (320, 320))
orig_image = image.copy()  # Keep original for inpainting
annotated_image = image.copy()

# Store polygons
polygons = []
current_polygon = []
mask_saved = False  # Flag to track if the mask has been saved

# Mouse callback function
def draw_polygon(event, x, y, flags, param):
    global current_polygon, annotated_image
    if event == cv2.EVENT_LBUTTONDOWN:  # Left-click to add point
        current_polygon.append((x, y))
        if len(current_polygon) > 1:
            cv2.line(annotated_image, current_polygon[-2], current_polygon[-1], (0, 255, 0), 1)
        cv2.circle(annotated_image, (x, y), 3, (0, 0, 255), -1)
cv2.namedWindow("Annotation")
cv2.setMouseCallback("Annotation", draw_polygon)
while True:
    cv2.imshow("Annotation", annotated_image)
    key = cv2.waitKey(1) & 0xFF
    if key == ord('c') and len(current_polygon) > 2:  # Close polygon with 'c'
        cv2.line(annotated_image, current_polygon[-1], current_polygon[0], (0, 255, 0), 1)
        polygons.append(np.array(current_polygon, np.int32))  # Save polygon
        current_polygon = []

    elif key == ord('n'):  # Start new polygon with 'n'
        if current_polygon:  # If not empty, store previous polygon
            polygons.append(np.array(current_polygon, np.int32))
        current_polygon = []

    elif key == ord('i'):  # Perform inpainting with 'i'
        if current_polygon:
            polygons.append(np.array(current_polygon, np.int32))  # Save last polygon
        mask = np.zeros(image.shape[:2], dtype=np.uint8)
        for poly in polygons:
            cv2.fillPoly(mask, [poly], 255)  # Fill polygons
        inpainted_image = cv2.inpaint(orig_image, mask, inpaintRadius=5, flags=cv2.INPAINT_TELEA)
        cv2.imshow("Inpainted", inpainted_image)
        cv2.waitKey(0)

    elif key == ord('s'):  # Save mask and inpainted image with 's'
        if polygons:
            mask = np.zeros(image.shape[:2], dtype=np.uint8)
            for poly in polygons:
                cv2.fillPoly(mask, [poly], 255)  # Fill mask
            inpainted_image = cv2.inpaint(orig_image, mask, inpaintRadius=5, flags=cv2.INPAINT_TELEA)

            # Save the mask and inpainted result
            base_name = os.path.splitext(image_path)[0]
            mask_path = base_name + "_mask.png"
            inpainted_path = base_name + "_inpainted.png"
            cv2.imwrite(mask_path, mask)
            cv2.imwrite(inpainted_path, inpainted_image)
            print(f"Saved mask as {mask_path}")
            print(f"Saved inpainted image as {inpainted_path}")
            mask_saved = True
    elif key == ord('q'):  # Quit without inpainting
        break
cv2.destroyAllWindows()
This script allows users to manually annotate text regions in an image and remove them using inpainting. The user interacts with the image through mouse clicks to draw polygons around text areas. Once a polygon is completed, it can be stored, and additional polygons can be created.
The script provides various keyboard shortcuts for functionality, such as:
- closing a polygon (‘c’)
- Start a new polygon (‘n’)
- performing inpainting (‘i’)
- saving the mask and inpainted image (‘s’)
- quitting (‘q’)
Make sure to click on the image window before pressing any keys; otherwise, the key presses will be registered in the terminal instead of executing the corresponding commands. The selected text regions are filled into a binary mask, which is then used with OpenCV’s inpainting function to seamlessly remove the text. The resulting images (mask and inpainted image) are saved for further use.
Output
Summary
This article explores different text detection models—EAST, DB50, and DB18—and evaluates their performance in detecting text from images. The models are compared based on their ability to detect text accurately. The detected text regions are then removed using OpenCV’s inpainting technique, which attempts to fill in the missing areas based on surrounding textures.
Additionally, the article discusses manual annotation for text removal, allowing users to draw polygons around text regions and remove them using inpainting. The manual method provides flexibility but requires user input. The results emphasize the importance of choosing the right detection and inpainting approach for achieving seamless text removal
Although more advanced methods for text detection and removal exist, in this article, we will focus on OpenCV’s built-in functions and techniques. However, readers are encouraged to explore other approaches, such as deep learning-based end-to-end text removal frameworks, for more complex scenarios.


5K+ Learners
Join Free VLM Bootcamp3 Hours of Learning