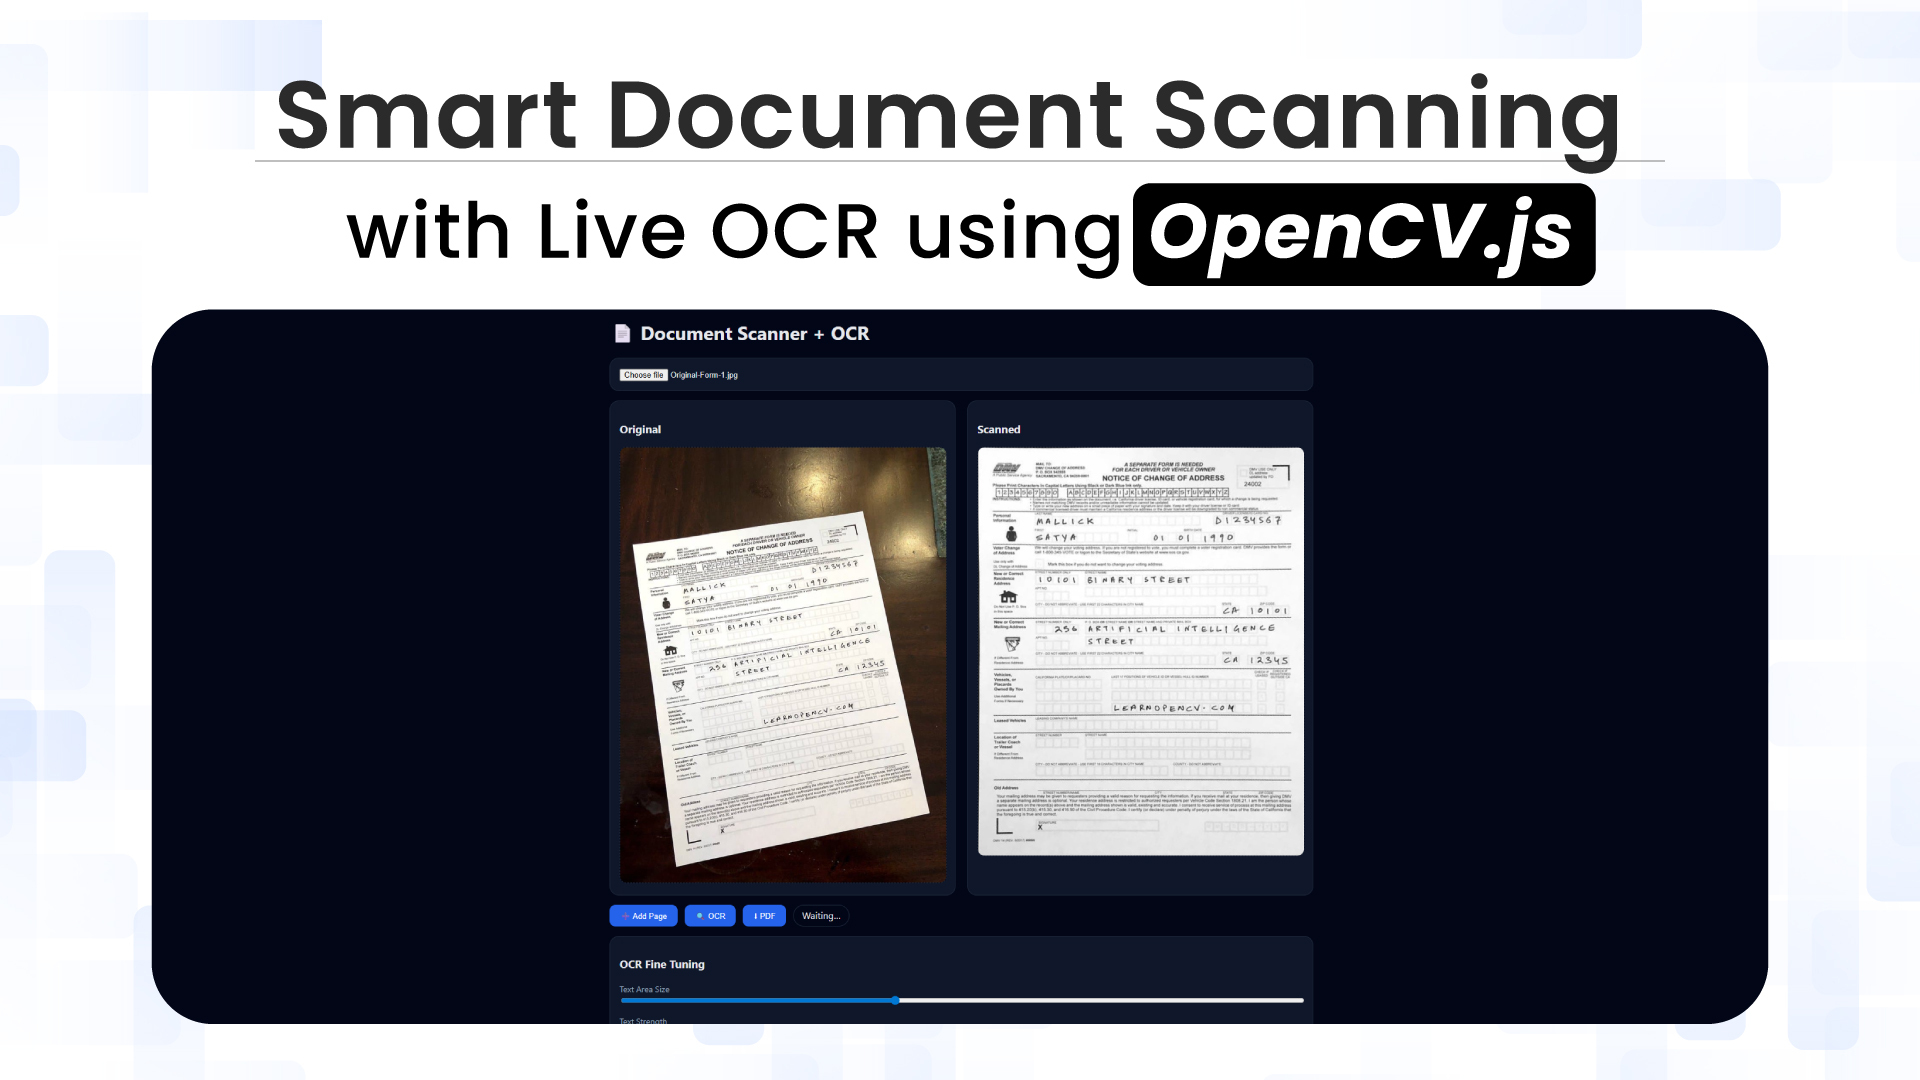
Imagine uploading an image of a document into your browser and watching it automatically detect page boundaries, correct perspective distortion, extract searchable text, and generate a clean, professional PDF, all without transmitting a single byte to a remote server. This isn’t science fiction; it’s the result of modern, high-performance web technologies running entirely on the client. This blog walks through building an end-to-end client-side document-scanning pipeline using uploaded images. The entire system runs in-browser, ensuring privacy while delivering near–native scanning quality.
Table of contents
- What Is Document Scanning?
- What Is Optical Character Recognition (OCR)?
- The Technology Stack: Three Engines, One Workflow
- Building the Scanner: Implementation Deep-Dive
- Understanding the OCR Trackbars
- Browser Limitations and Performance Considerations
- Future Optimization with PaddleOCR (Backend Processing)
- Conclusion and Learnings
- References
What Is Document Scanning?
Document scanning is an automated pipeline that combines computer vision and machine learning to interpret the structure, geometry, and textual content of a document image rather than treating it as a static photograph.
Instead of asking users to crop and adjust their images manually, the scanner:
- Detects document boundaries automatically
- Corrects perspective distortion
- Enhances the image for optimal OCR
- Extracts text in real time
- Exports multi-page PDFs directly from the browser.
What Is Optical Character Recognition (OCR)?
Optical Character Recognition (OCR) converts visual text in an image into machine-readable characters. In our browser-based pipeline, OCR is powered by Tesseract.js, while OpenCV.js prepares the image by correcting perspective, reducing noise, and enhancing contrast before recognition.
By separating image preparation from text recognition, the system ensures that OCR operates on the cleanest possible input, significantly improving accuracy across different document types and lighting conditions.

The Technology Stack: Three Engines, One Workflow
Our scanner orchestrates three specialized libraries, each handling a distinct phase of the pipeline:
- OpenCV.js – Image Processing Foundation
OpenCV.js provides the backbone of the system. It is used for detecting document boundaries, correcting perspective distortion via homography, and preparing images through grayscale conversion, blurring, morphological operations, and thresholding. These steps ensure that the visual input is geometrically correct and visually optimized before recognition.
- Tesseract.js – Text Recognition Engine
Tesseract.js runs the OCR engine inside a Web Worker, allowing text recognition to occur without blocking the UI. Significantly, it operates only on already-processed images, improving accuracy and performance.
- jsPDF – Document Generation
jsPDF is responsible for assembling scanned pages into a final PDF. It allows precise placement of images, supports multi-page documents, and can embed recognized text as a searchable layer, producing professional, indexable PDFs entirely on the client.
Live OCR Fundamentals
Live OCR refers to continuously extracting text as preprocessing parameters change, rather than running recognition in a one-time batch. In this scanner, OCR is tightly integrated with image enhancement controls, allowing users to see recognition results update in near real time. This approach improves accuracy and usability by shortening the feedback loop between preprocessing and recognition, making OCR an interactive, tunable process instead of a black-box operation.
Building the Scanner: Implementation Deep-Dive
This section walks through how the scanner transforms uploaded photos into clean, searchable documents. Before diving into individual code blocks, it’s essential to understand why the processing pipeline is structured the way it is.
Pipeline Structure:
The document-scanning pipeline is designed as a sequence of dependent steps, where each stage prepares the image for the next.
- Detection before OCR ensures text is upright and rectangular. Perspective correction significantly improves recognition accuracy.
- Geometry before appearance fixes shape distortions before enhancing contrast or removing noise, preventing visual artifacts.
- Preprocessing before recognition provides high-contrast, binarized input, which OCR engines handle most effectively.
- OCR as the final step, avoids unnecessary computation and ensures recognition runs only on optimized images.
- Debounced execution keeps live OCR responsive by limiting recognition frequency during rapid parameter changes.
This structured flow keeps the system accurate, performant and modular.
Initialization and Image Loading
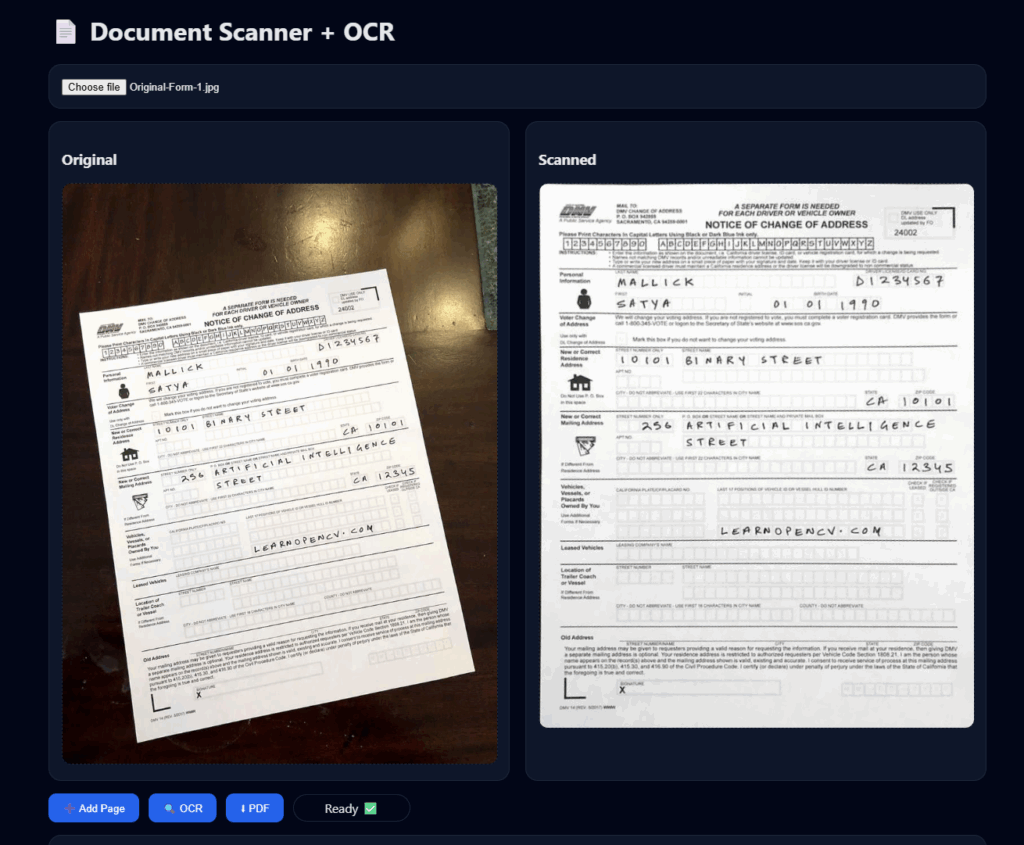
Our setup is straightforward – two canvases for before/after views and a file input:
function onOpenCvReady(){
  inputCanvas = document.getElementById("canvasInput");
  outputCanvas = document.getElementById("canvasOutput");

  document.getElementById("fileInput")
    .addEventListener("change", loadImage);
}

function loadImage(e){
  const img = new Image();
  img.onload = () => {
    inputCanvas.width = img.width;
    inputCanvas.height = img.height;
    inputCanvas.getContext("2d").drawImage(img, 0, 0);
    scanDocument(); // Process immediately
  };
  img.src = URL.createObjectURL(e.target.files[0]);
}
Document Detection Pipeline
The scanDocument() function executes three critical steps: edge detection, contour identification, and perspective correction.
Step 1: Edge Detection
let src = cv.imread(inputCanvas);
let gray = new cv.Mat();
let blur = new cv.Mat();
let edges = new cv.Mat();

cv.cvtColor(src, gray, cv.COLOR_RGBA2GRAY);
cv.GaussianBlur(gray, blur, new cv.Size(5,5), 0);
cv.Canny(blur, edges, 75, 200);
We convert to grayscale, smooth with a Gaussian blur to reduce noise, and then apply Canny edge detection. The thresholds (75, 200) work well for typical documents, lower for faint edges, and higher for noisy scenes.
Step 2: Finding the Document
let contours = new cv.MatVector();
cv.findContours(edges, contours, hierarchy,
                cv.RETR_EXTERNAL, cv.CHAIN_APPROX_SIMPLE);

let doc = null, maxArea = 0;
for(let i = 0; i < contours.size(); i++){
  let cnt = contours.get(i);
  let approx = new cv.Mat();
  cv.approxPolyDP(cnt, approx, 0.02 * cv.arcLength(cnt, true), true);

  if(approx.rows === 4 && cv.contourArea(cnt) > maxArea){
    doc = approx;
    maxArea = cv.contourArea(cnt);
  }
}
We identify all contours and select the largest 4-sided polygon—that’s our document. approxPolyDP simplifies contours to their corner points.
Step 3: Perspective Transform
// Extract and order corners
let pts = [];
for(let i = 0; i < 4; i++)
 pts.push({x: doc.intPtr(i,0)[0], y: doc.intPtr(i,0)[1]});

let o = orderPoints(pts);
// Calculate output dimensions
let w = Math.max(dist(o[0],o[1]), dist(o[2],o[3]));
let h = Math.max(dist(o[0],o[3]), dist(o[1],o[2]));

// Apply transform
let srcPts = cv.matFromArray(4, 1, cv.CV_32FC2,
                             o.flatMap(p => [p.x, p.y]));
let dstPts = cv.matFromArray(4, 1, cv.CV_32FC2,
                             [0,0, w,0, w,h, 0,h]);

let M = cv.getPerspectiveTransform(srcPts, dstPts);
The orderPoints() helper ensures consistent corner ordering using coordinate math:
function orderPoints(p){
  let s = p.map(pt => pt.x + pt.y);
  let d = p.map(pt => pt.y - pt.x);
  return [
    p[s.indexOf(Math.min(...s))],  // top-left
    p[d.indexOf(Math.min(...d))],  // top-right
    p[s.indexOf(Math.max(...s))],  // bottom-right
    p[d.indexOf(Math.max(...d))]   // bottom-left
  ];
}
OCR Preprocessing with Live Tuning
Users can adjust preprocessing parameters with sliders. Changes trigger OCR automatically with a 100ms debounce:
["areaSize", "textStrength", "noiseLevel", "morphSize", "invertText"]
  .forEach(id => {
    document.getElementById(id).addEventListener("input", () => {
      if(ocrTimeout) clearTimeout(ocrTimeout);
      ocrTimeout = setTimeout(updateOCR, 100);
    });
  });
The updateOCR() function applies adaptive thresholding and optional enhancements:


function updateOCR(){
  let mat = new cv.Mat();
  scannedGray.copyTo(mat);
  // Optional noise reduction
  if(noise > 0)
    cv.GaussianBlur(mat, mat, new cv.Size(noise*2+1, noise*2+1), 0);
  // Adaptive threshold for uneven lighting
  cv.adaptiveThreshold(
    mat, mat, 255,
    cv.ADAPTIVE_THRESH_GAUSSIAN_C,
    invert ? cv.THRESH_BINARY_INV : cv.THRESH_BINARY,
    area, strength
  );
  // Close gaps in characters
  if(morph > 0){
    let kernel = cv.getStructuringElement(
      cv.MORPH_RECT, new cv.Size(morph, morph)
    );
    cv.morphologyEx(mat, mat, cv.MORPH_CLOSE, kernel);
    kernel.delete();
  }

  // Run OCR
  ocrImage = matToDataURL(mat);
  Tesseract.recognize(ocrImage, "eng").then(result => {
    document.getElementById("ocrText").value = result.data.text;
  });

  mat.delete();
}
Key technique: Adaptive thresholding calculates local thresholds across the image, handling shadows and gradient lighting that would confuse standard thresholding.
PDF Export
Generate multi-page PDFs by adding scanned pages to a queue:
let scannedPages = [];

function addPage(){
  scannedPages.push(outputCanvas.toDataURL("image/jpeg", 0.95));
}

function downloadPDF(){
  const {jsPDF} = window.jspdf;
  const pdf = new jsPDF();

  scannedPages.forEach((img, i) => {
    if(i > 0) pdf.addPage();
    pdf.addImage(img, "JPEG", 10, 10, 190, 0);
  });

  pdf.save("scanned.pdf");
}
Memory Management in OpenCV.js
OpenCV.js uses manual memory management. Every cv.Mat must be explicitly deleted:
src.delete();
gray.delete();
blur.delete();
edges.delete();
contours.delete();
hierarchy.delete();
Understanding the OCR Trackbars
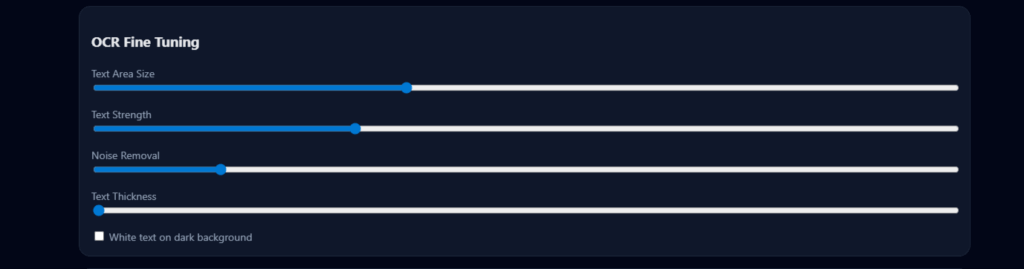
The OCR trackbars provide real-time control over image preprocessing, allowing fine adjustments to improve text recognition across different document types.
- Text Area Size (Adaptive Threshold Window):
Controls the neighborhood size for adaptive thresholding. Higher values produce smoother results for well-lit, large-text documents, while lower values improve localization for small fonts and uneven lighting. - Text Strength (Threshold Bias):
Adjusts text prominence during thresholding. Increasing it darkens and boldens text, while decreasing it preserves finer details at the cost of potential background noise. - Noise Removal (Gaussian Blur):
Applies smoothing before thresholding. Higher values suppress background noise; lower values retain sharp edges but may leave artifacts. - Text Thickness (Morphological Closing):
Modifies character thickness after thresholding. Increasing it helps recover faint or broken text, while decreasing it preserves crisp character boundaries. - White Text on Dark Background (Inversion):
Inverts the image for OCR. Useful for dark backgrounds with light text; disabled for standard black-on-white documents.
Together, these controls enable interactive, document-specific OCR optimization directly in the browser.
Browser Limitations and Performance Considerations
While modern browsers are remarkably powerful, running a full document-scanning and OCR pipeline client-side comes with inherent constraints.
CPU and Memory Constraints
- OCR engines like Tesseract are CPU-intensive
- Large images increase memory pressure
- Simultaneous UI rendering and OCR compete for resources
On low-end devices, live OCR updates may feel slower, especially when multiple sliders are adjusted rapidly.
Live Server vs Local File Usage
Running the project via a live development server (e.g., Live Server in VS Code) introduces additional overhead:
- Extra network abstraction
- Slower asset loading
- Increased latency during OCR worker initialization
For best performance:
- Use localhost builds
- Prefer static hosting or local file workflows
- Avoid remote hosting for large-scale OCR demos
Future Optimization with PaddleOCR (Backend Processing)
While client-side OCR offers good privacy and convenience, performance and accuracy can be further enhanced using a backend OCR engine.
Why PaddleOCR?
PaddleOCR provides:
- State-of-the-art text detection and recognition
- Better handling of low-resolution and complex layouts
- GPU acceleration for large-scale processing
- Superior multilingual performance
Conclusion and Learnings
We’ve built a complete document-scanning system that rivals native mobile apps, all in the browser.
The code we’ve examined provides a solid foundation. From here, you can add video scanning, multi-language support, automatic capture triggers, cloud backup, or integration with document workflows. The web platform continues to grow more capable, and what once required native apps now runs in a single HTML file.
Start experimenting with the controls. Try different documents, lighting conditions, and preprocessing parameters. The more you understand how each stage affects output, the better you’ll tune the system for your specific needs. Happy scanning!

5K+ Learners
Join Free VLM Bootcamp3 Hours of Learning