

OpenCV is an open-source computer vision library that provides a robust set of tools for handling images and videos. Among its many functionalities, it offers essential methods to read, display, and write images, making it a crucial library for various image-processing applications. With its simple yet efficient functions-imread(), imshow(), and imwrite()-users can seamlessly load images from different file formats, visualize them in a dedicated window, and save them back to the system in their preferred format. These functions serve as the foundation for more advanced computer vision tasks such as object detection, image transformation, and filtering.
In this article, we will take an in-depth look at each of these fundamental functions, understanding their role and functionality. We will also analyze their syntax in both Python and C++, ensuring that readers can implement them effectively across different programming environments. Whether you are a beginner exploring image processing for the first time or an experienced developer working with OpenCV, mastering these functions is essential for working with images in any computer vision project.
Import cv2
Before using any OpenCV functions, we must first import the library. This is the essential first step to access all OpenCV functionalities.
Python
# import the cv2 library
import cv2
C++
//Include Libraries
#include<opencv2/opencv.hpp>
#include<iostream>
We are assuming that you have already installed OpenCV on your device.
If not please refer the relevant links below:
OpenCV Function to Read, Show, and Write Images
- imread() – Reading an Image
- imshow() – Displaying an Image
- imwrite() – Writing an Image to a File
Example Image

Reading an Image in OpenCV
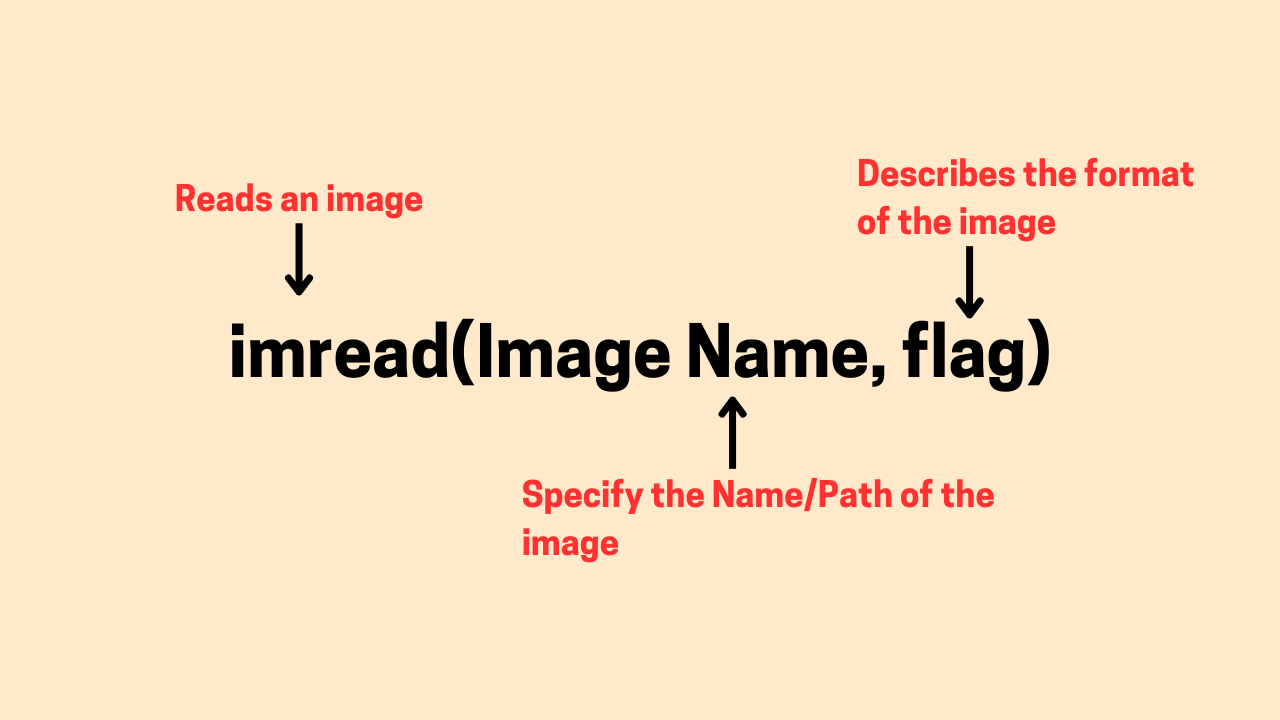
To read an image in OpenCV, we use the imread() function. This function loads an image from the specified file path and returns it as a NumPy array, allowing further processing or analysis.
Python Syntax
cv2.imread(filename, flags)
C++ Syntax
cv::Mat img_color = imread(filename, flags);
It accepts two arguments:
- filename (Required) – The name or full path of the image file.
- If your coding file (script) and image file are in the same directory, you only need to specify the image name along with its extension (e.g., “image.png” or “photo.jpg”).
- If they are in different folders, you must provide the full path to the image file.
Example path format:
“C:/Users/ssabb/Downloads/Astronaut.png”
Avoid spaces in filenames, folder names, or image names, as they may cause errors. Use forward slashes (/) instead of backslashes (\) in file paths to ensure compatibility across different operating systems. We can also use a relative path instead of an absolute path when specifying the image file location.
- flags (Optional) – This argument determines how the image should be loaded. OpenCV provides several options:
| Flags | Alternative Value | Description |
| IMREAD_UNCHANGED | -1 | Loads the image as is, including the alpha channel (if present). Total of 4 channels – (3-BGR & 1-Alpha) |
| IMREAD_GRAYSCALE | 0 | Loads the image in grayscale mode (single channel). |
| IMREAD_COLOR | 1 | Loads the image in full color (default mode, 3-BGR) ignores alpha channel |
If no flag is specified, imread() loads the image in BGR format by default, which means it reads the image as a 3-channel color image while ignoring any alpha (transparency) channel. This is equivalent to using IMREAD_COLOR (or 1).
Example Usage in Python for Reading Image in OpenCV
import cv2

# Load the image in color mode
image1 = cv2.imread("C:/Users/ssabb/Downloads/Astronaut.png", cv2.IMREAD_COLOR)
image2 = cv2.imread("C:/Users/ssabb/Downloads/Astronaut.png", cv2.IMREAD_GRAYSCALE)
image3 = cv2.imread("C:/Users/ssabb/Downloads/Astronaut.png", cv2.IMREAD_UNCHANGED)

# Check if the image was loaded successfully
if image1 is None:
    print("Error: Image not found or unable to read.")
else:
    print("Image loaded successfully!")
if image2 is None:
    print("Error: Image not found or unable to read.")
else:
    print("Image loaded successfully!")
if image3 is None:
    print("Error: Image not found or unable to read.")
else:
    print("Image loaded successfully!")
Example usage in C++ for Reading Image in OpenCV
#include <opencv2/opencv.hpp>
#include <iostream>

int main() {
    // Load the image in different modes
    cv::Mat image1 = cv::imread("C:/Users/ssabb/Downloads/Astronaut.png", cv::IMREAD_COLOR);
    cv::Mat image2 = cv::imread("C:/Users/ssabb/Downloads/Astronaut.png", cv::IMREAD_GRAYSCALE);
    cv::Mat image3 = cv::imread("C:/Users/ssabb/Downloads/Astronaut.png", cv::IMREAD_UNCHANGED);

    // Check if the images were loaded successfully
    if (image1.empty()) {
        std::cout << "Error: Image1 not found or unable to read." << std::endl;
    } else {
        std::cout << "Image1 loaded successfully!" << std::endl;
    }
    if (image2.empty()) {
        std::cout << "Error: Image2 not found or unable to read." << std::endl;
    } else {
        std::cout << "Image2 loaded successfully!" << std::endl;
    }
    if (image3.empty()) {
        std::cout << "Error: Image3 not found or unable to read." << std::endl;
    } else {
        std::cout << "Image3 loaded successfully!" << std::endl;
    }
    return 0;
}
By using imread(), you can efficiently handle images in OpenCV, setting the foundation for further operations like displaying and modifying the image.
When working with images in OpenCV, it’s crucial to understand that OpenCV reads and processes color images in BGR (Blue-Green-Red) format rather than the more commonly used RGB (Red-Green-Blue) format used by most other computer vision libraries, such as Matplotlib, PIL (Pillow), TensorFlow, and PyTorch. Oh, and speaking of PyTorch—if you’re looking to level up your deep learning skills, our PyTorch Bootcamp is the perfect place to start. Register now!
This difference in color channel order can lead to incorrect color representations when displaying images or working with multiple libraries. If you directly display an OpenCV-loaded image using another library without converting it to RGB, the Red and Blue colors will appear inverted.
Visualizing the output

Displaying an Image in OpenCV
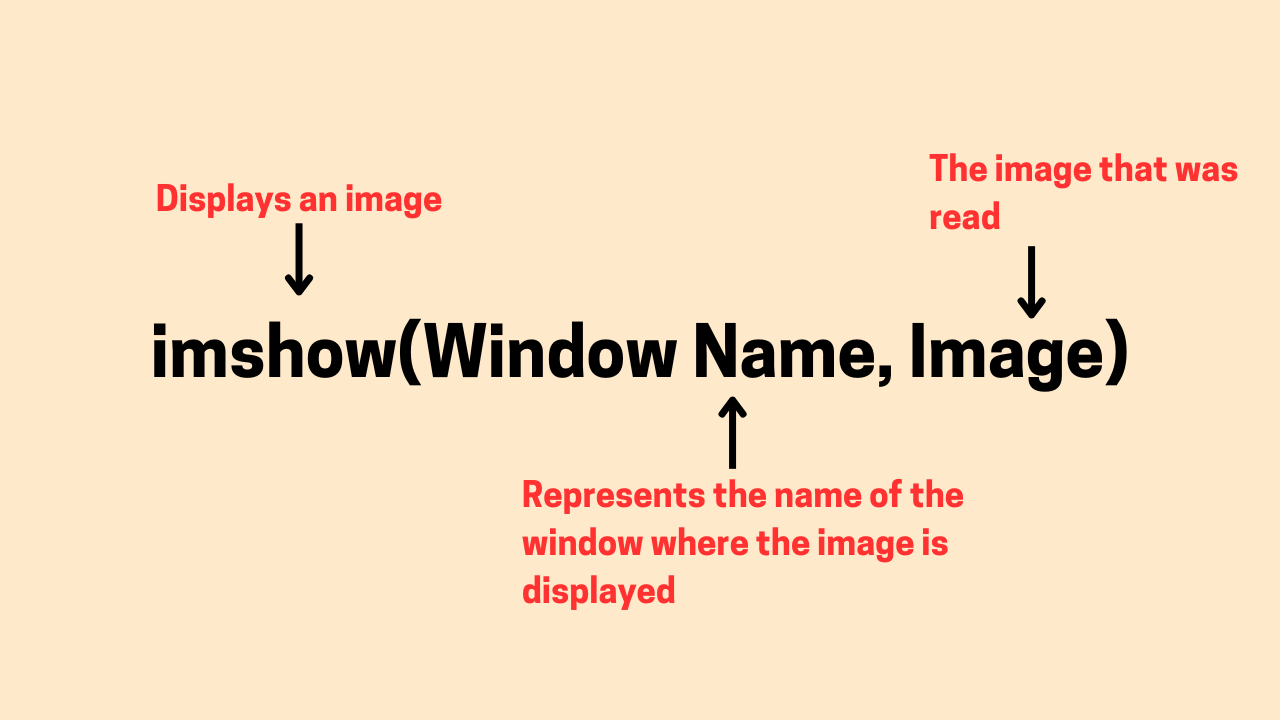
Now that we have successfully read the image, we can visually confirm this by displaying the image on the screen. To achieve this, OpenCV provides the imshow() function, which opens a window to display the image.
Python Syntax
cv2.imshow(window name, image)
C++ Syntax
cv::imshow(window name, image);
It accepts two arguments:
- window name (Required) – A string representing the name of the window where the image will be displayed.
- image (Required) – The image array that was read using cv2.imread().
Example usage in Python for Displaying an Image in OpenCV
import cv2

# Load the image
image = cv2.imread("C:/Users/ssabb/Downloads/Astronaut.png")

# Display the image in a window
cv2.imshow("Displayed Image", image)

# Wait for a key press before closing the window
cv2.waitKey(0)
cv2.destroyAllWindows()
Example usage in C++ for Displaying an Image in OpenCV
#include <opencv2/opencv.hpp>
#include <iostream>

int main() {
    // Load the image
    cv::Mat image = cv::imread("C:/Users/ssabb/Downloads/Astronaut.png");

    // Display the image in a window
    cv::imshow("Displayed Image", image);

    // Wait for a key press before closing the window
    cv::waitKey(0);
    cv::destroyAllWindows();
    return 0;
}
Following are some of the important syntax used in the above code block:


imshow(“Displayed Image”, image) – Opens a new window with the title “Displayed Image” and displays the loaded image.
waitKey(0) – Pauses the program execution until a key is pressed. Without this, the image window may open and close instantly. You can also specify a time (in milliseconds). For example, waitKey(5000) will keep the window open for 5 seconds before closing it automatically.
Setting waitKey(0) does not mean the window remains open for 0 milliseconds—instead, it tells OpenCV to keep the window open until the user presses a key, making it the preferred option for manual image inspection.
destroyAllWindows() – is used to close all the windows that have been opened with imshow(). However, if you want to close a specific window instead of all windows, you can use the destroyWindow() function, which requires the exact window name as an argument. It frees up system memory.
Visualizing the output
Colab Python Implementation
If you are working in Google Colab, you need to upload the image manually using the file upload feature or mount Google Drive. Once uploaded, specify the correct filename or full file path when using cv2.imread().
Since cv2.imshow() does not work in Google Colab, you need to use cv2_imshow() from google.colab.patches to display images.
Colab Syntax
from google.colab.patches import cv2_imshow

import cv2
image = cv2.imread("Astronaut.png")  # Load the image
cv2_imshow(image)  # Display the image
Visualizing the output

Display image in all formats using Python
import cv2

# Define the image path
image_path = "C:/Users/ssabb/Downloads/Astronaut.png"

# Load the image in different modes
# Default: BGR Color
image_color = cv2.imread(image_path, cv2.IMREAD_COLOR)

# Grayscale
image_gray = cv2.imread(image_path, cv2.IMREAD_GRAYSCALE)

# As-Is (includes Alpha if available)
image_unchanged = cv2.imread(image_path, cv2.IMREAD_UNCHANGED)

# Display all images
cv2.imshow("Color Image (BGR)", image_color)
cv2.imshow("Grayscale Image", image_gray)
cv2.imshow("Unchanged Image", image_unchanged)

# Wait for a key press and close all windows
cv2.waitKey(0)
cv2.destroyAllWindows()
Display image in all formats using C++
#include <opencv2/opencv.hpp>
#include <iostream>

int main() {

    // Define the image path
    std::string image_path = "C:/Users/ssabb/Downloads/Astronaut.png";

    // Load the image in different modes
    // Default: BGR Color
    cv::Mat image_color = cv::imread(image_path, cv::IMREAD_COLOR);

    // Grayscale
    cv::Mat image_gray = cv::imread(image_path, cv::IMREAD_GRAYSCALE);

    // As-Is (includes Alpha if available)
    cv::Mat image_unchanged = cv::imread(image_path, cv::IMREAD_UNCHANGED);

    // Display all images
    cv::imshow("Color Image (BGR)", image_color);
    cv::imshow("Grayscale Image", image_gray);
    cv::imshow("Unchanged Image", image_unchanged);

    // Wait for a key press and close all windows
    cv::waitKey(0);
    cv::destroyAllWindows();
    return 0;
}
The code uses imshow() to display each image in a separate window with corresponding titles. The program will wait indefinitely for a key press (via waitKey(0)) before closing all image windows with destroyAllWindows(). This simple example shows how to handle different image formats and modes using OpenCV, providing flexibility for various image processing tasks.
Visualizing the output
- The first image is displayed in color
- The next as grayscale
- The third is again in color, as this was the original format of the image (which was read using IMREAD_UNCHANGED)
Writing an Image in OpenCV
In OpenCV, you can save or write an image to the disk using the imwrite() function. This function allows you to save an image in various formats like PNG, JPEG, and BMP, among others.
Python Syntax
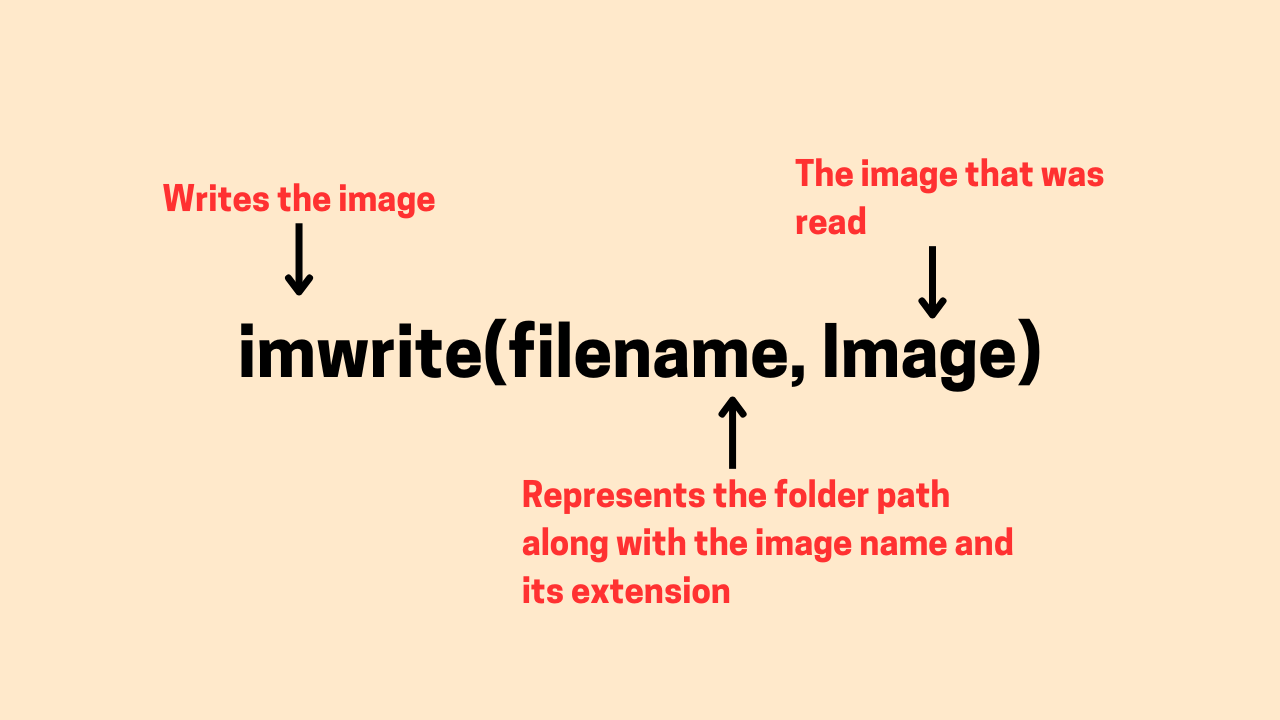
cv2.imwrite(filename, image)
C++ Syntax
cv::imwrite(filename, image);
It accepts two arguments:
- filename: The name of the file where the image will be saved, including the file extension (e.g., .jpg, .png, .bmp).
- image: The image you want to save (the image object returned by imread() or any processed image).
Example usage in Python for Writing an Image in OpenCV
import cv2

# Load the image
image = cv2.imread("C:/Users/ssabb/Downloads/Astronaut.png")

# Save the grayscale image to disk
cv2.imwrite("C:/Users/ssabb/Downloads/Astronaut_.png", image)

# Optional: Display the saved grayscale image
cv2.imshow("Image", image)
cv2.waitKey(0)
cv2.destroyAllWindows()
Example usage in C++ for Writing an Image in OpenCV
#include <opencv2/opencv.hpp>
#include <iostream>

int main() {
    // Load the image
    cv::Mat image = cv::imread("C:/Users/ssabb/Downloads/Astronaut.png");

    // Save the image (grayscale or color as is)
    bool isSaved = cv::imwrite("C:/Users/ssabb/Downloads/Astronaut_.png", image);

    // Optional: Display the saved image
    cv::imshow("Image", image);
    cv::waitKey(0);
    cv::destroyAllWindows();
    return 0;
}
Visualizing the output
The imwrite() function returns a Boolean value (True or False) to indicate whether the image was successfully written to disk.
- Returns True: If the image is successfully saved at the specified location, imwrite() returns True.
- Returns False: If the function fails to save the image (due to incorrect path, invalid filename, or permission issues), it returns False.
The key takeaway is how straightforward and intuitive the process is. All you have to do is specify the filename with its extension (including any path to save the image in a specific folder), and provide the variable that holds the image data, and OpenCV will handle saving the image efficiently. Additionally, if we are saving an image to a specific directory, the directory must exist beforehand; otherwise, the image will not be saved.There’s no need for complex file handling or extra steps—just a quick function call and you’re done!
This simplicity makes OpenCV an excellent choice for quickly saving processed or altered images during your computer vision or image processing tasks.
Summary
We have learned how to effectively use OpenCV’s basic image handling functions: imread(), imshow(), and imwrite().
- Reading an Image: We saw how imread() loads images in different formats, with options for color, grayscale, or unchanged (including transparency).
- Displaying an Image: imshow() allows us to show the image in a window, and waitKey(0) keeps the window open until a key is pressed. Without it, the window would close immediately.
- Writing an Image: With imwrite(), saving an image to disk is as simple as specifying the filename and providing the image data.
We also discussed the default BGR format for images in OpenCV and how to manage image windows using destroyWindow() and destroyAllWindows().
In short, OpenCV simplifies the process of loading, displaying, and saving images, making it a valuable tool for image processing tasks.


5K+ Learners
Join Free VLM Bootcamp3 Hours of Learning