Accessing and manipulating pixels is the most fundamental step in image processing. Every image is made up of tiny elements called pixels, and modifying these pixels allows us to perform a wide range of operations, from simple adjustments to complex transformations. While techniques like brightness and contrast enhancement, applying filters, or edge detection are considered advanced, they all rely on the basic concept of directly modifying pixel values. In this article, we will explore the fundamental operations of pixel-level image manipulation in detail and demonstrate how they can be performed using both Python and C++ with OpenCV. By understanding these core concepts, you will build a strong foundation for more advanced image processing techniques.
Import cv2
Before using any OpenCV functions, we must first import the library. This is the essential first step to access all OpenCV functionalities.
Python
# import the cv2 library
import cv2
C++
//Include Libraries
//OpenCV's cv::Mat acts like NumPy arrays for image processing.

#include<opencv2/opencv.hpp>
#include<iostream>
We are assuming that you have already installed OpenCV on your device.
If not please refer the relevant links below:
Example Image
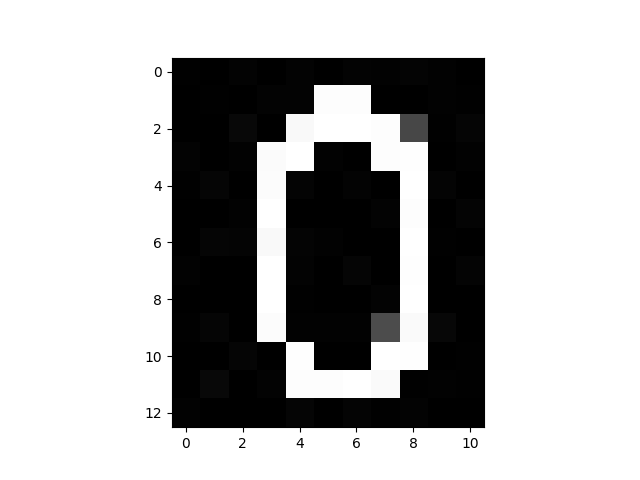
We are using a 13×11 image with 3 color channels (all the channels have the same grayscale values that is the reason why it appears to be a black and white image), displaying the digit “0”. This small image allows us to clearly demonstrate pixel-level image manipulations without excessive data, making it easier to visualize changes at the pixel level. We will convert it to grayscale when required.

Image as a Matrix
An image is nothing but a matrix containing pixel values. If the image is in grayscale, it is represented as a single matrix where each element corresponds to a pixel’s intensity. If the image has three color channels (RGB), it is represented as three matrices, each corresponding to the intensity values of Red, Green, and Blue channels.
Before proceeding further, let’s load the image in grayscale and print its matrix representation.
Python Syntax
import cv2

image_path = "C:/Users/ssabb/Desktop/opencv/article/images for article 4/number_zero.jpg"
img = cv2.imread(image_path,0)
print(img)
C++ Syntax
#include <opencv2/opencv.hpp>
#include <iostream>

int main() {
    std::string image_path = "C:/Users/ssabb/Desktop/opencv/article/images for article 4/number_zero.jpg";

    // Read the image in grayscale
    cv::Mat img = cv::imread(image_path, cv::IMREAD_GRAYSCALE);

    // Print the image matrix
    std::cout << "Image Matrix:\n" << img << std::endl;
    return 0;
}
Output
Values printed above are the intensity values of each pixel.
- 0 represents a black pixel.
- As the value increases, it moves toward white.
- 255 represents a white pixel.
Let’s have a look at the image properties
Python Syntax
print("Data type = {}\n".format(img.dtype))
print("Object type = {}\n".format(type(img)))
print("Image Dimensions = {}\n".format(img.shape))
C++ Syntax
// Check image properties
std::cout << "Data type = " << testImage.depth() << std::endl;
std::cout << "Object type = " << typeid(testImage).name() << std::endl;
std::cout << "Image Dimensions = " << testImage.rows << "x" << testImage.cols << std::endl;
Output
Data type = uint8
Object type = <class 'numpy.ndarray'>
Image Dimensions = (13, 11)- The datatype of the loaded image is unsigned int with 8-bit depth.
- The image is represented as a 2D matrix with values ranging from 0 to 255.
- The resolution of the image is 13×11, meaning height = 13 and width = 11.
Manipulating pixels
Since a grayscale image is essentially a 2D array, all operations that apply to arrays can also be performed on images. Let’s begin by exploring pixel-level image manipulations, where we will learn how to access and modify individual pixel values. Note that we are using Matplotlib instead of OpenCV’s imshow() to display the image because, with imshow(), the image appears too small, making it difficult to see details clearly. Using Matplotlib allows for better visualization, especially when working with small images, as we can resize and adjust the display easily.
Let’s first plot the image to get a better idea
Python Syntax
import cv2
import matplotlib.pyplot as plt

image_path = "C:/Users/ssabb/Desktop/opencv/article/images for article 4/number_zero.jpg"
img = cv2.imread(image_path,0)
plt.imshow(img, cmap='gray')
plt.show()
print(img)
C++ Syntax
#include <opencv2/opencv.hpp>
#include <iostream>

int main() {
    std::string image_path = "C:/Users/ssabb/Desktop/opencv/article/images for article 4/number_zero.jpg";

    // Load the image in grayscale
    cv::Mat img = cv::imread(image_path, cv::IMREAD_GRAYSCALE);

    // Check if the image is loaded successfully
    if (img.empty()) {
        std::cerr << "Error: Could not load image!" << std::endl;
        return -1;
    }

    // Display the image
    cv::imshow("Grayscale Image", img);
    cv::waitKey(0);  // Wait for a key press
    cv::destroyAllWindows();

    // Print the pixel matrix
    std::cout << "Image Matrix:\n" << img << std::endl;
    return 0;
}
In C++, OpenCV doesn’t have built-in support for Matplotlib, but we can still use it by saving the image first and then plotting it using Python. However, if you want a direct equivalent of plt.imshow(), we can use OpenCV’s imshow with a resized window for better visibility.
By default, plt.imshow() expects RGB images, and when given a grayscale image, it applies a default colormap (viridis) instead of displaying it in true grayscale. That is the reason why we added an argument cmap = “gray”
Output
Accessing Pixels
To perform pixel-level image manipulations, we first need to understand how to access individual pixels in an image. Since an image is essentially a matrix of pixel values, we can retrieve or modify specific pixel values using their row and column indices.
In OpenCV, pixels are accessed using (row, column) format, where:


- Row index (i) represents the y-coordinate (height).
- Column index (j) represents the x-coordinate (width).
- The shape is in the format of (height x width)
Now let’s access the pixels values of the image
Python Syntax
import cv2
import matplotlib.pyplot as plt

image_path = "C:/Users/ssabb/Desktop/opencv/article/images for article 4/number_zero.jpg"
img = cv2.imread(image_path,0)
print(img[0,0])
print(img[1,1])
print(img[2,2])
print(img)
C++ Syntax
#include <opencv2/opencv.hpp>
#include <iostream>

int main() {
    std::string image_path = "C:/Users/ssabb/Desktop/opencv/article/images for article 4/number_zero.jpg";

    // Load the image in grayscale
    cv::Mat img = cv::imread(image_path, cv::IMREAD_GRAYSCALE);
    if (img.empty()) {
        std::cerr << "Error: Could not load image!" << std::endl;
        return -1;
    }

    // Access and print individual pixel values
    std::cout << "Pixel at (0,0): " << (int)img.at<uchar>(0, 0) << std::endl;
    std::cout << "Pixel at (1,1): " << (int)img.at<uchar>(1, 1) << std::endl;
    std::cout << "Pixel at (0,2): " << (int)img.at<uchar>(0, 2) << std::endl;

    // Print the entire image matrix directly
    std::cout << "Image Pixel Values:\n" << img << std::endl;
    return 0;
}
OpenCV follows zero-based indexing, meaning the first row and column start at index 0. Just like accessing elements in an array, we use square brackets [] to retrieve pixel values, following the (row, column) format.
Output
We represented the output numbers with colors matching the position of their pixels respectively. You can see that (1,3) extracts the element in the 1st row and 3rd column. Which clearly shows that OpenCV uses (height x width) or (rows x columns) format.
Accessing Group of Pixels
Sometimes, instead of modifying a single pixel, we need to access or manipulate a group of pixels—also known as a Region of Interest (ROI). This can be useful for cropping, filtering, or applying transformations to a specific part of an image.
Python Syntax
roi = img[startY:endY, startX:endX] # Extract a region from the image
C++ Syntax
cv::Rect roi(startX, startY, endX - startX, endY - startY);
cv::Mat roiImg = img(roi);  // Extract ROI
Since an image is essentially a matrix of pixel values, we can specify a rectangular section by defining the starting and ending coordinates. In Python, this is done using array slicing, where img[startY:endY, startX:endX] selects the rows from startY to endY-1 and columns from startX to endX-1.
In C++, OpenCV provides the cv::Rect structure, where cv::Rect(startX, startY, endX – startX, endY – startY) defines the ROI with its top-left corner at (startX, startY) and dimensions calculated as width = endX – startX and height = endY – startY. The extracted region is then assigned to a new cv::Mat object using cv::Mat roiImg = img(roi)
Python Syntax
import cv2
import matplotlib.pyplot as plt

image_path = "C:/Users/ssabb/Desktop/opencv/article/images for article 4/number_zero.jpg"
img = cv2.imread(image_path,0)
roi = img[0:2,0:4]
print(roi)
print(img)
C++ Syntax
#include <opencv2/opencv.hpp>
#include <iostream>

int main() {
    std::string image_path = "C:/Users/ssabb/Desktop/opencv/article/images for article 4/number_zero.jpg";

    // Load the image in grayscale
    cv::Mat img = cv::imread(image_path, cv::IMREAD_GRAYSCALE);
    if (img.empty()) {
        std::cerr << "Error: Could not load image!" << std::endl;
        return -1;
    }

    // Define Region of Interest (ROI) - Extract rows 0 to 1 and columns 0 to 3
    cv::Rect roi(0, 0, 4, 2);  // (x, y, width, height)
    cv::Mat roiImg = img(roi); // Extract the region

    // Print ROI values
    std::cout << "ROI Pixel Values:\n" << roiImg << std::endl;

    // Print the entire image matrix
    std::cout << "Full Image Pixel Values:\n" << img << std::endl;
    return 0;
}
extracts a 2-row by 4-column region starting from the top-left corner
Output
Modifying Pixel Values
Once we know how to access pixel values, the next step is to modify them.
- Grayscale images have pixel values in the range 0 to 255 (uint8 format).
- Assigning values outside this range may cause overflow issues.
Python Syntax
import cv2
import matplotlib.pyplot as plt

image_path = "C:/Users/ssabb/Desktop/opencv/article/images for article 4/number_zero.jpg"
img = cv2.imread(image_path,0)
img[0,0]=255
img[1,1]=200
img[0,2]=150
plt.imshow(img, cmap='gray')
plt.show()
print(img)
C++ Syntax
#include <opencv2/opencv.hpp>
#include <iostream>

int main() {
    std::string image_path = "C:/Users/ssabb/Desktop/opencv/article/images for article 4/number_zero.jpg";

    // Load the image in grayscale
    cv::Mat img = cv::imread(image_path, cv::IMREAD_GRAYSCALE);
    if (img.empty()) {
        std::cerr << "Error: Could not load image!" << std::endl;
        return -1;
    }

    // Modify specific pixel values
    img.at<uchar>(0, 0) = 255;  // Set pixel at (0,0) to white
    img.at<uchar>(1, 1) = 200;  // Set pixel at (1,1) to 200
    img.at<uchar>(0, 2) = 150;  // Set pixel at (0,2) to 150

    // Display the modified image
    cv::imshow("Modified Image", img);
    cv::waitKey(0);
    cv::destroyAllWindows();

    // Print the modified image matrix
    std::cout << "Modified Image Pixel Values:\n" << img << std::endl;
    return 0;
}
Here we chose the same three pixels from before and modified their pixel value. We can see the corresponding changes in the below output. Manipulating pixels is fun, but writing solid code comes first—build your foundation with our Python for Beginners course!
Output
You can observe that the values closing to 255 are having high intensity and the values closing to 0 are having less intensity.
Modifying Group of pixels
Instead of modifying individual pixels, we can manipulate a group of pixels or a Region of Interest (ROI) at once.
Python Syntax
import cv2
import matplotlib.pyplot as plt

image_path = "C:/Users/ssabb/Desktop/opencv/article/images for article 4/number_zero.jpg"
img = cv2.imread(image_path,0)
img[0:2,0:3] = 180
plt.imshow(img, cmap='gray')
plt.show()
print(img)
C++ Syntax
#include <opencv2/opencv.hpp>
#include <iostream>

int main() {
    std::string image_path = "C:/Users/ssabb/Desktop/opencv/article/images for article 4/number_zero.jpg";

    // Load the image in grayscale
    cv::Mat img = cv::imread(image_path, cv::IMREAD_GRAYSCALE);
    if (img.empty()) {
        std::cerr << "Error: Could not load image!" << std::endl;
        return -1;
    }

    // Define ROI - Modify a 2x3 block in the top-left corner
    cv::Rect roi(0, 0, 3, 2);  // (x, y, width, height)
    img(roi) = 180;  // Set all pixels in this region to 180 (gray)

    // Display the modified image
    cv::imshow("Modified Image", img);
    cv::waitKey(0);
    cv::destroyAllWindows();

    // Print the modified image matrix
    std::cout << "Modified Image Pixel Values:\n" << img << std::endl;
    return 0;
}
The code loads a grayscale image and modifies a 2 by 3 (2×3) region in the top-left corner by setting all its pixel values to 180 (a gray shade). It then displays the modified image using Matplotlib and prints the updated pixel values. This demonstrates how to access and modify a group of pixels in an image.
Output
You can see that the selected region is given a pixel value of 180.
Manipulating Color Pixels
We saw how to perform pixel-level manipulation on grayscale images. The same does not hold for color images. As we discussed, the color image has 3 channels, when we access a pixel, we get an array of values from the 3 channels. Similarly, we need to specify a tuple for changing the values in the color image.
Let us load the grayscale image in color. Note that it still looks the same ( black and white ) since all the channels contain the same values.
Python Syntax
import cv2
import matplotlib.pyplot as plt

image_path = "C:/Users/ssabb/Desktop/opencv/article/images for article 4/number_zero.jpg"
img = cv2.imread(image_path)
plt.imshow(img[:,:,::-1])
plt.show()
print(img)
C++ Syntax
#include <opencv2/opencv.hpp>
#include <iostream>

int main() {
    std::string image_path = "C:/Users/ssabb/Desktop/opencv/article/images for article 4/number_zero.jpg";

    // Load the image in color
    cv::Mat img = cv::imread(image_path);
    if (img.empty()) {
        std::cerr << "Error: Could not load image!" << std::endl;
        return -1;
    }

    // Display the image
    cv::imshow("Image", img);
    cv::waitKey(0);
    cv::destroyAllWindows();

    // Print the image matrix
    std::cout << "Image Pixel Values:\n" << img << std::endl;
    return 0;
}
Output

Access Color Pixels
In a color image, each pixel consists of three intensity values representing the Blue, Green, and Red (BGR) channels in OpenCV. Unlike grayscale images, which store a single value per pixel, color images use a 3D matrix where each pixel is an array of three values. To access a specific pixel, we use row and column indexing, similar to grayscale images, but retrieve a list of three values instead of one.
Python Syntax
import cv2
import matplotlib.pyplot as plt

image_path = "C:/Users/ssabb/Desktop/opencv/article/images for article 4/number_zero.jpg"
img = cv2.imread(image_path)
print(img[0,0])
plt.imshow(img, cmap='gray')
plt.show()
C++ Syntax
#include <opencv2/opencv.hpp>
#include <iostream>

int main() {
    std::string image_path = "C:/Users/ssabb/Desktop/opencv/article/images for article 4/number_zero.jpg";

    // Load the image in color
    cv::Mat img = cv::imread(image_path);
    if (img.empty()) {
        std::cerr << "Error: Could not load image!" << std::endl;
        return -1;
    }

    // Print the first pixel values (BGR format)
    std::cout << img.at<cv::Vec3b>(0, 0) << std::endl;

    // Display the image
    cv::imshow("Image", img);
    cv::waitKey(0);
    cv::destroyAllWindows();
    return 0;
}
Output
[1 1 1]Modifying Color Pixels
Let us change the pixel at
- location [0,0] to Yellow ( It is a mixture of Red and Green )
- location [1,1] to Cyan ( It is a mixture of Blue and Green )
- location [2,2] to Magenta ( It is a mixture of Blue and Red )
Python Syntax
import cv2
import matplotlib.pyplot as plt

image_path = "C:/Users/ssabb/Desktop/opencv/article/images for article 4/number_zero.jpg"
img = cv2.imread(image_path)
plt.figure(figsize=[20,20])
img[0,0] = (0,255,255)
plt.subplot(131);plt.imshow(img[:,:,::-1])
img[1,1] = (255,255,0)
plt.subplot(132);plt.imshow(img[:,:,::-1])
img[2,2] = (255,0,255)
plt.subplot(133);plt.imshow(img[:,:,::-1])
plt.show()
C++ Syntax
#include <opencv2/opencv.hpp>
#include <iostream>

int main() {
    std::string image_path = "C:/Users/ssabb/Desktop/opencv/article/images for article 4/number_zero.jpg";

    // Load the image in color
    cv::Mat img = cv::imread(image_path);
    if (img.empty()) {
        std::cerr << "Error: Could not load image!" << std::endl;
        return -1;
    }

    // Modify specific pixel values (BGR format)
    img.at<cv::Vec3b>(0, 0) = cv::Vec3b(255, 255, 0);  // Yellow (BGR)
    img.at<cv::Vec3b>(1, 1) = cv::Vec3b(0, 255, 255);  // Cyan (BGR)
    img.at<cv::Vec3b>(2, 2) = cv::Vec3b(255, 0, 255);  // Magenta (BGR)

    // Display modified images sequentially
    cv::imshow("Modified Image 1", img);
    cv::waitKey(0);
    cv::imshow("Modified Image 2", img);
    cv::waitKey(0);
    cv::imshow("Modified Image 3", img);
    cv::waitKey(0);
    cv::destroyAllWindows();
    return 0;
}
To modify a specific pixel in an image, we use row and column indexing. In Python, the syntax img[row, col] = (B, G, R) directly assigns a new color to the pixel at the specified location, where (B, G, R) represents the new Blue, Green, and Red values. Similarly, in C++, we use img.at<cv::Vec3b>(row, col) = cv::Vec3b(B, G, R);, where cv::Vec3b is a three-element vector representing the BGR color. This method allows us to manipulate individual pixel values in both languages efficiently.
Output
Modifying Group of Color Pixels
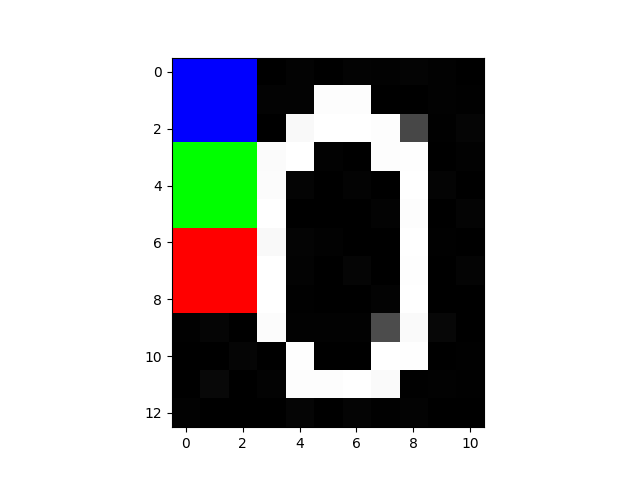
Since accessing a group of pixels in a color image follows the same approach as in grayscale or single-channel images, we directly move to modifying them. The key difference is that instead of dealing with a single intensity value per pixel, each pixel contains three values corresponding to the Blue, Green, and Red (BGR) channels. By selecting a region using slicing, we can assign new BGR values to all pixels in that region at once, effectively changing the colors in a specific part of the image.
Python Syntax
import cv2
import matplotlib.pyplot as plt

image_path = "C:/Users/ssabb/Desktop/opencv/article/images for article 4/number_zero.jpg"
img = cv2.imread(image_path)
img[0:3,0:3] = (255,0,0)
img[3:6,0:3] = (0,255,0)
img[6:9,0:3] = (0,0,255)
plt.imshow(img[:,:,::-1])
plt.show()
C++ Syntax
#include <opencv2/opencv.hpp>
#include <iostream>

int main() {
    std::string image_path = "C:/Users/ssabb/Desktop/opencv/article/images for article 4/number_zero.jpg";

    // Load the image in color
    cv::Mat img = cv::imread(image_path);
    if (img.empty()) {
        std::cerr << "Error: Could not load image!" << std::endl;
        return -1;
    }

    // Modify 3x3 pixel regions with different colors (BGR format)
    img(cv::Rect(0, 0, 3, 3)) = cv::Scalar(255, 0, 0);  // Blue
    img(cv::Rect(0, 3, 3, 3)) = cv::Scalar(0, 255, 0);  // Green
    img(cv::Rect(0, 6, 3, 3)) = cv::Scalar(0, 0, 255);  // Red

    // Display the modified image
    cv::imshow("Modified Image", img);
    cv::waitKey(0);
    cv::destroyAllWindows();
    return 0;
}
To modify a group of pixels in a color image, we select a rectangular region and assign new BGR values. In Python, slicing like img[startY:endY, startX:endX] = (B, G, R) modifies all pixels in the selected region. Similarly, in C++, we use cv::Rect(x, y, width, height) inside img(Rect) = cv::Scalar(B, G, R); to apply the color to the entire region at once. This efficiently changes pixel values in blocks instead of modifying them one by one.
Output
Summary
In this article, we explored how images are represented as matrices and how we can perform pixel-level image manipulations using OpenCV in both Python and C++. We started by accessing and modifying grayscale pixels, then moved on to color images, where each pixel contains three intensity values (BGR). We demonstrated how to change individual pixel values and modify entire regions by assigning new colors. Understanding these basic pixel operations is essential for advanced image processing tasks like filtering, segmentation, and object detection.


5K+ Learners
Join Free VLM Bootcamp3 Hours of Learning