OpenCV is a library with 20 years of continuous development under its belt. The age of introspection and search of destiny. Are there any projects based on the library which have made someone’s life better and happier? Can you make it by yourself? Seeking the answers and trying to discover new OpenCV modules, I would like to collect apps which produce great visual effects – so that the wow-reaction comes first, followed by a deduction that the computer vision is actually on the table.
The style transfer experiment is entitled to be described in the first place. Maestros’ artistic styles are transferred to the photographs. The article will shed light on the gist of the procedure, as well as on the new version of OpenCV library – namely, OpenCV.js — JavaScript one.
Dmitry Kurtaev
Software Engineer at Intel Corporation
Style transfer
I regret to inform the machine-learning naysayers that deep convolutional network is the core component of the present article. Because it works. The OpenCV does not provide an opportunity to train neural networks, but one can launch the existing models. We are going to use CycleGAN, a pre-trained network. Thanks to the authors, we can download the network absolutely for free to convert images of apples into the ones of oranges, horses into zebras, satellite images into maps, pictures of winter into pictures of summer, and so on. Moreover, network training procedure allows to have two generator models active in both directions. That is, training to convert winter into summer, you will also get a model for drawing of winter sceneries on pictures of summer. It is impossible to give up such a unique opportunity. In our example we use models able to convert photos into pictures of artists. Namely, of Vincent van Gogh, Claude Monet, Paul Cezanne, as well as an entire genre of Japanese engravings called Ukiyo-e. Thus, we acquire four separate networks. It is worth mentioning that a big number of pictures by this or that artist were used to train each network, as the authors tried to teach the network to assimilate the artistic style, not to transfer style of a particular work.
OpenCV.js
OpenCV is a C++ library, and an opportunity to create automatic wrappers, which call native methods, exists for the major part of its functionality. Officially, wrappers in Python and Java are supported. On top of that, user solutions for Go and PHP are available. It would be great to learn about your experience of using in other languages too, if any, and who made it possible. OpenCV.js is a project implemented in 2017 thanks to Google Summer of Code. Besides, the OpenCV deep learning module was once created and significantly improved within this framework. In contrast to other languages, at the moment OpenCV.js is not a wrapper for native methods in JavaScript, but a full compilation by means of Emscripten which uses LLVM и Clang. It allows you to convert your C or C++ application or library into a .js file, which can be launched in a browser.
For instance,
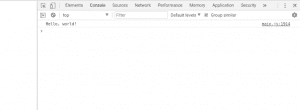
#include <iostream>

int main(int argc, char** argv) {

std::cout << "Hello, world!" << std::endl;

return 0;

}
Is compiled into asm.js
emcc main.cpp -s WASM=0 -o main.js
Then we launch:
<!DOCTYPE html>

<html>

<head>
  <script src="main.js" type="text/javascript"></script>
</head>

</html>
OpenCV.js can be connected to the project in the following way (nightly build):
<script src="https://docs.opencv.org/master/opencv.js" type="text/javascript"></script>
For image reading, camera application, etc., an additional library written manually in JavaScript may come up as helpful:
<script src="https://docs.opencv.org/master/utils.js" type="text/javascript"></script>
Image Upload
In OpenCV.js, images can be read from the elements like canvas or img. That means that the image files shall be uploaded by the users. For convenience, the auxiliary function addFileInputHandler uploads the image specific canvas element automatically — just push the button once the image is selected on the disk.
var utils = new Utils('');
utils.addFileInputHandler('fileInput', 'canvasInput');

var img = cv.imread('canvasInput');
where
<input type="file" id="fileInput" name="file" accept="image/*" />

<canvas id="canvasInput" ></canvas>
It should be noted that img will be a 4-channel RGBA image, which is different from the typical behavior of cv::imread which creates a BGR image. It shall be considered, for instance, while porting algorithms from other languages.It is quite simple when it comes to rendering – it is enough to call imshow only once specifying the id of the canvas needed (RGB or RGBA).
cv.imshow("canvasOutput", img);
Algorithm
The whole algorithm of image processing is basically the launch of a neural network. Imagine that all inner processes shall remain a mystery, the only thing we have to do is to prepare a proper input and to interpret the prediction correctly (the output of the net).


In this example we will look at the network which receives a four-dimensional tensor with values of float type within the interval [-1, 1]. Each of the dimensions in accordance with the change rate, is an index of a picture, channels, height, and width. Such a layout is called NCHW, and the tensor itself is called a blob (binary large object). Pre-processing is aimed to convert an OpenCV image, the intensity levels of which are interleaved and have intervals of values [0, 255] of unsigned char type in NCHW blob with a value range [-1, 1].

Post-processing requires inverse transformation: the network retrieves NCHW blob with the values within the interval [-1, 1], which needs to be repackaged into an image, normalized to [0, 255] and converted to unsigned char. Therefore, taking into consideration all specific aspects of image reading and recording in OpenCV.js, we have the following steps shaping up:
imread -> RGBA -> BGR [0, 255] -> NCHW [-1, 1] -> [network]
[network] -> NCHW [-1, 1] -> RGB [0, 255] -> imshow
Having a look at the pipeline obtained, some questions arise: why is the network not able to base on RGBA and retrieve RGB? Why do pixel shift and normalization require extra transformations to be done? The answer is that neural network – is a mathematical object which performs computations over the input data from specific distribution. In our case we trained it to receive data of this particular type, so to achieve the desired results, one has to reproduce the preprocessing used by the authors during pretraining.
Implementation
The neural network that we are going to launch is stored as a binary file, which has to be uploaded to the local file system first.
var net;
var url = 'style_vangogh.t7';
utils.createFileFromUrl('style_vangogh.t7', url, () => {
  net = cv.readNet('style_vangogh.t7');
});
By the way, url< — is a fully functional link. In this case we just upload the file stored next to the current HTML page, which can be, however, substituted for the the original source (in this case download may take more time).
var imgRGBA = cv.imread('canvasInput');
var imgBGR = new cv.Mat(imgRGBA.rows, imgRGBA.cols, cv.CV_8UC3);
cv.cvtColor(imgRGBA, imgBGR, cv.COLOR_RGBA2BGR);
A 4D blob is created, where a blobFromImage convert to float type data, with normalization constants applied. Then the network is launched.
var blob = cv.blobFromImage(imgBGR, 1.0 / 127.5,  // multiplier
                            {width: imgBGR.cols, height: imgBGR.rows},  // dimensions
                            [127.5, 127.5, 127.5, 0]);  // subtraction of the average
net.setInput(blob);
var out = net.forward();
The result is converted back to the image of the type needed with the interval of values [0, 255]
// Normalization of values from interval [-1, 1] to [0, 255]
var outNorm = new cv.Mat();
out.convertTo(outNorm, cv.CV_8U, 127.5, 127.5);

// Creation of an interleaved image from the planar blob
var outHeight = out.matSize[2];
var outWidth = out.matSize[3];
var planeSize = outHeight * outWidth;

var data = outNorm.data;
var b = cv.matFromArray(outHeight, outWidth, cv.CV_8UC1, data.slice(0, planeSize));
var g = cv.matFromArray(outHeight, outWidth, cv.CV_8UC1, data.slice(planeSize, 2 * planeSize));
var r = cv.matFromArray(outHeight, outWidth, cv.CV_8UC1, data.slice(2 * planeSize, 3 * planeSize));

var vec = new cv.MatVector();
vec.push_back(r);
vec.push_back(g);
vec.push_back(b);
var rgb = new cv.Mat();
cv.merge(vec, rgb);

// Result rendering
cv.imshow("canvasOutput", rgb);
At the moment, OpenCV.js is collected in a semi-automatic mode. It means that not all the modules and methods acquire corresponding signatures in JavaScript. For instance, for dnn module the list of acceptable functions is determined as follows:
dnn = {'dnn_Net': ['setInput', 'forward'],
       '': ['readNetFromCaffe', 'readNetFromTensorflow',
            'readNetFromTorch', 'readNetFromDarknet',
            'readNetFromONNX', 'readNet', 'blobFromImage']}
The last conversion, that separates the blob into three channels and mixes them into an image, in fact can be performed by means of a single method — imagesFromBlob, which has not been added to the list above yet. It could be you first contribution to the development of OpenCV, couldn’t it? 😉
Conclusion
Regarding the demo, you may dash a glance at my GitHub page, where you are also free to test the resulting code (Attention! Network download is about 22MB, watch your traffic. It is also recommended to refresh the page for each new image, otherwise the quality of the following processing is distorted. Keep in mind the processing may take long and try changing the size of the image which turns to be a slider as a result).
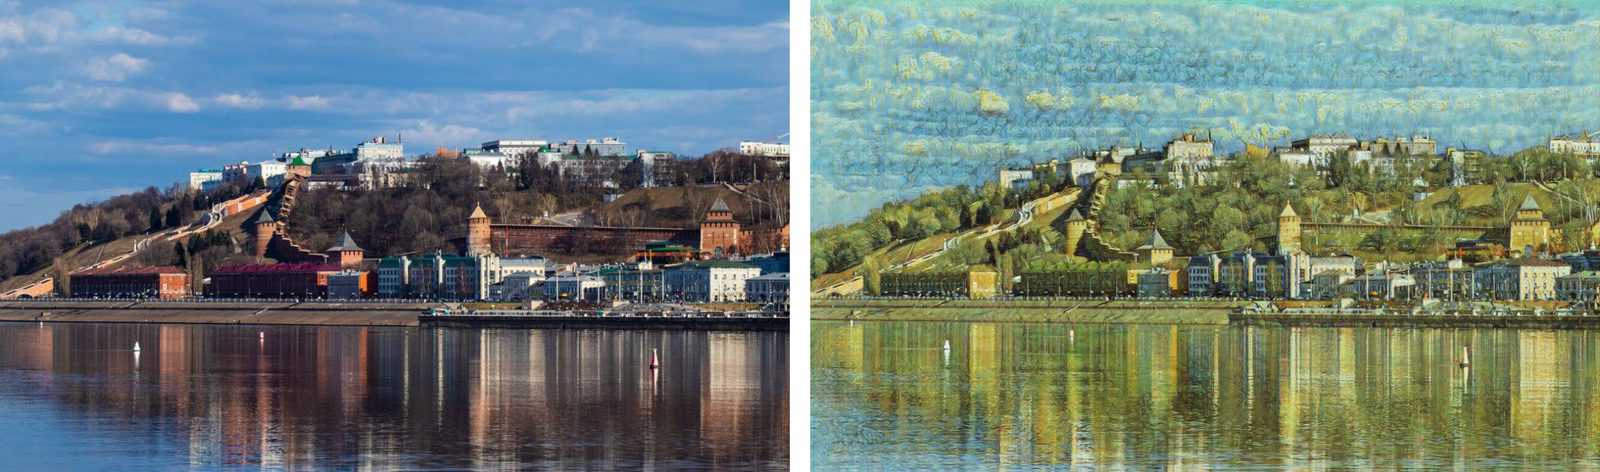
While working on the article and looking for the best welcome picture, I stumbled across a photo of Nizhny Novgorod Kremlin taken by a friend of mine, and it made me feel just right – the title of the article came to my mind and I finally conceived the way it should be written. Let me suggest you testing the app with a picture of your favorite spot, and maybe sharing some interesting facts about it in the comments or by mail.
Useful Links
- OpenCV.js Tutorials
- CycleGAN Models
- Other Style Transfer Models (different normalization)


5K+ Learners
Join Free VLM Bootcamp3 Hours of Learning