In computer vision, there are number of general, pretrained models available for deployment to edge devices (such as OpenCV AI Kit). However, the real power in computer vision deployment today lies in custom training your own computer vision model on your own data to apply to your custom solution on your own device.
To train your own custom model, you must gather a dataset of images, annotate them, train your model, and then convert and optimize your model for your deployment destination. This machine learning pathway is wrought with nuance, and slows development cycles. What’s more – mistakes do not manifest themselves not as blatant errors, but rather, quietly degrade your model’s performance.
In effort to streamline computer vision development and deployment, Roboflow, OpenCV, and Luxonis are partnering to provide a one-click custom training and deployment solution to the OAK-1 and the OAK-D.

In this blog, we’ll walk through the custom model deployment process to OAK devices and show just how seamless it can be.
And the best part is, you do not need to have your OAK device in hand yet to develop your project, today. You can develop and test in Roboflow’s cloud environment first, then deploy the trained model to your OAK later on.
Step 1: Gather Your Dataset
In order to train your custom model, you need to gather images that are representative of the problems your model will solve in the wild. It is extremely important to use images that are similar to your deployment environment. The best course of action is to train on images taken from your OAK device, at the resolution you wish to infer at. You can automatically upload images to Roboflow from your OAK for annotation via the Roboflow Upload API.
To just get a feel for a problem you will need 5-100 images. To build a production grade system, you will likely need many more.
Step 2: Annotate Your Dataset
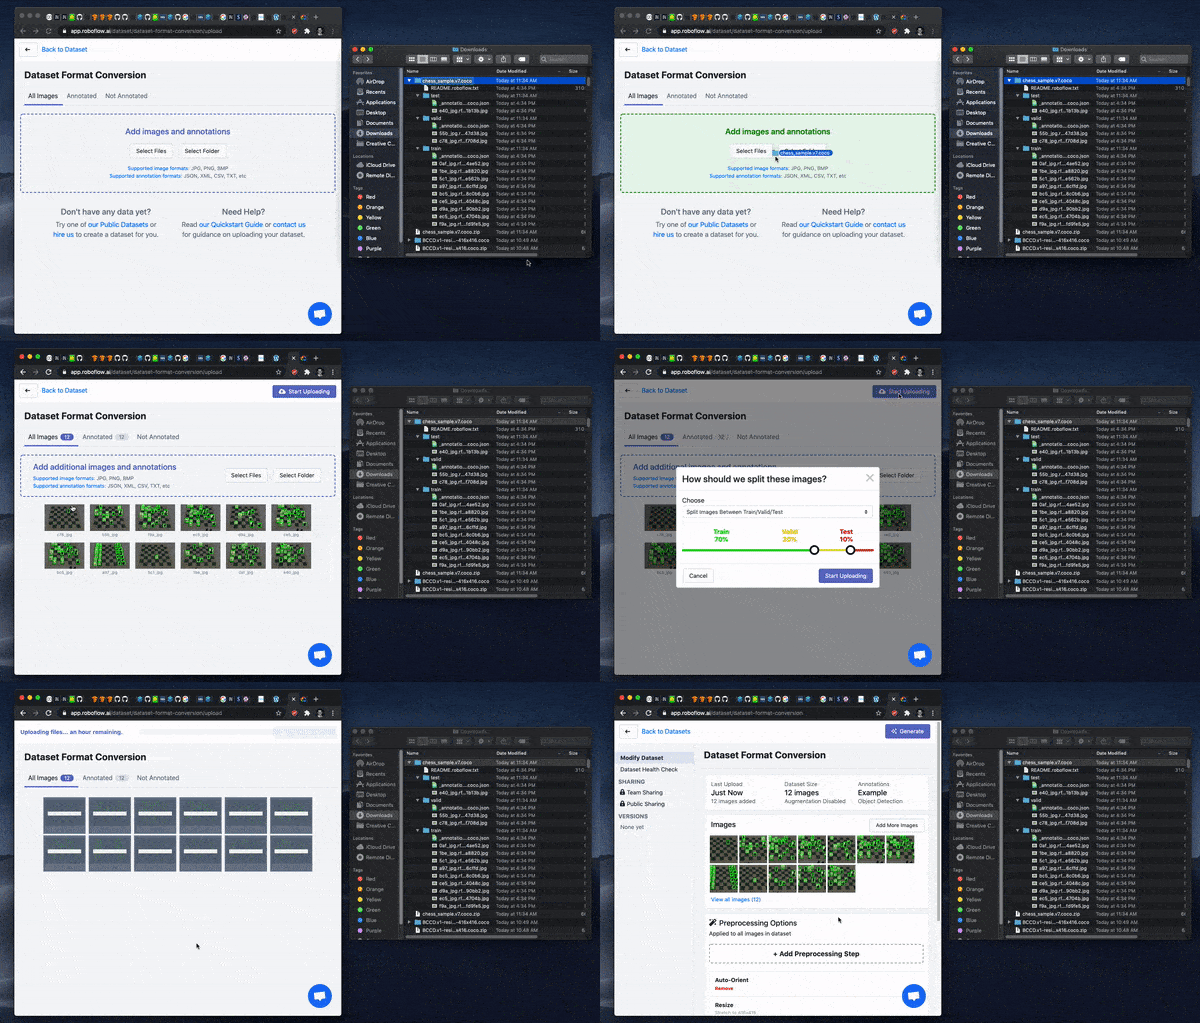
The next step is to upload and annotate your images in Roboflow.
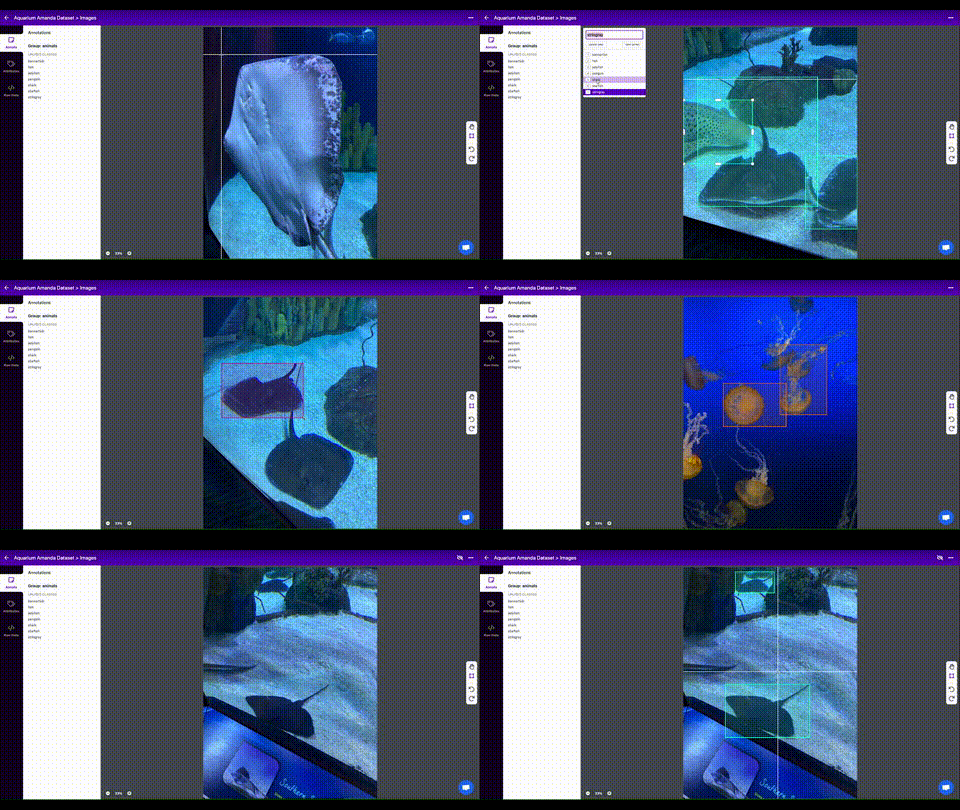
You will be drawing bounding boxes around objects that you want to detect. See our tips on labeling best practices.
Step 3: Version Your Data
Once you are satisfied with your dataset’s annotations, you can create a dataset version in Roboflow to prepare for training. A dataset version is locked in time allowing you to iterate on experiments, knowing that the dataset has been fixed at the point of the version.
In creating a dataset version, you will be making two sets of decisions:
- Preprocessing – image standardization choices across your dataset such as image resolution. For OAK deployment, we recommend the 416×416 image resolution.
- Augmentation – image augmentation creates new, transformed images from your training set, exposing your model to different variations of data.

Step 4: Train and Deploy Your Model to the OAK
Roboflow Train offers single-click training and deployment to your OAK device. After you’ve created a version, click Start Training and choose a checkpoint to start from. If you don’t have a checkpoint to start from, just choose Train from Scratch or Public Models --> COCO

Depending on the size of your dataset, training and conversion will take anywhere from 15min-12hrs, and you will receive and email when it has completed.

Step 5: Test Your Model on the Hosted API
After Step 4, your model is ready for OAK deployment (Step 6), but we recommend taking a moment to test your model against the Roboflow Hosted Inference API, before deploying. The Hosted Inference API is a version of your model, deployed to a cloud server. You can get a feel for the quality of your inference on test images, and develop your application against this API.
When you need edge deployment, you can move forward to setting up the OAK Inference Server.
This also means, that you do not need your OAK in hand yet to start iterating on your model and testing deployment conditions.
Step 6: Deploy Your Model to Your OAK Device
Once your model has finished training, it is ready to deploy to the edge on your OAK Device.
Supported Devices
The Roboflow OAK Inference Server runs on the following devices:
- DepthAI OAK-D (LUX-D)
- Luxonis OAK-1 (LUX-1)
The host system requires a linux/amd64 processor. arm65/aarch64 support is coming soon.
Inference Speed
In our tests, we observed an inference speed of 20FPS at 416×416 resolution, suitable for most realtime applications. This speed will vary slightly based on your host machine.
Serving Your Model
On your host machine, install docker. Then run:
sudo docker run --rm \
    --privileged \
    -v /dev/bus/usb:/dev/bus/usb \
    --device-cgroup-rule='c 189:* rmw' \
    -e DISPLAY=$DISPLAY \
    -v /tmp/.X11-unix:/tmp/.X11-unix \
    -p 9001:9001 \
    roboflow/oak-inference-server:latest
This will start a local inference server on your machine running on port 9001.
Use the server:
- Validate that you’ve stood up your OAK correctly by visiting in your browser
https://localhost:9001/validate - Validate that inference is working by invoking the pre-trained COCO model that comes built-in
https://localhost:9001/coco - Invoke your custom model by get request to
https://localhost:9001/[YOUR_ENDPOINT]?access_token=[YOUR_ACCESS_TOKEN]
On invocation, you cant get an image or json response.
{
    'predictions': [
                {
                       'x': 95.0,
                       'y': 179.0,
                       'width': 190,
                       'height': 348,
                       'class': 'mask',
                       'confidence': 0.35
                }
         ]
   }
And with that, you are off to the races! The real challenge begins in implementing your computer vision model into your application.
- For more information on developing against your OAK inference server, see the Roboflow OAK Inference Server Docs.
Conclusion
Congratulations! Now you know how to deploy a custom computer vision model to the edge with a battle-hardened machine learning pipeline in a few clicks.
Getting Access
If you already have an OAK device, you can get started for free. Simply request Roboflow Train directly in Roboflow and reply to the email with your OAK serial number. (If you don’t yet have an OAK device, email us for a discount.)
import depthai
for device in depthai.Device.getAllAvailableDevices():
    print(f"{device.getMxId()} {device.state}")
Happy training! And more importantly, happy inferencing!


5K+ Learners
Join Free VLM Bootcamp3 Hours of Learning