
Image translation and rotation are two of the most common and essential operations in computer vision. Whether you’re aligning scanned documents, augmenting datasets for deep learning, correcting skewed camera input, or building a panorama stitching pipeline — these geometric transformations are at the core of modern image processing. In this tutorial, we’ll take a deep dive into image translation and rotation using OpenCV, one of the most powerful computer vision libraries.
You’ll learn:
- What image translation and rotation mean mathematically,
- How to implement them efficiently using OpenCV in both Python and C++, and
- How to combine them to create advanced transformation workflows.
Table of contents
Import cv2
Before using any OpenCV functions, we must first import the library. This is the essential first step to access all OpenCV functionalities.
Python
# import the cv2 library
import cv2
C++
//Include Libraries
//OpenCV's cv::Mat acts like NumPy arrays for image processing.

#include<opencv2/opencv.hpp>
#include<iostream>
We are assuming that you have already installed OpenCV on your device.
If not please refer the relevant links below:
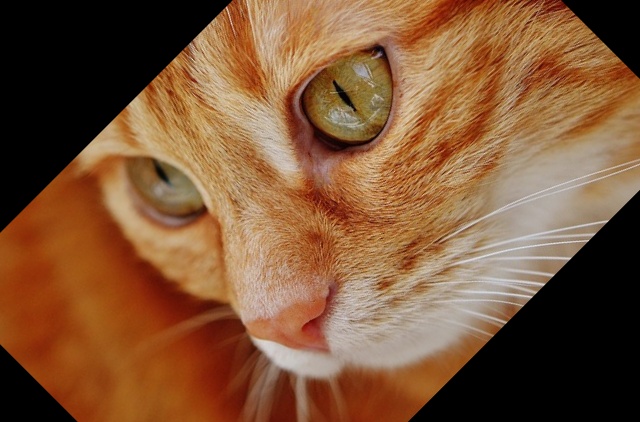
Example Image
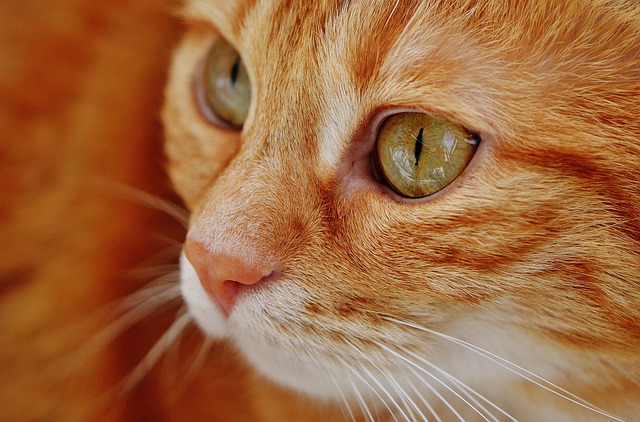
Image Translation
Translation is simply shifting an image along the x-axis and y-axis. You move every pixel from its original location to a new location based on how much you want to move horizontally and vertically. In computer vision or image processing, image translation is the rectilinear shift of an image from one location to another, so the shifting of an object is called translation. In other words, translation is the shifting of an object’s location.
Mathematical Representation
Image translation can be represented using homogeneous transformation matrices:
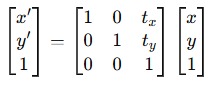
Where:
- (x,y)(x, y)(x,y) is the original pixel coordinate,
- (x′,y′)(x’, y’)(x′,y′) is the translated pixel coordinate,
- tx and ty are the shifts along the x and y axes respectively.
In simpler terms:
- x′=x+tx
- y′=y+ty
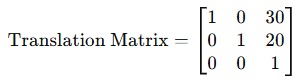
Suppose we want to translate a pixel located at:
- Original position: (x,y) = (50,100)
- Translation values: tx=30, ty=20
Using the translation matrix:
Now multiply this with the original position in homogeneous coordinates:

Result: The pixel originally at (50,100) (50, 100) (50,100) moves to (80,120) (80, 120) (80,120) after translation.
Instead of thinking in matrices, we can summarize it as:
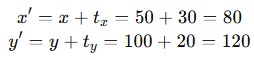
So, every pixel in the image undergoes this shift — the whole image moves 30 pixels right and 20 pixels down.
How to Translate an Image using OpenCV
To perform image translation in OpenCV, we use the function cv2.warpAffine() in Python or warpAffine() in C++. This function applies a 2×3 affine transformation matrix to an image, which allows us to perform operations like translation, rotation, scaling, and shearing.
Since translation is a type of affine transformation, we can achieve it by constructing a translation matrix and passing it to warpAffine().
Python
cv2.warpAffine(src, M, dsize[, dst[, flags[, borderMode[, borderValue]]]])
C++
cv::warpAffine(src, dst, M, dsize, flags = INTER_LINEAR, borderMode = BORDER_CONSTANT, borderValue = Scalar())
It accepts the following arguments:


- src: The input image (e.g., a cv::Mat or numpy.ndarray).
- dst: (C++ only) The output image.
- M: The 2×3 affine transformation matrix. For translation, this matrix has the form:

- dsize: Size of the output image (width, height). This is often the same size as the input image.
- flags: Interpolation method. Common values: cv2.INTER_LINEAR, cv2.INTER_NEAREST.
- borderMode: How to handle pixels outside the image border. E.g., cv2.BORDER_CONSTANT, cv2.BORDER_REPLICATE.
- borderValue: Value used for pixels outside the image if BORDER_CONSTANT is selected. The default is black (0,0,0).
Python
import cv2
import numpy as np

# Load the image
image = cv2.imread('ex.jpg')

# Define translation values
tx, ty = 100, 50  # Shift 100 pixels right and 50 pixels down

# Create the translation matrix
translation_matrix = np.float32([
    [1, 0, tx],
    [0, 1, ty]
])

# Get the dimensions of the image
height, width = image.shape[:2]

# Apply translation
translated_image = cv2.warpAffine(image, translation_matrix, (width, height))

# Display the result
cv2.imshow('Translated Image', translated_image)

cv2.waitKey(0)
cv2.destroyAllWindows()
C++
#include <opencv2/opencv.hpp>
int main() {

    // Load the image
    cv::Mat image = cv::imread("ex.jpg");

    // Check if the image is loaded successfully
    if (image.empty()) {
        std::cerr << "Error loading image!" << std::endl;
        return -1;
    }

    // Define translation values
    int tx = 100; // Shift 100 pixels to the right
    int ty = 50;  // Shift 50 pixels down

    // Create the translation matrix
    cv::Mat translation_matrix = (cv::Mat_<double>(2, 3) << 1, 0, tx, 0, 1, ty);

    // Get the dimensions of the image
    int width = image.cols;
    int height = image.rows;

    // Create an empty matrix to hold the translated image
    cv::Mat translated_image;

    // Apply the affine transformation (translation)
    cv::warpAffine(image, translated_image, translation_matrix, cv::Size(width, height));

    // Display the result
    cv::imshow("Translated Image", translated_image);
    cv::waitKey(0);
    cv::destroyAllWindows();
    return 0;
}
Explanation:
- int tx = 100, ty = 50: These values control how much the image will move. The parameter tx controls horizontal movement—shifting the image to the right when positive and to the left when negative. Similarly, ty controls vertical movement—moving the image downward when positive and upward when negative.
- translation_matrix = (cv::Mat_<double>(2, 3) << 1, 0, tx, 0, 1, ty): Constructs a 2×3 translation matrix using the values tx and ty. This matrix tells OpenCV how to shift every pixel.
- cv::warpAffine(…): Applies the translation matrix to the image using affine transformation. The output image size is specified with cv::Size(width, height).
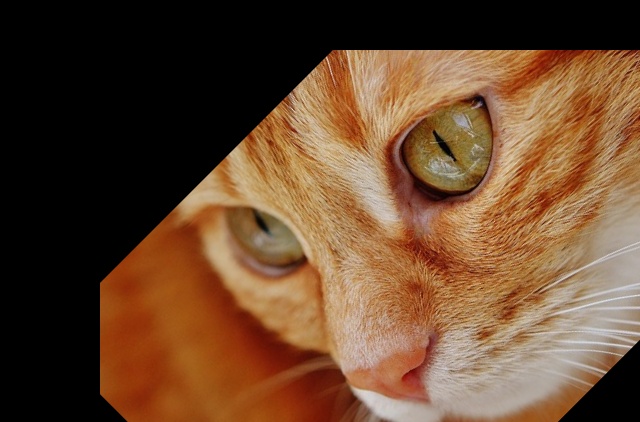
Output

Image Rotation
Rotation is turning the image around a certain point (usually the center) by a specific angle. Imagine pinning a paper at its center and turning it! Image rotation is a common image processing routine with applications in matching, alignment, and other image-based algorithms, in image rotation the image is rotated by a definite angle. It is used extensively in data augmentation, especially when it comes to image classification.
Mathematical Representation
The 2D rotation of a point is given by:
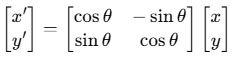
Where:
- θ is the rotation angle (in radians),
- (x,y) is the original coordinate,
- (x′,y′) is the new coordinate after rotation.
When combined with translation (for rotating around the center rather than the origin), the affine transformation becomes a bit more complex.
Let’s rotate the point (1,0)(1, 0)(1,0) by 90 degrees counterclockwise around the origin.
- Convert θ=90 to radians:
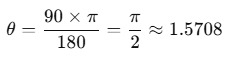
- Plug into the rotation matrix:

- So the rotation matrix becomes:
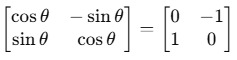
- Multiply the matrix by point (1,0):
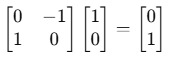
- Result: The point (1,0)(1, 0)(1,0) becomes (0,1)(0, 1)(0,1) after a 90° rotation around the origin.
How to Rotate an Image using OpenCV
Rotating an image is a common task in computer vision—whether it’s to correct orientation, perform data augmentation, or align features. OpenCV simplifies this process through the combination of two functions:
- cv2.getRotationMatrix2D() (in Python) or cv::getRotationMatrix2D() (in C++)
- cv2.warpAffine() / cv::warpAffine()
These functions together allow precise control over angle, rotation center, and scaling.
Rotation Matrix
This function generates a 2×3 affine transformation matrix used to rotate an image.
Python
cv2.getRotationMatrix2D(center, angle, scale)
C++
cv::getRotationMatrix2D(center, angle, scale)
It accepts the following arguments
- center: The point (x, y) around which the image is to be rotated. Often this is the center of the image.
- angle: The rotation angle in degrees. Positive values mean counter-clockwise rotation.
- scale: Scaling factor. Use 1.0 to keep the same size. Larger values will zoom in; smaller values will zoom out.
The function returns a 2×3 matrix, which is then passed into warpAffine() to apply the transformation to the image.
Python
import cv2
import numpy as np

# Load the image
image = cv2.imread('ex.jpg')

# Get the image dimensions
height, width = image.shape[:2]

# Define the rotation center
center = (width // 2, height // 2)

# Define the rotation angle
angle = 45  # Rotate by 45 degrees

# Define the scaling factor
scale = 1.0  # No scaling

# Get the rotation matrix
rotation_matrix = cv2.getRotationMatrix2D(center, angle, scale)

# Perform the rotation
rotated_image = cv2.warpAffine(image, rotation_matrix, (width, height))

# Display the result
cv2.imshow('Rotated Image', rotated_image)

cv2.waitKey(0)
cv2.destroyAllWindows()
C++
#include <opencv2/opencv.hpp>
int main() {

    // Load the image
    cv::Mat image = cv::imread("ex.jpg");
    if (image.empty()) {
        std::cout << "Could not load the image!" << std::endl;
        return -1;
    }

    // Get image dimensions
    int height = image.rows;
    int width = image.cols;

    // Define the rotation center (usually the center of the image)
    cv::Point2f center(width / 2.0f, height / 2.0f);

    // Define the angle of rotation (in degrees)
    double angle = 45.0;

    // Define the scale factor (1.0 = no scaling)
    double scale = 1.0;

    // Get the 2x3 rotation matrix
    cv::Mat rotation_matrix = cv::getRotationMatrix2D(center, angle, scale);

    // Apply the affine transformation (rotate the image)
    cv::Mat rotated_image;
    cv::warpAffine(image, rotated_image, rotation_matrix, cv::Size(width, height));

    // Display the result
    cv::imshow("Rotated Image", rotated_image);

    cv::waitKey(0);
    cv::destroyAllWindows();
    return 0;
}
- We rotate around the center of the image, so we calculate it using (width / 2, height / 2). OpenCV expects a cv::Point2f here, which stores floating-point values.
- The angle is 45 degrees (counter-clockwise).
- The scale is set to 1.0, meaning the image size remains unchanged during rotation.
- cv::getRotationMatrix2D(center, angle, scale) generates a 2×3 affine transformation matrix. This matrix encodes both the rotation and the translation needed to keep the image centered.
- cv::warpAffine() takes the original image and the rotation matrix and outputs the rotated image with the same width and height as the input.
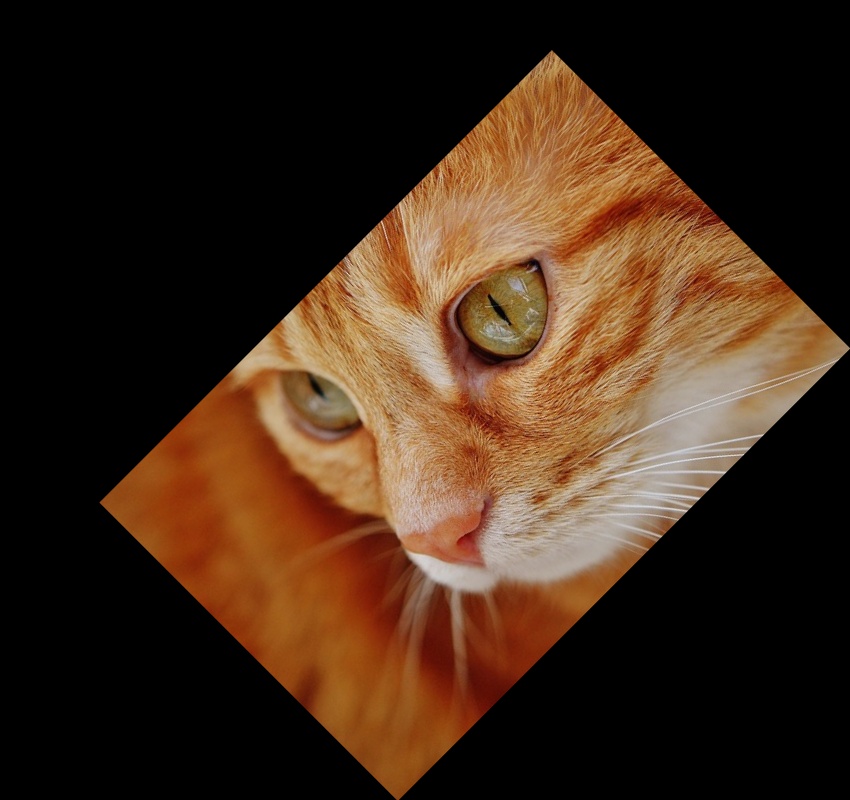
Output
Combining Rotation and Translation
You can chain translation and rotation by simply multiplying their transformation matrices. In practice, it’s easier to rotate and translate sequentially using OpenCV:
Python
import cv2
import numpy as np

# Load the image
image = cv2.imread('ex.jpg')

# Get image dimensions
height, width = image.shape[:2]

# --- Step 1: Rotation ---
# Define center, angle, and scale
center = (width // 2, height // 2)
angle = 45  # degrees
scale = 1.0

# Create rotation matrix
rotation_matrix = cv2.getRotationMatrix2D(center, angle, scale)

# Apply rotation
rotated_image = cv2.warpAffine(image, rotation_matrix, (width, height))

# --- Step 2: Translation ---
# Define translation offsets
tx, ty = 100, 50  # Right and down

# Create translation matrix
translation_matrix = np.float32([
    [1, 0, tx],
    [0, 1, ty]
])

# Apply translation on rotated image
translated_image = cv2.warpAffine(rotated_image, translation_matrix, (width, height))

# Save and show result
cv2.imwrite('rotated_then_translated.jpg', translated_image)
cv2.imshow('Rotated and Translated', translated_image)

cv2.waitKey(0)
cv2.destroyAllWindows()
C++
#include <opencv2/opencv.hpp>
int main() {

    // Load the image
    cv::Mat image = cv::imread("ex.jpg");
    if (image.empty()) {
        std::cout << "Failed to load image!" << std::endl;
        return -1;
    }

    // Get image dimensions
    int width = image.cols;
    int height = image.rows;

    // --- Step 1: Rotation ---
    cv::Point2f center(width / 2.0f, height / 2.0f);
    double angle = 45.0;
    double scale = 1.0;

    // Get rotation matrix
    cv::Mat rotation_matrix = cv::getRotationMatrix2D(center, angle, scale);

    // Apply rotation
    cv::Mat rotated_image;
    cv::warpAffine(image, rotated_image, rotation_matrix, cv::Size(width, height));

    // --- Step 2: Translation ---
    float tx = 100, ty = 50;
    cv::Mat translation_matrix = (cv::Mat_<float>(2,3) << 1, 0, tx, 0, 1, ty);

    // Apply translation
    cv::Mat translated_image;
    cv::warpAffine(rotated_image, translated_image, translation_matrix, cv::Size(width, height));

    // Save and display the result
    cv::imwrite("rotated_then_translated.jpg", translated_image);
    cv::imshow("Rotated and Translated", translated_image);

    cv::waitKey(0);
    cv::destroyAllWindows();
    return 0;
}
This two-step process lets you rotate the image first and then move it wherever you want.
Output
Note:
- Angle in Degrees: cv2.getRotationMatrix2D() expects angles in degrees, not radians.
- Border Handling: You can control how OpenCV handles borders after rotation/translation using the borderMode argument in warpAffine().
- Automatic Size Adjustment: If you don’t want any clipping when rotating, you must manually adjust the output size to fit the rotated image.
- Negative Angles: Negative angles rotate the image clockwise.
Example of avoiding cutoff by enlarging canvas size:
In the above output we can see that the image is cut off at some parts, that is because we are using the original canvas size.
To rotate and then translate an image without any cutoff, we need to:
- First calculate a rotation matrix that includes canvas expansion (to avoid cropping).
- Then apply a translation by modifying the affine matrix accordingly.
- Finally, perform a single warpAffine call using the combined transformation.
Python
import cv2
import numpy as np

# Load image
image = cv2.imread('ex.jpg')
height, width = image.shape[:2]
center = (width // 2, height // 2)

# Rotation parameters
angle = 45  # degrees
scale = 1.0

# Translation values
tx, ty = 100, 50  # Shift right and down

# Step 1: Get basic rotation matrix
rotation_matrix = cv2.getRotationMatrix2D(center, angle, scale)

# Step 2: Compute new canvas size to avoid cropping
cos = np.abs(rotation_matrix[0, 0])
sin = np.abs(rotation_matrix[0, 1])
new_width = int((height * sin) + (width * cos))
new_height = int((height * cos) + (width * sin))

# Step 3: Adjust the rotation matrix to center the image on new canvas
rotation_matrix[0, 2] += (new_width / 2) - center[0]
rotation_matrix[1, 2] += (new_height / 2) - center[1]

# Step 4: Create translation matrix manually
translation_matrix = np.float32([[1, 0, tx], [0, 1, ty]])

# Step 5: Combine both rotation and translation into a single affine matrix
# Convert to 3x3 matrix to multiply them
rotation_3x3 = np.vstack([rotation_matrix, [0, 0, 1]])
translation_3x3 = np.vstack([translation_matrix, [0, 0, 1]])
combined_matrix = np.dot(translation_3x3, rotation_3x3)  # Apply rotation, then translation
final_matrix = combined_matrix[:2, :]  # Convert back to 2x3 for warpAffine

# Step 6: Perform transformation
final_image = cv2.warpAffine(image, final_matrix, (new_width + tx, new_height + ty))

# Save and display
cv2.imwrite("rotated_translated_safe.jpg", final_image)
cv2.imshow("Rotated + Translated (No Crop)", final_image)

cv2.waitKey(0)
cv2.destroyAllWindows()
C++
#include <opencv2/opencv.hpp>
#include <cmath>
int main() {

    // Load the image
    cv::Mat image = cv::imread("ex.jpg");
    if (image.empty()) {
        std::cerr << "Image not found!" << std::endl;
        return -1;
    }
    int width = image.cols;
    int height = image.rows;
    cv::Point2f center(width / 2.0f, height / 2.0f);

    // Rotation parameters
    double angle = 45.0; // degrees
    double scale = 1.0;

    // Translation parameters
    double tx = 100; // Shift right
    double ty = 50;  // Shift down

    // Step 1: Get rotation matrix (2x3)
    cv::Mat rotationMatrix = cv::getRotationMatrix2D(center, angle, scale);

    // Step 2: Calculate new bounding dimensions
    double radians = angle * CV_PI / 180.0;
    double cosA = std::abs(std::cos(radians));
    double sinA = std::abs(std::sin(radians));
    int newWidth = int((height * sinA) + (width * cosA));
    int newHeight = int((height * cosA) + (width * sinA));

    // Step 3: Adjust rotation matrix to move image to new center
    rotationMatrix.at<double>(0, 2) += (newWidth / 2.0) - center.x;
    rotationMatrix.at<double>(1, 2) += (newHeight / 2.0) - center.y;

    // Step 4: Convert rotation to 3x3 matrix
    cv::Mat rotation3x3 = cv::Mat::eye(3, 3, CV_64F);
    rotationMatrix.copyTo(rotation3x3(cv::Rect(0, 0, 3, 2)));

    // Step 5: Create translation matrix (3x3)
    cv::Mat translation3x3 = cv::Mat::eye(3, 3, CV_64F);
    translation3x3.at<double>(0, 2) = tx;
    translation3x3.at<double>(1, 2) = ty;

    // Step 6: Combine both matrices: T * R
    cv::Mat combinedMatrix = translation3x3 * rotation3x3;

    // Step 7: Extract the 2x3 matrix for warpAffine
    cv::Mat finalAffine = combinedMatrix(cv::Rect(0, 0, 3, 2));

    // Step 8: Apply warpAffine
    cv::Mat finalImage;
    cv::warpAffine(image, finalImage, finalAffine, cv::Size(newWidth + tx, newHeight + ty));

    // Save and display
    cv::imwrite("rotated_translated_safe_cpp.jpg", finalImage);
    cv::imshow("Rotated + Translated (No Crop)", finalImage);

    cv::waitKey(0);
    cv::destroyAllWindows();
    return 0;
}
We rotate around the center while expanding the canvas. Then, we build a separate translation matrix. We combine both matrices to form a single transformation using matrix multiplication. Finally, cv2.warpAffine() is called once using this matrix, ensuring no image content is lost.
Output
Summary
This article explores how to move (translate) and rotate images using OpenCV, with detailed explanations, mathematical foundations, and full code examples in both Python and C++. We begin by understanding the transformation matrices behind translation and rotation, followed by practical implementation using cv2.warpAffine() and cv2.getRotationMatrix2D(). The article also shows how combining these operations can lead to cropped results, and demonstrates how to enlarge the canvas to preserve the entire image during rotation and translation. Each step is accompanied by real-world examples, clean visual outputs, and C++ equivalents for completeness.


5K+ Learners
Join Free VLM Bootcamp3 Hours of Learning