
Fingerprint matching plays a crucial role in various security applications, such as identity verification and criminal investigations. While most fingerprint matching systems rely on large machine learning models and sophisticated algorithms, it is also possible to perform this task with simpler, more accessible techniques. In this article, we’ll explore how basic OpenCV feature extraction operations, such as ORB, SIFT, and matching algorithms like BF and FLANN, can be leveraged for fingerprint matching. To evaluate the effectiveness of these methods, we conducted several experiments to determine whether satisfying fingerprint matching results can be achieved using only OpenCV’s feature extraction and matching algorithms. Let’s dive in and explore how we can achieve fingerprint matching using OpenCV!
Table of contents
Pre requisites
To follow this tutorial, ensure you have Python 3.x installed in your system.
For Jupyter Notebook Users
If you are using Jupyter Notebook, install the required libraries by running the following command inside a notebook cell:
!pip install opencv-python numpy matplotlib scikit-learn
or
%pip install opencv-python numpy matplotlib scikit-learn
For Visual Studio Code & Command Prompt Users
If you are using Visual Studio Code or running the code in a standard Command Prompt or Terminal, install the required libraries using:
pip install opencv-python numpy matplotlib scikit-learn
For Google Colab Users
If you are using Google Colab, you can run the code directly without additional setup, as the required libraries are pre-installed in the Colab environment.
Fingerprint Dataset
Custom Paired Dataset
This dataset contains subfolders named same_1, same_2, and so on, which includes 2 images of the same fingerprint. Similarly, different_1, different_2, and so on., contain 2 images of different fingerprints.
- Download data_check
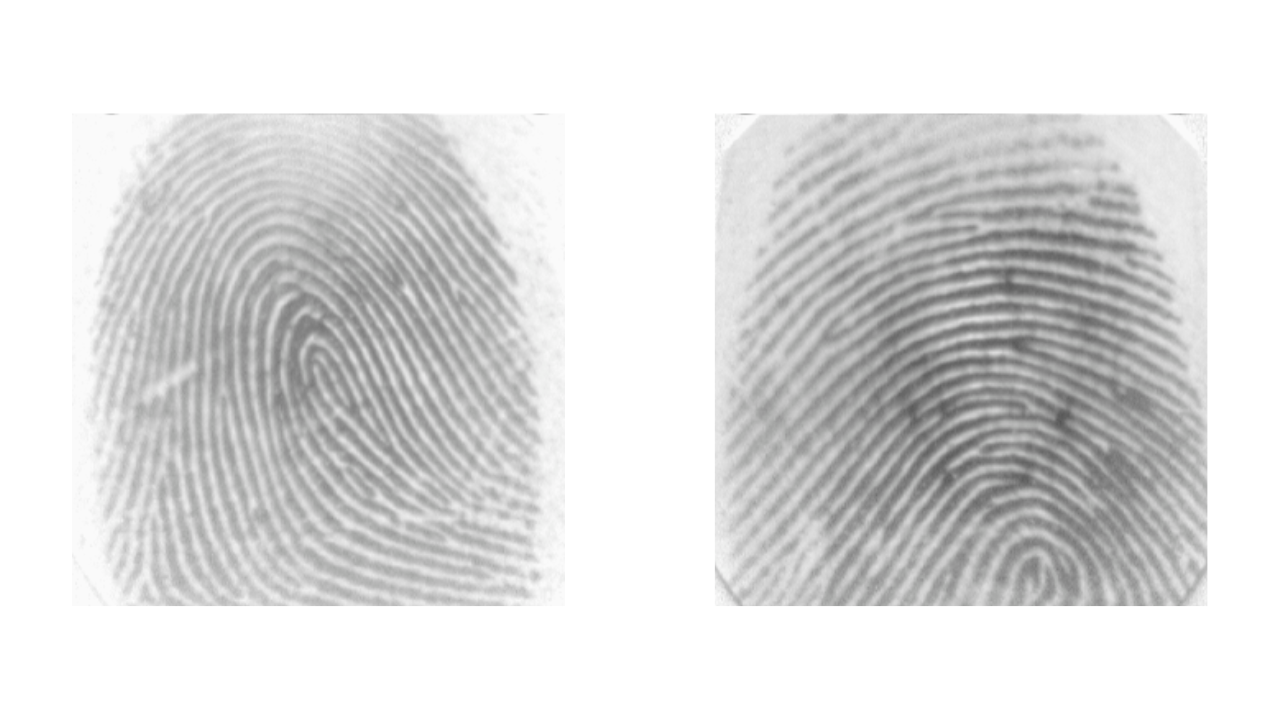
Sample Images
Two images of the same fingerprint
Multi-Sample Dataset
We will also use four additional fingerprint datasets, each containing 80 images. You can download them from the links below:
Create a folder in your working directory named “dataset_folder”, and extract each dataset into separate folders named data1, data2, etc. For easy access, it’s essential to organize the images properly. Each fingerprint image is labeled with an ID, such as 101, 102, 103, etc. You should create a separate folder for each label and store all corresponding images within it.
For example:
- All images labeled 101 should be placed inside a folder named “101”
- All images labeled 102 should go into “102”

Feature Matching Operations
In this section, we will explore how to extract feature descriptors using ORB and SIFT, two widely used feature detection techniques. These methods identify key points in an image by detecting distinct patterns such as corners, edges, and textures, which remain consistent even under transformations like scaling or rotation. Once the features are extracted, we need to match them across different fingerprint images. For this, we will use BFMatcher and FLANN, two powerful algorithms for finding correspondences between feature descriptors. Understanding these methods is essential for implementing fingerprint matching using OpenCV efficiently.
ORB (Oriented FAST and Rotated BRIEF)
ORB (Oriented FAST and Rotated BRIEF) is a fast and efficient feature detection and description algorithm. It is a fusion of the FAST (Features from Accelerated Segment Test) keypoint detector and the BRIEF (Binary Robust Independent Elementary Features) descriptor, making it both scale and rotation invariant. ORB is widely used due to its speed and robustness compared to SIFT and SURF, and it works well even in real-time applications.
Functions and Syntax
# Create ORB detector
orb = cv2.ORB_create(nfeatures=1000)

# Detect keypoints and compute descriptors
keypoints, descriptors = orb.detectAndCompute(image, None)

# Draw keypoints on the image
output_image = cv2.drawKeypoints(image, keypoints, None, color=(0,255,0))
- cv2.ORB_create(nfeatures=1000): Initializes the ORB detector with a maximum of 1000 keypoints.
- detectAndCompute(image, None): Detects keypoints and computes descriptors simultaneously.
- cv2.drawKeypoints(): Draws detected keypoints on the image.
ORB is computationally efficient because it replaces SIFT’s expensive operations with a binary descriptor
SIFT (Scale-Invariant Feature Transform)
SIFT (Scale-Invariant Feature Transform) is one of the most popular feature detection algorithms. It detects key points that are scale and rotation invariant, meaning they can be recognized even if the image is resized or rotated. SIFT is widely used in object recognition, image stitching, fingerprint matching, and many other applications.
Functions and Syntax
# Create SIFT detector
sift = cv2.SIFT_create()

# Detect keypoints and compute descriptors
keypoints, descriptors = sift.detectAndCompute(image, None)

# Draw keypoints on the image
output_image = cv2.drawKeypoints(image, keypoints, None, color=(255,0,0))
- cv2.SIFT_create(): Initializes the SIFT detector.
- detectAndCompute(image, None): Detects keypoints and computes descriptors.
- cv2.drawKeypoints(): Visualizes detected keypoints.
SIFT is more accurate than ORB, but it is slower.
Once we have extracted key features from fingerprint images using ORB and SIFT, the next step in fingerprint matching is to compare these features across different images to determine similarities. Feature descriptors alone do not establish correspondences; they need to be matched against one another. This is where feature matching algorithms like BFMatcher and FLANN come into play. These algorithms help find the best matches between the descriptors of two images, allowing us to determine how similar or different they are.
Brute Force Matcher (BFMatcher)
BFMatcher (Brute Force Matcher) is a simple approach that compares each descriptor from one image with every descriptor from another image and returns the best matches.
Functions and Syntax
orb = cv2.ORB_create()

# Detect and compute keypoints and descriptors for two images
keypoints1, descriptors1 = orb.detectAndCompute(image1, None)
keypoints2, descriptors2 = orb.detectAndCompute(image2, None)

# Create BFMatcher and match descriptors
bf = cv2.BFMatcher(cv2.NORM_HAMMING, crossCheck=True)
matches = bf.match(descriptors1, descriptors2)

# Sort matches based on distance (lower distance = better match)
matches = sorted(matches, key=lambda x: x.distance)
- cv2.BFMatcher(cv2.NORM_HAMMING, crossCheck=True): Creates a BFMatcher with Hamming distance for ORB descriptors.
- match(descriptors1, descriptors2): Matches descriptors between two images.
- sorted(matches, key=lambda x: x.distance): Sorts matches by distance (lower distance means a better match).
BFMatcher is easy to implement but is computationally expensive for large datasets.
FLANN (Fast Library for Approximate Nearest Neighbors)
FLANN (Fast Library for Approximate Nearest Neighbors) is an optimized way to find matches quickly, especially for large datasets. It uses k-d trees and other optimizations to make fingerprint matching much faster than brute-force approaches.
Functions and Syntax
# Create FLANN parameters
FLANN_INDEX_KDTREE = 1  # Algorithm type for SIFT/SURF
index_params = dict(algorithm=FLANN_INDEX_KDTREE, trees=5)  # K-D Tree with 5 trees
search_params = dict(checks=50)  # Number of times the tree is recursively traversed

# Initialize FLANN matcher
flann = cv2.FlannBasedMatcher(index_params, search_params)

# Perform matching
matches = flann.knnMatch(des1, des2, k=2)
- cv2.FlannBasedMatcher(index_params, search_params):
Initializes the FLANN-based matcher with index_params (determining the algorithm) and search_params (controlling the accuracy of matches). - knnMatch(des1, des2, k=2): Finds the two best matches for each feature descriptor in the first image with descriptors in the second image.
FLANN is significantly faster than brute-force matching for large datasets since it approximates nearest neighbors instead of performing an exhaustive search. It is best suited for SIFT and SURF, which generate floating-point descriptors. However, it does not support binary descriptors like ORB, BRIEF. It uses k-d trees for fast approximate nearest neighbor searches.


Fingerprint Matching
In this section, we will explore how different combinations of feature extractors and matching algorithms perform on fingerprint images. First, we will analyze Dataset 1, which contains structured subfolders with images categorized as same and different fingerprints. This will help us evaluate the effectiveness of feature extractors like ORB and SIFT, along with matching algorithms such as BF and FLANN, in distinguishing between genuine and impostor matches. Then, we will work with Dataset 2, where we compare fingerprint images within the same dataset and also across different datasets to assess the robustness of these techniques in various scenarios.
Experiment 1 (Dataset1: Paired Dataset)
ORB (Oriented FAST and Rotated BRIEF)
In this implementation, we use ORB (Oriented FAST and Rotated BRIEF) for feature extraction and Brute-Force (BF) Matcher for fingerprint comparison. This approach allows us to identify similarities between fingerprint pairs from the dataset. We use K-Nearest Neighbors (KNN) matching and Lowe’s ratio test to filter out weak matches, ensuring robust fingerprint comparisons.
Syntax
import cv2
import numpy as np
import os
import matplotlib.pyplot as plt
from sklearn.metrics import confusion_matrix, ConfusionMatrixDisplay

def preprocess_fingerprint(image_path):
    img = cv2.imread(image_path, 0)
    _, img_bin = cv2.threshold(img, 0, 255, cv2.THRESH_BINARY_INV + cv2.THRESH_OTSU)
    return img_bin

def match_fingerprints(img1_path, img2_path):
    img1 = preprocess_fingerprint(img1_path)
    img2 = preprocess_fingerprint(img2_path)

    # Initialize ORB detector
    orb = cv2.ORB_create(nfeatures=1000)

    # Find keypoints and descriptors
    kp1, des1 = orb.detectAndCompute(img1, None)
    kp2, des2 = orb.detectAndCompute(img2, None)
    if des1 is None or des2 is None:
        return 0, None  # Return 0 matches if no descriptors found

    # Use Brute-Force Matcher with Hamming distance
    bf = cv2.BFMatcher(cv2.NORM_HAMMING, crossCheck=False)

    # KNN Match
    matches = bf.knnMatch(des1, des2, k=2)

    # Apply Lowe's ratio test (keep only good matches)
    good_matches = [m for m, n in matches if m.distance < 0.7 * n.distance]

    # Draw only good matches
    match_img = cv2.drawMatches(img1, kp1, img2, kp2, good_matches, None, flags=cv2.DrawMatchesFlags_NOT_DRAW_SINGLE_POINTS)
    return len(good_matches), match_img

def process_dataset(dataset_path, results_folder):
    threshold = 20  # Adjust this based on tests
    y_true = []  # True labels (1 for same, 0 for different)
    y_pred = []  # Predicted labels

    # Create results folder if it does not exist
    os.makedirs(results_folder, exist_ok=True)

    # Loop through all subdirectories
    for folder in sorted(os.listdir(dataset_path)):
        folder_path = os.path.join(dataset_path, folder)
        if os.path.isdir(folder_path):  # Check if it's a valid directory
            image_files = [f for f in os.listdir(folder_path) if f.endswith(('.tif', '.png', '.jpg'))]
            if len(image_files) != 2:
                print(f"Skipping {folder}, expected 2 images but found {len(image_files)}")
                continue  # Skip if the folder doesn't have exactly 2 images
            img1_path = os.path.join(folder_path, image_files[0])
            img2_path = os.path.join(folder_path, image_files[1])
            match_count, match_img = match_fingerprints(img1_path, img2_path)

            # Determine the ground truth (expected label)
            actual_match = 1 if "same" in folder.lower() else 0  # 1 for same, 0 for different
            y_true.append(actual_match)

            # Decision based on good matches count
            predicted_match = 1 if match_count > threshold else 0
            y_pred.append(predicted_match)
            result = "orb_bf_matched" if predicted_match == 1 else "orb_bf_unmatched"
            print(f"{folder}: {result.upper()} ({match_count} good matches)")

            # Save match image in the results folder
            if match_img is not None:
                match_img_filename = f"{folder}_{result}.png"
                match_img_path = os.path.join(results_folder, match_img_filename)
                cv2.imwrite(match_img_path, match_img)
                print(f"Saved match image at: {match_img_path}")

    # Compute and display confusion matrix
    labels = ["Different (0)", "Same (1)"]
    cm = confusion_matrix(y_true, y_pred)
    disp = ConfusionMatrixDisplay(confusion_matrix=cm, display_labels=labels)
    plt.figure(figsize=(6, 5))
    disp.plot(cmap="Blues", values_format="d")
    plt.title("Confusion Matrix orb_bf")
    plt.show()

# Example usage
dataset_path = r"C:\Users\ssabb\Desktop\opencv_courses\articles\FingerPrint\Data_check"
results_folder = r"C:\Users\ssabb\Desktop\opencv_courses\articles\FingerPrint\orb_bf_"
process_dataset(dataset_path, results_folder)
The following is an explanation of the important parts of the code:
- cv2.threshold(img, 0, 255, cv2.THRESH_BINARY_INV + cv2.THRESH_OTSU): Applies Otsu’s binarization, which automatically selects the best threshold value. The cv2.THRESH_BINARY_INV inverts the colors, making ridges white and background black.
- kp1, des1: Keypoints and descriptors for the first fingerprint image. kp2, des2: Keypoints and descriptors for the second fingerprint image. If des1 or des2 is None, we return 0 matches since no descriptors were found.
- knnMatch(des1, des2, k=2): Finds the two best matches for each descriptor in des1 from des2. Lowe’s ratio test is applied to filter out weak matches. Keeps only matches where the best match (m) is significantly better than the second-best (n). A match is considered “good” if m.distance < 0.7 * n.distance.
- cv2.drawMatches(): Draws lines connecting matched keypoints between the two fingerprint images. cv2.DrawMatchesFlags_NOT_DRAW_SINGLE_POINTS: Ensures that only matched keypoints are drawn, not all detected keypoints.
- We set a threshold of 20 good matches. If match_count is greater than the threshold, the fingerprints are classified as a match (1). Otherwise, they are classified as not matching (0).
- confusion_matrix(y_true, y_pred): Computes the confusion matrix, comparing actual and predicted labels. ConfusionMatrixDisplay(confusion_matrix=cm, display_labels=[“Different (0)”, “Same (1)”]): Creates a visualization of the matrix. The results are then saved into “orb_bf” folder
Output
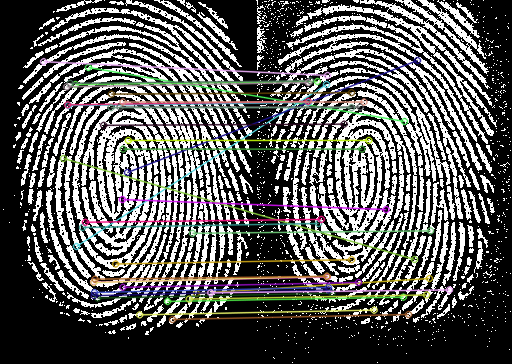


All “different” fingerprints were correctly classified as “different” (True Negatives). 3 “same” fingerprints were misclassified as “different” (False Negatives). 7 “same” fingerprints were correctly classified as “same” (True Positives). No “different” fingerprints were misclassified as “same” (False Positives = 0).
Fingerprint Matching using SIFT + FLANN
In this implementation, we use Scale-Invariant Feature Transform (SIFT) for feature extraction and Fast Library for Approximate Nearest Neighbors (FLANN) for feature matching. SIFT is a powerful algorithm that detects and describes key points in an image, making it highly effective for fingerprint recognition. FLANN provides an efficient way to match these descriptors using a KD-tree-based nearest neighbor search.
Syntax
import cv2
import numpy as np
import os
import matplotlib.pyplot as plt
from sklearn.metrics import confusion_matrix, ConfusionMatrixDisplay

def preprocess_fingerprint(image_path):
    img = cv2.imread(image_path, 0)
    _, img_bin = cv2.threshold(img, 0, 255, cv2.THRESH_BINARY_INV + cv2.THRESH_OTSU)
    return img_bin

def match_fingerprints(img1_path, img2_path):
    img1 = preprocess_fingerprint(img1_path)
    img2 = preprocess_fingerprint(img2_path)

    # Initialize SIFT detector
    sift = cv2.SIFT_create(nfeatures=1000)

    # Find keypoints and descriptors
    kp1, des1 = sift.detectAndCompute(img1, None)
    kp2, des2 = sift.detectAndCompute(img2, None)
    if des1 is None or des2 is None:
        return 0, None  # Return 0 matches if no descriptors found

    # FLANN parameters (KD-tree for SIFT)
    index_params = dict(algorithm=1, trees=5)  # KD-tree
    search_params = dict(checks=50)  # Number of checks for nearest neighbors
    flann = cv2.FlannBasedMatcher(index_params, search_params)

    # KNN Match
    matches = flann.knnMatch(des1, des2, k=2)

    # Apply Lowe's ratio test (keep only good matches)
    good_matches = [m for m, n in matches if m.distance < 0.7 * n.distance]

    # Draw only good matches
    match_img = cv2.drawMatches(img1, kp1, img2, kp2, good_matches, None, flags=cv2.DrawMatchesFlags_NOT_DRAW_SINGLE_POINTS)
    return len(good_matches), match_img

def process_dataset(dataset_path, results_folder):
    threshold = 20  # Adjust this based on tests
    y_true = []  # True labels (1 for same, 0 for different)
    y_pred = []  # Predicted labels
    os.makedirs(results_folder, exist_ok=True)
    for folder in sorted(os.listdir(dataset_path)):
        folder_path = os.path.join(dataset_path, folder)
        if os.path.isdir(folder_path):  # Check if it's a valid directory
            image_files = [f for f in os.listdir(folder_path) if f.endswith(('.tif', '.png', '.jpg'))]
            if len(image_files) != 2:
                print(f"Skipping {folder}, expected 2 images but found {len(image_files)}")
                continue
            img1_path = os.path.join(folder_path, image_files[0])
            img2_path = os.path.join(folder_path, image_files[1])
            match_count, match_img = match_fingerprints(img1_path, img2_path)

            # Determine the ground truth
            actual_match = 1 if "same" in folder.lower() else 0  # 1 for same, 0 for different
            y_true.append(actual_match)

            # Decision based on good matches count
            predicted_match = 1 if match_count > threshold else 0
            y_pred.append(predicted_match)
            result = "sift_flann_matched" if predicted_match == 1 else "sift_flann_unmatched"
            print(f"{folder}: {result.upper()} ({match_count} good matches)")
            if match_img is not None:
                match_img_filename = f"{folder}_{result}.png"
                match_img_path = os.path.join(results_folder, match_img_filename)
                cv2.imwrite(match_img_path, match_img)
                print(f"Saved match image at: {match_img_path}")

    # Compute and display confusion matrix
    labels = ["Different (0)", "Same (1)"]
    cm = confusion_matrix(y_true, y_pred)
    disp = ConfusionMatrixDisplay(confusion_matrix=cm, display_labels=labels)
    plt.figure(figsize=(6, 5))
    disp.plot(cmap="Blues", values_format="d")
    plt.title("Confusion Matrix sift_flann")
    plt.show()

# Example usage
dataset_path = r"C:\Users\ssabb\Desktop\opencv_courses\articles\FingerPrint\Data_check"
results_folder = r"C:\Users\ssabb\Desktop\opencv_courses\articles\FingerPrint\sift_flann_"
process_dataset(dataset_path, results_folder)
match_fingerprints(img1_path, img2_path): Loads and preprocesses two fingerprint images.
- Extracts features using SIFT: cv2.SIFT_create(nfeatures=1000): Detects and computes 1000 keypoints and descriptors. sift.detectAndCompute(img, None): Extracts keypoints and descriptors for both images.
- Performs feature matching using FLANN:
algorithm=1: Specifies KD-tree (suitable for SIFT). trees=5: Number of trees for KD-tree. checks=50: Number of nearest-neighbor searches for efficiency. Uses cv2.FlannBasedMatcher(index_params, search_params).knnMatch(des1, des2, k=2) for KNN matching.
Output
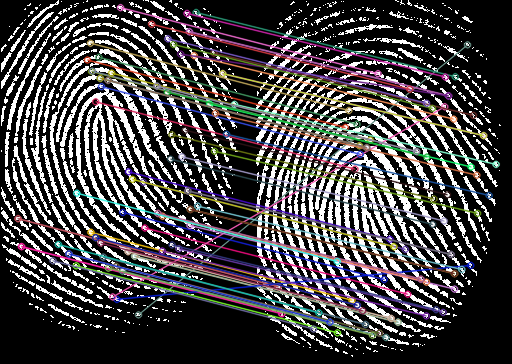
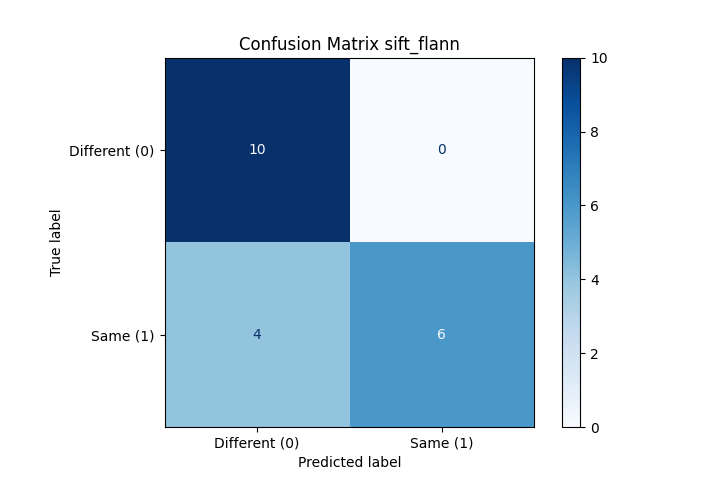
All “different” fingerprints were correctly classified as “different” (True Negatives). 4 “same” fingerprints were misclassified as “different” (False Negatives). 6 “same” fingerprints were correctly classified as “same” (True Positives). No “different” fingerprints were misclassified as “same” (False Positives = 0).
You can also implement SIFT with Brute-Force (BF) Matcher by replacing FLANN with cv2.BFMatcher(cv2.NORM_L2), as SIFT descriptors use Euclidean distance for matching. However, note that ORB cannot be used with FLANN since ORB descriptors are binary, whereas FLANN is optimized for floating-point descriptors like those from SIFT.
Experiment 2 (Dataset2)
Same Folder
In this implementation, we analyze fingerprint images within the same folder to see how consistently ORB and BFMatcher recognize matching fingerprints. Each folder contains 8 images of the same fingerprint, and we generate 28 unique pairwise comparisons within each folder (since we choose 2 images out of 8 without repetition nCr=8C2)
Syntax
import cv2
import numpy as np
import os
import matplotlib.pyplot as plt

def preprocess_fingerprint(image_path):
    img = cv2.imread(image_path, 0)
    _, img_bin = cv2.threshold(img, 0, 255, cv2.THRESH_BINARY_INV + cv2.THRESH_OTSU)
    return img_bin

def match_fingerprints(img1_path, img2_path):
    img1 = preprocess_fingerprint(img1_path)
    img2 = preprocess_fingerprint(img2_path)
    orb = cv2.ORB_create(nfeatures=1000)
    kp1, des1 = orb.detectAndCompute(img1, None)
    kp2, des2 = orb.detectAndCompute(img2, None)
    if des1 is None or des2 is None:
        return 0
    bf = cv2.BFMatcher(cv2.NORM_HAMMING, crossCheck=False)
    matches = bf.knnMatch(des1, des2, k=2)
    good_matches = [m for m, n in matches if m.distance < 0.7 * n.distance]
    return len(good_matches)

def compute_correct_and_incorrect_matches(dataset_path):
    fingerprint_match_counts = {}
    total_comparisons = {}
    for folder in sorted(os.listdir(dataset_path)):
        folder_path = os.path.join(dataset_path, folder)
        if os.path.isdir(folder_path):
            image_files = sorted([os.path.join(folder_path, f) for f in os.listdir(folder_path) if f.endswith(('.tif', '.png', '.jpg'))])
            correct_match_count = 0
            incorrect_match_count = 0
            total_comparisons_count = 0
            for i in range(len(image_files)):
                for j in range(i + 1, len(image_files)):
                    total_comparisons_count += 1
                    match_count = match_fingerprints(image_files[i], image_files[j])
                    if match_count > 0:  # If there are any good matches
                        correct_match_count += 1
                    else:
                        incorrect_match_count += 1
            fingerprint_match_counts[folder] = correct_match_count
            total_comparisons[folder] = total_comparisons_count
            print(f"Fingerprint ID: {folder}, Total Comparisons: {total_comparisons_count}, Correct Matches: {correct_match_count}, Incorrect Matches: {incorrect_match_count}")
    return fingerprint_match_counts, total_comparisons

def plot_stacked_bar_chart(fingerprint_match_counts, total_comparisons):
    fingerprint_ids = list(fingerprint_match_counts.keys())
    correct_matches = list(fingerprint_match_counts.values())
    incorrect_matches = [total_comparisons[fid] - correct_matches[i] for i, fid in enumerate(fingerprint_ids)]

    # Stacked bar chart
    plt.figure(figsize=(12, 6))
    plt.bar(fingerprint_ids, correct_matches, label='Correct Matches', color='green')
    plt.bar(fingerprint_ids, incorrect_matches, bottom=correct_matches, label='Incorrect Matches', color='red')
    plt.xlabel("Fingerprint ID")
    plt.ylabel("Number of Matches")
    plt.title("Correct and Incorrect Matches per Fingerprint ID")
    plt.legend()
    plt.xticks(rotation=45)
    plt.show()

dataset_path = r"C:\Users\ssabb\Desktop\opencv_courses\articles\FingerPrint\Data4"
fingerprint_match_counts, total_comparisons = compute_correct_and_incorrect_matches(dataset_path)
plot_stacked_bar_chart(fingerprint_match_counts, total_comparisons)
Inside each folder, unique image pairs are created using a nested loop that ensures no pair is repeated, and order does not matter (e.g., if image_1 is compared with image_2, then image_2 will not be compared with image_1 again).
A stacked bar chart is generated using matplotlib.pyplot to visualize the number of correct vs. incorrect matches for each fingerprint ID.
Correct matches are displayed in green, and incorrect matches in red, making it easy to see how well ORB + BF performs across different fingerprints. Since all pairs being compared are from the same fingerprint, ideally, all matches should be correct matches (high consistency).
Note: We executed the code on all four datasets by updating the dataset name. Simply replace “data1” with “data2”, “data3”, and “data4” in the code and run it separately for each dataset to obtain individual results.
Output
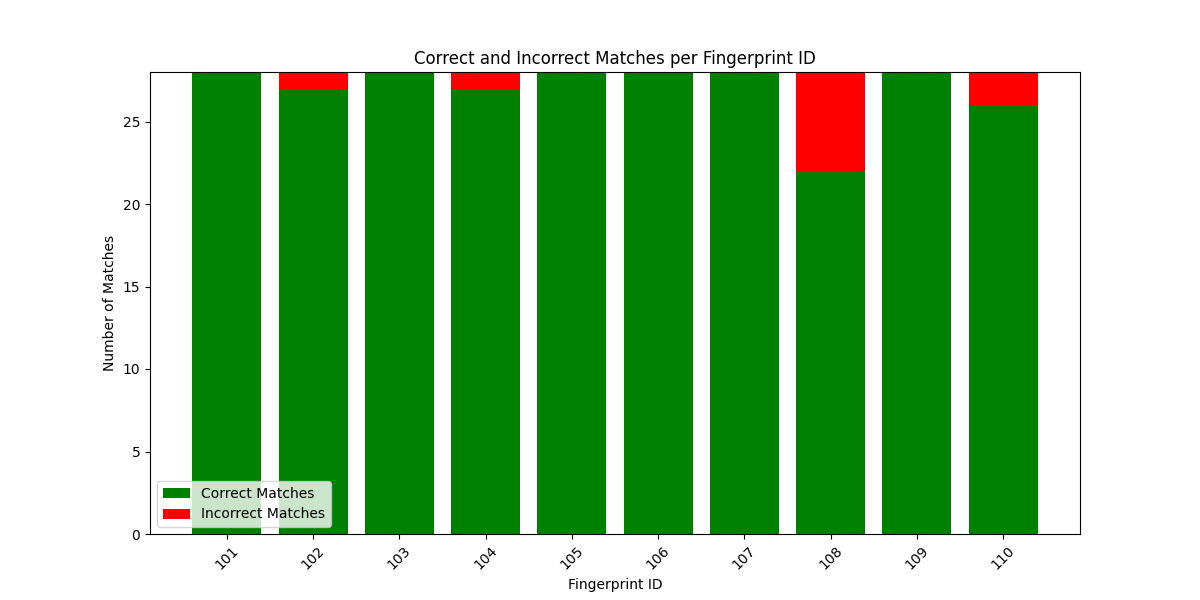
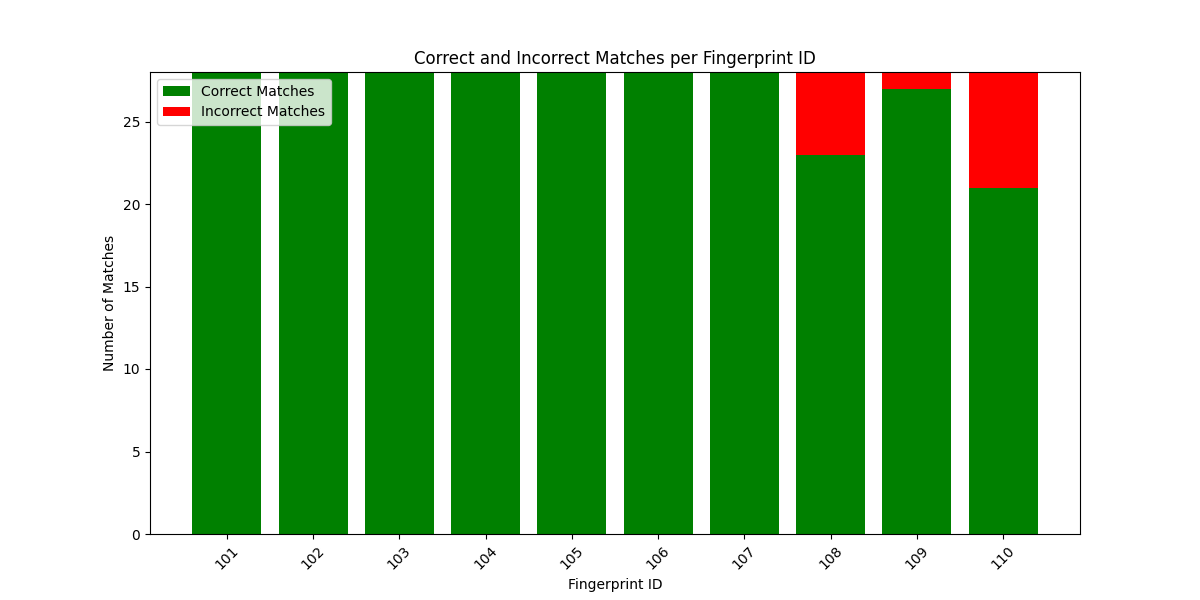
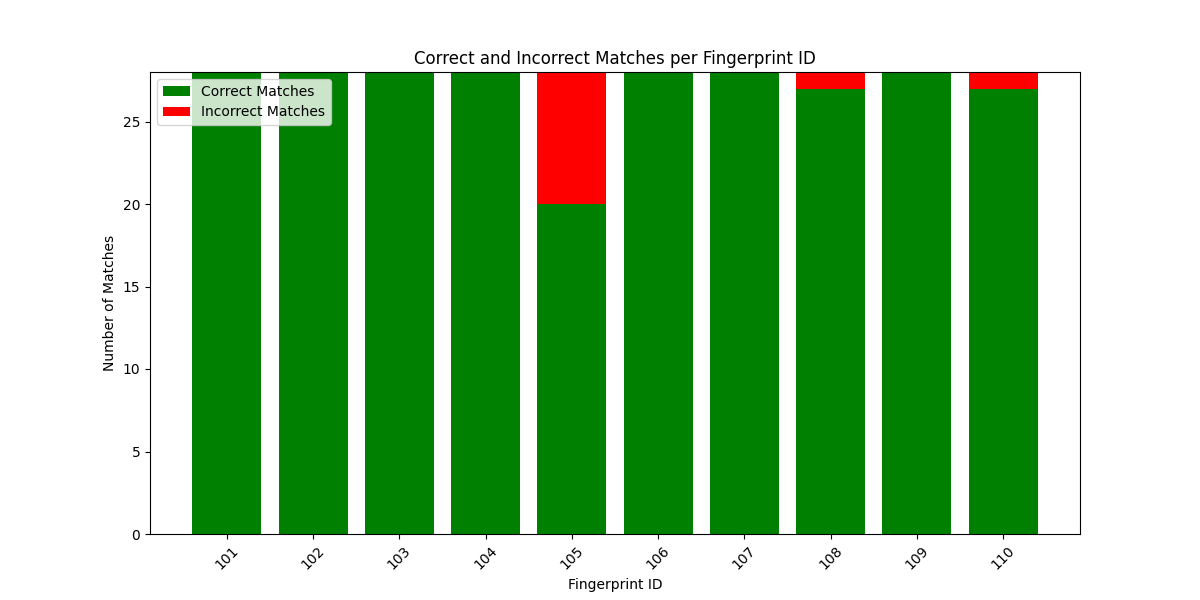
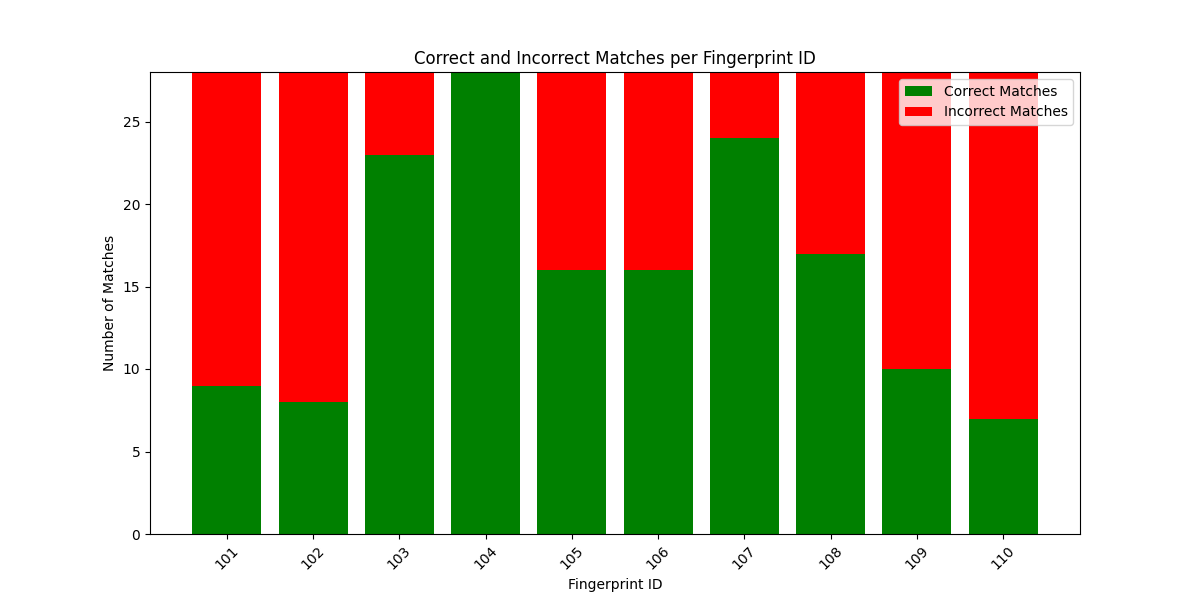
You can observe from the above outputs that except the last data set other datasets have almost been matched correctly. The last dataset shows more incorrect matches since the data is having high noise.
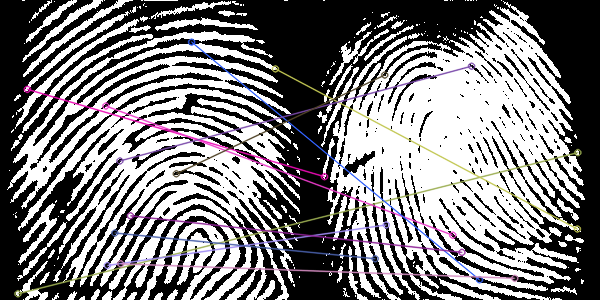
Different Folder
Now that we have matched fingerprints within the same folder, let’s extend the comparison to fingerprints from different folders. Since the fingerprints belong to different identities, incorrect matches are expected. In this case, the number of unique pairs is 64 (8 × 8).
Syntax
import cv2
import numpy as np
import os
import matplotlib.pyplot as plt

def preprocess_fingerprint(image_path):
    img = cv2.imread(image_path, 0)
    _, img_bin = cv2.threshold(img, 0, 255, cv2.THRESH_BINARY_INV + cv2.THRESH_OTSU)
    return img_bin

def match_fingerprints(img1_path, img2_path):
    img1 = preprocess_fingerprint(img1_path)
    img2 = preprocess_fingerprint(img2_path)
    orb = cv2.ORB_create(nfeatures=1000)
    kp1, des1 = orb.detectAndCompute(img1, None)
    kp2, des2 = orb.detectAndCompute(img2, None)
    if des1 is None or des2 is None:
        return 0
    bf = cv2.BFMatcher(cv2.NORM_HAMMING, crossCheck=False)
    matches = bf.knnMatch(des1, des2, k=2)
    good_matches = [m for m, n in matches if m.distance < 0.7 * n.distance]
    return len(good_matches)

def compute_correct_and_incorrect_matches(dataset_path):
    fingerprint_match_counts = {}
    total_comparisons = {}
    folders = sorted(os.listdir(dataset_path))
    num_folders = len(folders)

    # Iterate over the folders in pairs
    for i in range(num_folders // 2):
        folder_1 = folders[i]
        folder_2 = folders[num_folders - 1 - i]
        folder_1_path = os.path.join(dataset_path, folder_1)
        folder_2_path = os.path.join(dataset_path, folder_2)
        image_files_1 = sorted([os.path.join(folder_1_path, f) for f in os.listdir(folder_1_path) if f.endswith(('.tif', '.png', '.jpg'))])
        image_files_2 = sorted([os.path.join(folder_2_path, f) for f in os.listdir(folder_2_path) if f.endswith(('.tif', '.png', '.jpg'))])
        correct_match_count = 0
        incorrect_match_count = 0
        total_comparisons_count = 0

        # Compare images from folder_1 with folder_2
        for i in range(len(image_files_1)):
            for j in range(len(image_files_2)):
                total_comparisons_count += 1
                match_count = match_fingerprints(image_files_1[i], image_files_2[j])
                if match_count > 0:  # If there are any good matches, it's an incorrect match
                    incorrect_match_count += 1
                else:  # If no matches, it's a correct match (they are different images)
                    correct_match_count += 1
        fingerprint_match_counts[f"{folder_1}-{folder_2}"] = correct_match_count
        total_comparisons[f"{folder_1}-{folder_2}"] = total_comparisons_count
        print(f"Fingerprint Pair: {folder_1}-{folder_2}, Total Comparisons: {total_comparisons_count}, Correct Matches: {correct_match_count}, Incorrect Matches: {incorrect_match_count}")
    return fingerprint_match_counts, total_comparisons

def plot_stacked_bar_chart(fingerprint_match_counts, total_comparisons):
    fingerprint_pairs = list(fingerprint_match_counts.keys())
    correct_matches = list(fingerprint_match_counts.values())
    incorrect_matches = [total_comparisons[pair] - correct_matches[i] for i, pair in enumerate(fingerprint_pairs)]

    # Stacked bar chart
    plt.figure(figsize=(12, 6))
    plt.bar(fingerprint_pairs, correct_matches, label='Correct Matches', color='green')
    plt.bar(fingerprint_pairs, incorrect_matches, bottom=correct_matches, label='Incorrect Matches', color='red')
    plt.xlabel("Fingerprint ID Pairs")
    plt.ylabel("Number of Matches")
    plt.title("Correct and Incorrect Matches per Fingerprint Pair")
    plt.legend()
    plt.xticks(rotation=45)
    plt.show()

dataset_path = r"C:\Users\ssabb\Desktop\opencv_courses\articles\FingerPrint\Data4"
fingerprint_match_counts, total_comparisons = compute_correct_and_incorrect_matches(dataset_path)
plot_stacked_bar_chart(fingerprint_match_counts, total_comparisons)
Run the above code on all the datasets as mentioned above. This time the graph has more incorrect matches than good matches. We will be matching 101-110, 102-109, 103-108, 104-107 and 105-106
Output
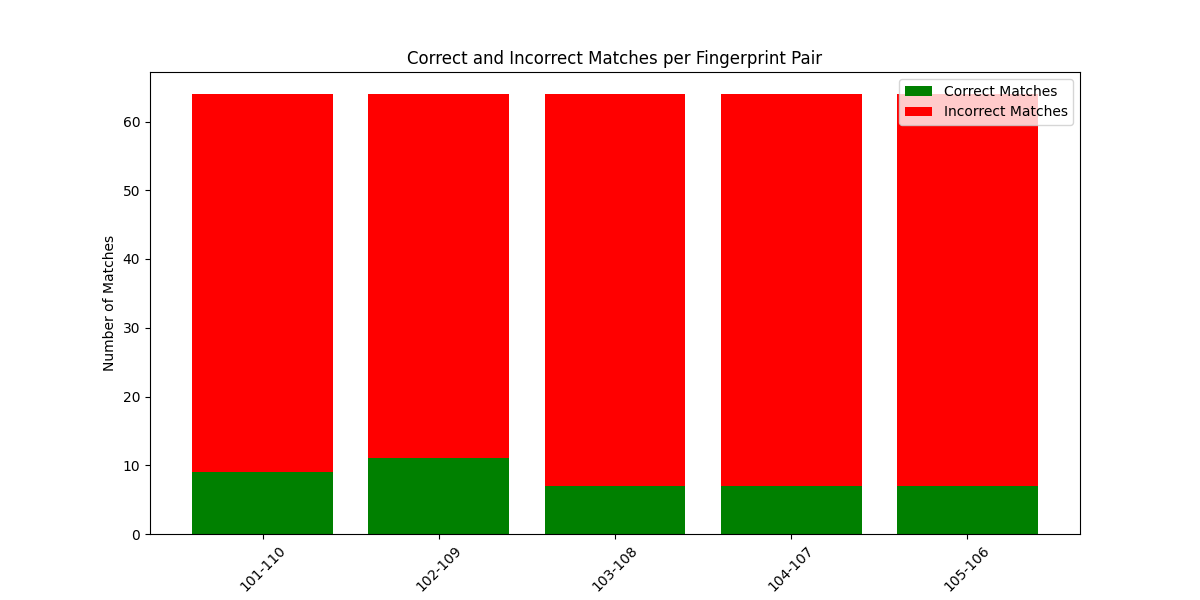

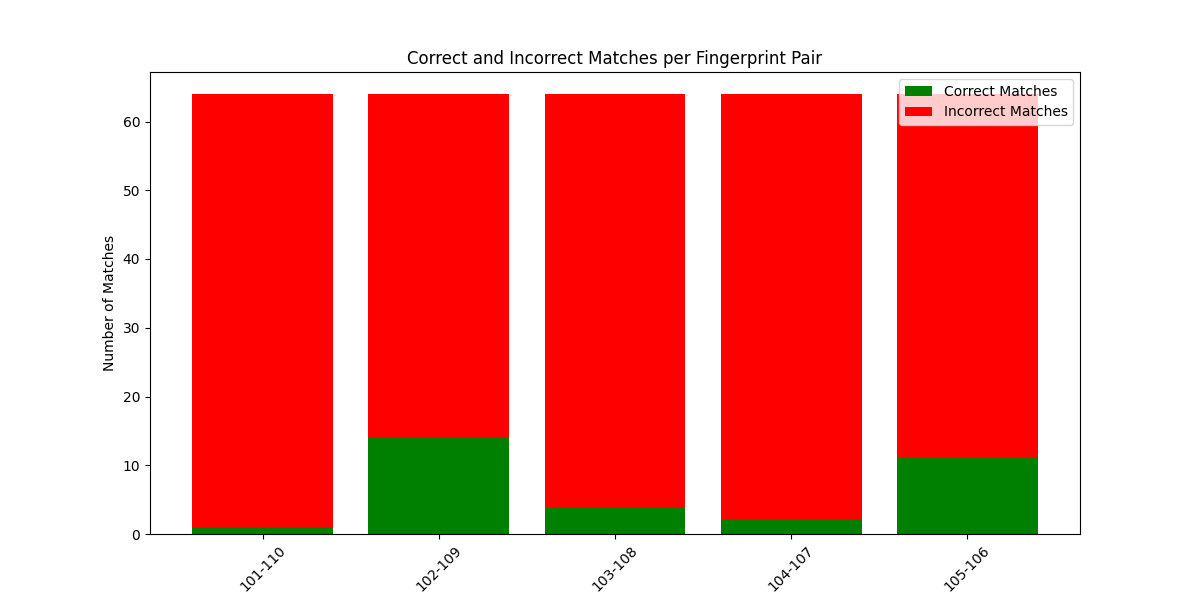
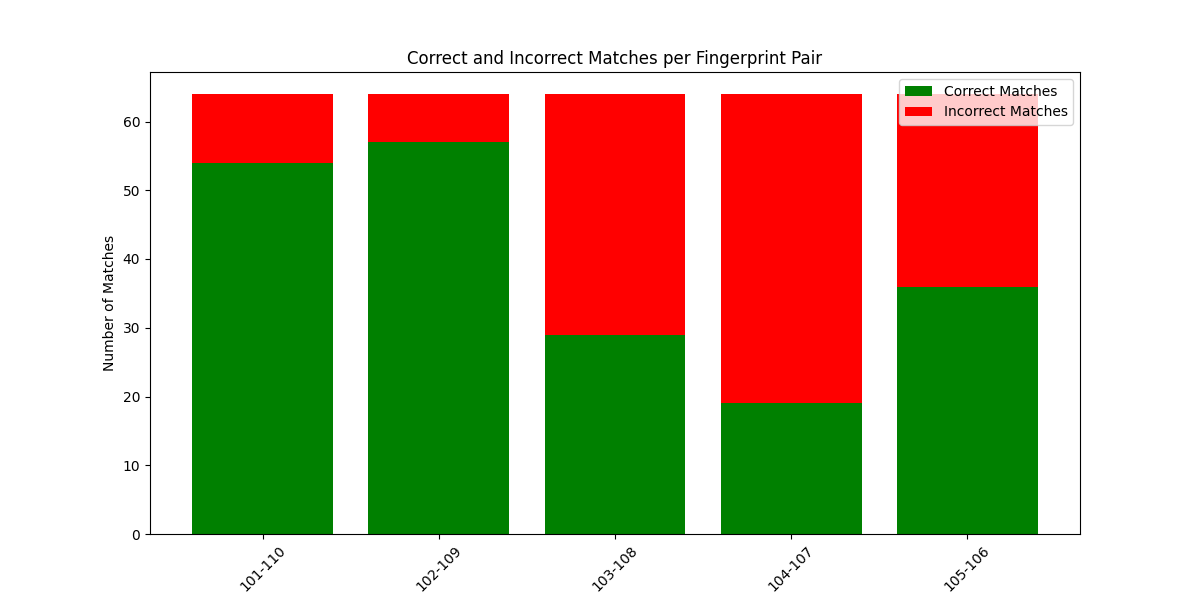
Here you can observe that data4 has matched more finger prints due to the corrupted data. The rest of the three datasets are mostly matched incorrectly which is as expected.
Summary
In this article we explored different feature extraction and matching algorithms, including ORB, SIFT, BFMatcher, and FLANN. We first applied ORB + BF and SIFT + FLANN on a paired dataset to evaluate how well feature matching works on fingerprint images. Then, we extended our experiment by applying ORB + BF to a larger dataset containing 80 images, where each fingerprint had 8 variations. Through these tests, we analyzed the performance of these techniques in real-world fingerprint matching scenarios. In conclusion, our experiments demonstrated that these methods are highly effective and form the foundation of large-scale fingerprint recognition systems.
Note:
This article is not intended for advanced biometric security implementations. It demonstrates how efficient OpenCV’s feature matching techniques (like ORB) can be even in complex applications such as fingerprint matching. The aim is to provide a foundational understanding using basic computer vision tools.
For this demonstration, the following references were used:
- Efficient Distorted Fingerprint Matching Using OpenCV and SIFT-FLANN Algorithm
- Fingerprint Recognition Using OpenCV (IEEE Reference)
For more advanced fingerprint recognition approaches, one of the widely used methods is minutiae-based fingerprint matching. You can read more about it here:
It’s fascinating how simple functions in OpenCV can be leveraged to build powerful applications. And this is just the beginning—unlock your potential and bring your ideas to life with our OpenCV course. Join now and redefine your possibilities!
Keep coding, keep CV-ing!


5K+ Learners
Join Free VLM Bootcamp3 Hours of Learning