Image cropping is a fundamental operation in image processing that involves selecting a specific region of interest (ROI) from an image and discarding the rest. This technique is widely used in various applications, such as object detection, face recognition, and image enhancement. OpenCV, a powerful open-source computer vision library, provides efficient methods for cropping images in both Python and C++. In this article, we will explore how to crop an image using OpenCV in both programming languages.
Table of contents
Import cv2
Before using any OpenCV functions, we must first import the library. This is the essential first step to access all OpenCV functionalities.
Python
# import the cv2 library
import cv2
C++
//Include Libraries
//OpenCV's cv::Mat acts like NumPy arrays for image processing.
#include<opencv2/opencv.hpp>
#include<iostream>
We are assuming that you have already installed OpenCV on your device.
If not please refer the relevant links below:
Example Image
Image Cropping Syntax using OpenCV
OpenCV does not have a dedicated function for image cropping. Instead, image cropping is done using array slicing (in Python) or ROI (Region of Interest) selection (in C++). Since an image is stored as a multi-dimensional array (a NumPy array in Python or cv::Mat in C++), you can crop an image by selecting a specific portion of this array.
By defining the height and width of the area you want to crop, you extract the specific region from the image. The process is straightforward and efficient because no extra processing function is required.
Refer this article of manipulating pixels for detailed understanding of image indexing – link
Python Syntax
cropped_img = img[y_start:y_end, x_start:x_end]
- img is a NumPy array representing the image.
- y_start:y_end defines the vertical range (height) to be cropped.
- x_start:x_end defines the horizontal range (width) to be cropped.
- The result is a new image (cropped_img) containing only the specified region.
This method is efficient because NumPy slicing does not copy data—it just references the original array.
C++ Syntax
cv::Mat cropped_img = img(cv::Rect(x_start, y_start, width, height));
- cv::Rect(x_start, y_start, width, height) defines a rectangular region of interest.
- x_start, y_start specify the top-left corner of the crop.
- width, height define the dimensions of the cropped area.
- cv::Mat cropped_img creates a new matrix containing the cropped portion.
OpenCV’s cv::Mat does not copy the cropped region by default—it references the original image unless explicitly cloned.
Cropping an Image
Image Cropping is an essential image processing technique that allows us to extract a specific region of an image. It is useful for focusing on a particular subject while removing unnecessary parts.
To manually crop an object from an image, we need to determine its position within the image. This is done by specifying the coordinates (x, y) and the width and height of the area we want to extract. Here we find these values through trial and error by visually inspecting the image and adjusting values.
Python Syntax
import cv2

# Load the image
img = cv2.imread("Original.png")

# Define the region of interest (ROI) - arbitrary coordinates
x_start, y_start, x_end, y_end = 400, 200, 850, 700  # Adjust as needed

# Crop the image using slicing
cropped_img = img[y_start:y_end, x_start:x_end]

# Show the original and cropped images
cv2.imshow("Original Image", img)
cv2.imshow("Cropped Image", cropped_img)
cv2.waitKey(0)
cv2.destroyAllWindows()
C++ Syntax
#include <opencv2/opencv.hpp>
#include<iostream>

int main() {

    // Load the image
    cv::Mat img = cv::imread("Original.png");
    if (img.empty()) {
        std::cout << "Could not load image!" << std::endl;
        return -1;
    }

    // Define the region of interest (ROI) - arbitrary coordinates
    int x_start = 400, y_start = 200, width = 850, height = 700;  // Adjust as needed

    // Crop the image using ROI
    cv::Rect roi(x_start, y_start, width, height);
    cv::Mat cropped_img = img(roi);

    // Show the original and cropped images
    cv::imshow("Original Image", img);
    cv::imshow("Cropped Image", cropped_img);
    cv::waitKey(0);
    cv::destroyAllWindows();
    return 0;
}
To define the region of interest (ROI), python uses NumPy slicing with img[y_start:y_end, x_start:x_end], where y_start:y_end specifies the height range and x_start:x_end specifies the width range. On the other hand, C++ uses OpenCV’s cv::Rect(x, y, width, height), where (x, y) represents the top-left corner of the crop, and width and height define its dimensions.
Output
User Selective Cropping
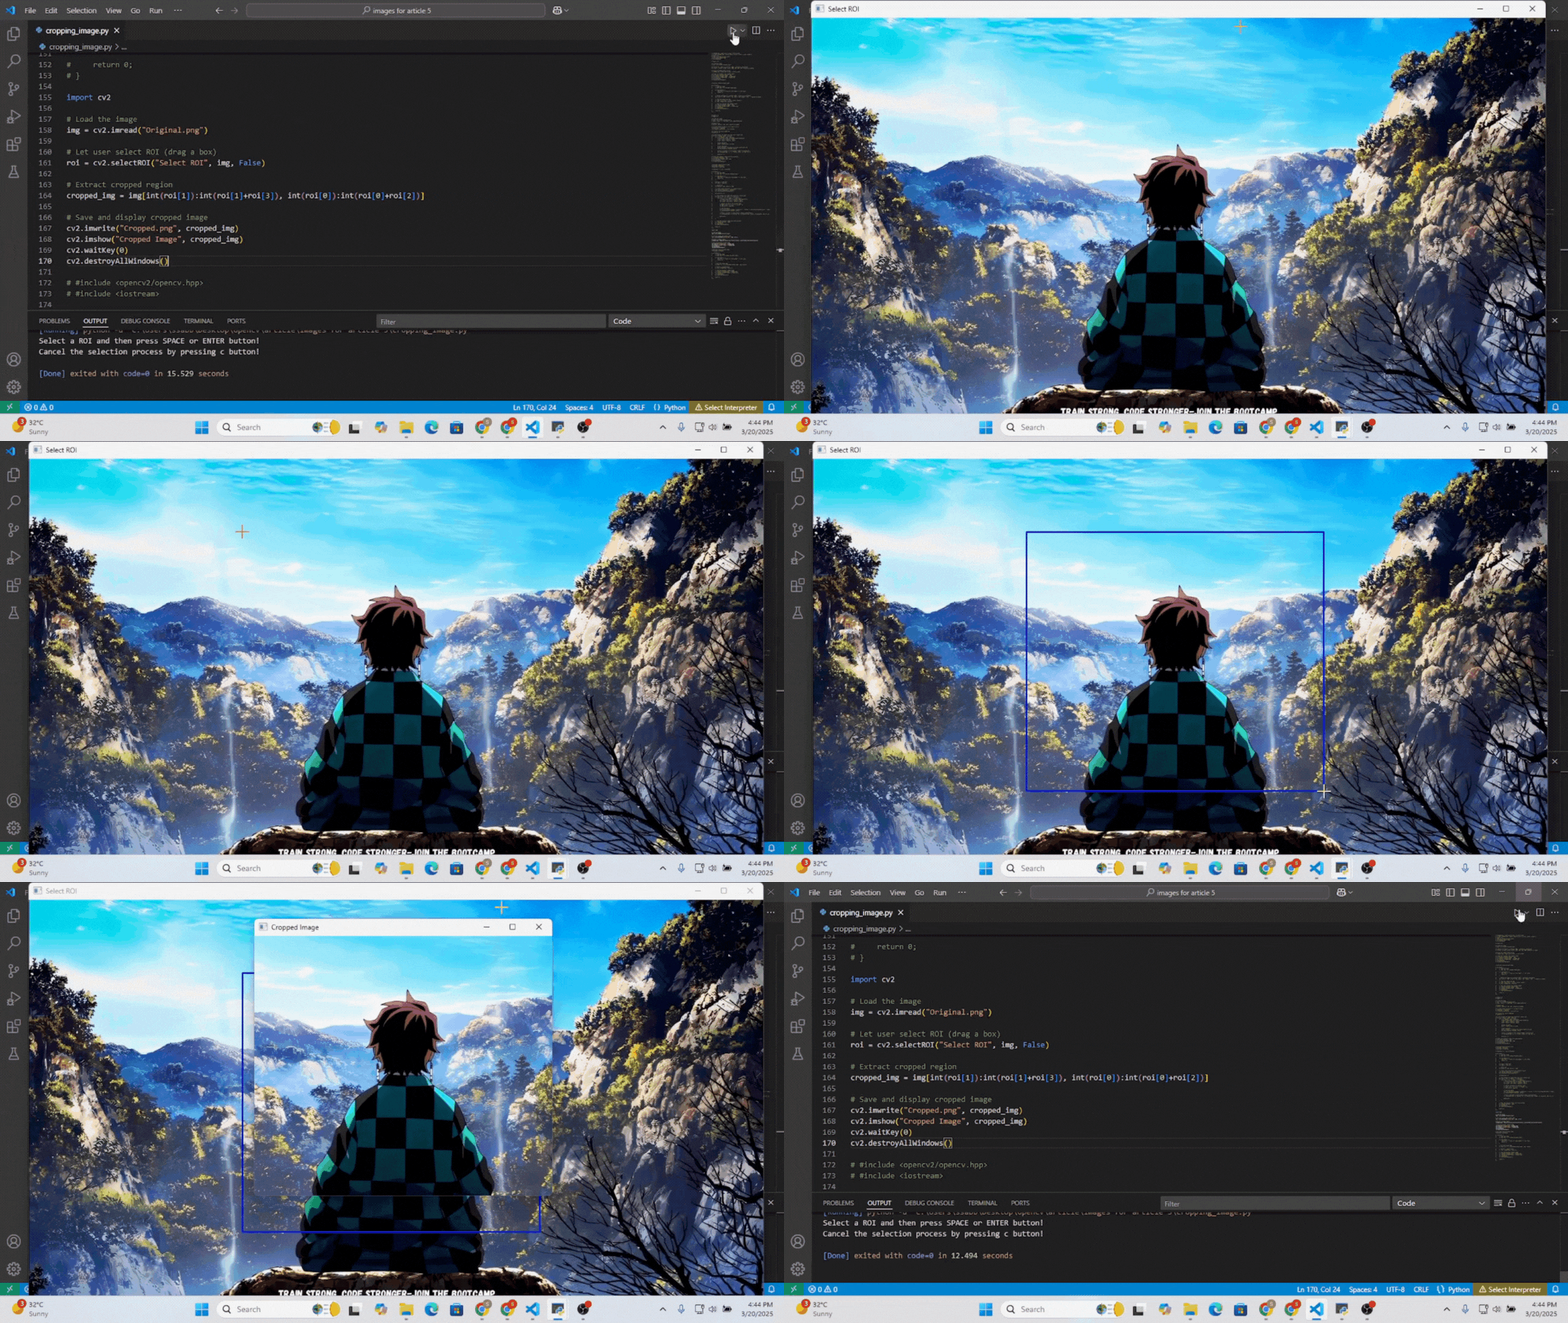
Sometimes, we need to crop specific regions in an image, but manually specifying coordinates is inefficient. OpenCV provides an interactive way to select the region of interest (ROI) dynamically. Instead of hardcoding pixel values, we can let the user click and drag to define the cropping area.
Python Syntax
import cv2

# Load the image
img = cv2.imread("Original.png")

# Let user select ROI (drag a box)
roi = cv2.selectROI("Select ROI", img, False)

# Extract cropped region
cropped_img = img[int(roi[1]):int(roi[1]+roi[3]), int(roi[0]):int(roi[0]+roi[2])]

# Save and display cropped image
cv2.imwrite("Cropped.png", cropped_img)
cv2.imshow("Cropped Image", cropped_img)
cv2.waitKey(0)
cv2.destroyAllWindows()
C++ Syntax
#include <opencv2/opencv.hpp>
#include <iostream>

int main() {

    // Load the image
    cv::Mat img = cv::imread("Original.png");
    if (img.empty()) {
        std::cout << "Could not load image!" << std::endl;
        return -1;
    }

    // Let user select ROI
    cv::Rect roi = cv::selectROI("Select ROI", img, false);

    // Extract cropped region
    cv::Mat cropped_img = img(roi);

    // Save and display cropped image
    cv::imwrite("Cropped.png", cropped_img);
    cv::imshow("Cropped Image", cropped_img);
    cv::waitKey(0);
    cv::destroyAllWindows();
    return 0;
}
The function cv2.selectROI() (Python) and cv::selectROI() (C++) allows the user to manually draw a selection box over the image.
- You click and drag to create a selection box.
- After drawing the box, you must press ENTER or SPACE to confirm the selection.
- If you press ESC, it will cancel the selection, and the function will return (0,0,0,0), which results in no cropping happening.
- If you click the ‘X’ button of the image window the code stops.
Output
Dividing the Image into Patches
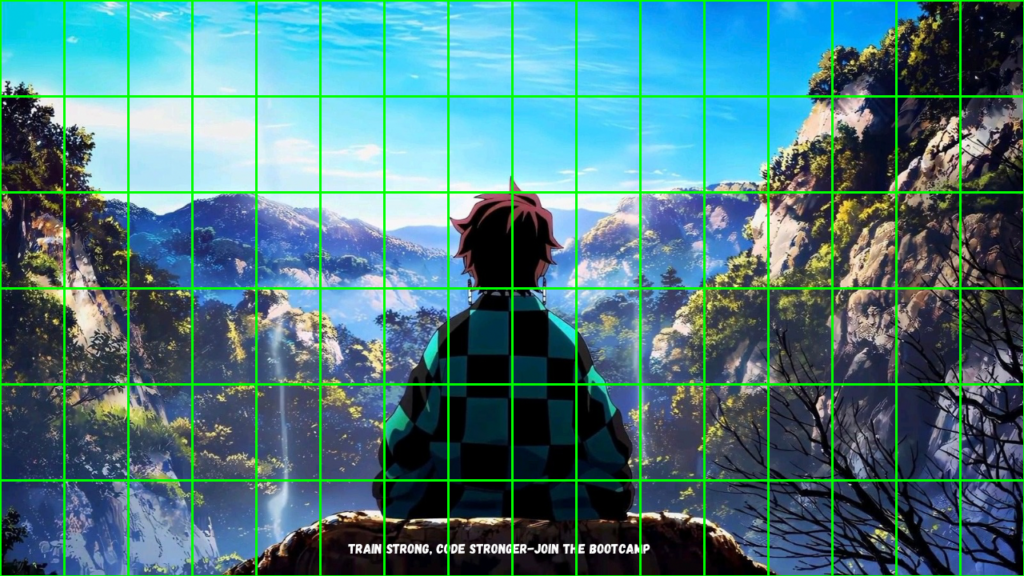
By breaking an image into smaller patches, we can analyze local features, improve model performance, and efficiently process large images while working with large deep learning models. OpenCV provides an easy way to extract patches using slicing in Python and Region of Interest (ROI) selection in C++. This approach ensures that the entire image is divided into equal-sized or adaptive patches, making it useful for training machine learning models or detecting small details in an image.
Python Syntax
import cv2
import os

# Load the image
img = cv2.imread("Original.png")
img_h, img_w, _ = img.shape  # Get image dimensions

# Patch size
patch_w, patch_h = 200, 200  # Adjust as needed

# Create output directory if it doesn't exist
output_dir = "patches"
os.makedirs(output_dir, exist_ok=True)

# Counter for patch numbering
patch_id = 0

# Loop through the image with step size = patch size
for y in range(0, img_h, patch_h):
    for x in range(0, img_w, patch_w):

        # Ensure patch does not exceed image boundaries
        x_end = min(x + patch_w, img_w)
        y_end = min(y + patch_h, img_h)

        # Crop the patch
        patch = img[y:y_end, x:x_end]

        # Save the patch
        patch_filename = f"{output_dir}/patch_{patch_id}.png"
        cv2.imwrite(patch_filename, patch)

        # Draw a rectangle on the original image (visualization)
        cv2.rectangle(img, (x, y), (x_end, y_end), (0, 255, 0), 2)
        patch_id += 1

# Show the original image with drawn patches
cv2.imshow("Patches", img)
cv2.waitKey(0)
cv2.destroyAllWindows()
C++ Syntax
#include <opencv2/opencv.hpp>
#include <iostream>
#include <filesystem>

namespace fs = std::filesystem;
int main() {

    // Load the image
    cv::Mat img = cv::imread("Original.png");
    if (img.empty()) {
        std::cout << "Could not load image!" << std::endl;
        return -1;
    }
    int img_h = img.rows;
    int img_w = img.cols;

    // Patch size
    int patch_w = 200, patch_h = 200;

    // Create output directory if it doesn't exist
    std::string output_dir = "patches";
    fs::create_directory(output_dir);
    int patch_id = 0;

    // Loop through the image with step size = patch size
    for (int y = 0; y < img_h; y += patch_h) {
        for (int x = 0; x < img_w; x += patch_w) {

            // Ensure patch does not exceed image boundaries
            int x_end = std::min(x + patch_w, img_w);
            int y_end = std::min(y + patch_h, img_h);

            // Define the Region of Interest (ROI)
            cv::Rect roi(x, y, x_end - x, y_end - y);
            cv::Mat patch = img(roi);

            // Save the patch
            std::string patch_filename = output_dir + "/patch_" + std::to_string(patch_id) + ".png";
            cv::imwrite(patch_filename, patch);

            // Draw a rectangle on the original image (visualization)
            cv::rectangle(img, cv::Point(x, y), cv::Point(x_end, y_end), cv::Scalar(0, 255, 0), 2);
            patch_id++;
        }
    }

    // Show the original image with drawn patches
    cv::imshow("Patches", img);
    cv::waitKey(0);
    cv::destroyAllWindows();
    return 0;
}
- The height and width of the image are retrieved to determine how many patches will be extracted. The patch size is defined as (patch_w, patch_h), and a loop is used to traverse the image, ensuring no areas are left out.
- In Python, slicing img[y:y_end, x:x_end] extracts the patch, while in C++, cv::Rect(x, y, width, height) defines the ROI, which is then cropped using cv::Mat patch = img(roi).
- The cropped patches are saved separately in a “patches” folder using cv2.imwrite() in Python and cv::imwrite() in C++. Additionally, rectangles are drawn on the original image to visualize the patches using cv2.rectangle() in both implementations.
These patches from the image are useful for training a patch-based neural network.
Output
Key Takeaways
- Basic image cropping uses array slicing in Python and cv::Rect in C++ to manually define a region of interest.
- User-selective image cropping with cv2.selectROI() enables interactive selection, allowing users to drag a box to define the area.
- Patch-based image cropping helps divide images into smaller sections, useful for deep learning, object detection, and data augmentation.
Summary
In this article, we explored multiple image cropping methods using OpenCV in both Python and C++, starting with basic manual cropping using array slicing and cv::Rect, followed by interactive user-selective cropping with cv2.selectROI(), enabling dynamic selection. We also discussed patch-based cropping for dividing images into smaller sections, useful in deep learning and object detection.


5K+ Learners
Join Free VLM Bootcamp3 Hours of Learning