
Graphical User Interfaces (GUIs) are essential for interactive computer vision, enabling developers to visualize results, adjust parameters, and interact with applications in real time. While frameworks like PyQt and Tkinter are powerful, OpenCV’s HighGUI module offers a lightweight, cross-platform solution that integrates seamlessly with OpenCV, making it ideal for quick experiments, prototyping, and debugging. HighGUI allows developers to create interactive windows, handle mouse and keyboard events, and use trackbars or sliders for live parameter tuning. Beyond simple image display, it supports custom tools like checkboxes, radio buttons, zooming, color picking, and canvas clearing, bridging the gap between algorithm development and engaging design for tasks such as annotation, segmentation, or real-time image processing.
Table of contents
What is OpenCV HighGUI?
HighGUI (High-level Graphical User Interface) is a core module in OpenCV that provides the fundamental tools for interacting with images, videos, and users in real time. It serves as the visual front-end for OpenCV applications, enabling us to open windows, render images, capture camera feeds, respond to mouse and keyboard input, and create simple UI elements such as sliders and buttons.
Why Use OpenCV HighGUI?
Although OpenCV focuses on image processing, HighGUI enhances it by adding interactivity without needing external GUI frameworks. It enables rapid prototyping of vision algorithms through real-time parameter adjustments, visual debugging of multi-stage image processing, and intuitive interaction via mouse and keyboard callbacks for tasks like drawing ROIs or selecting objects. HighGUI also allows quick real-time visualization with minimal setup, offering a lightweight, cross-platform solution ideal for research prototypes, educational demos, and computer vision tools.
Python Implementation of OpenCV GUI
OpenCV provides basic GUI functionality for displaying images, capturing user input (keyboard/mouse), and creating simple interactive controls such as trackbars. It also allows handling window events and building lightweight, responsive interfaces. These features make it easy to prototype hands-on computer vision workflows directly in Python.
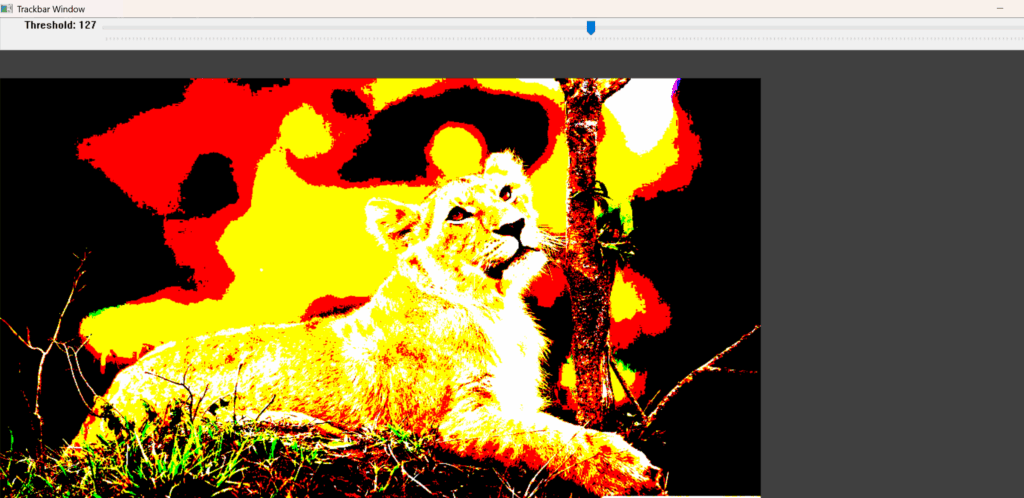
1. Code: Threshold Trackbar Demo
The code demonstrates dynamic thresholding using a trackbar.
OpenCV GUI Functions:
- cv2.namedWindow(‘Trackbar Window’): Window for showing thresholded image
- cv2.createTrackbar(‘Threshold’, ‘Trackbar Window’, 0, 255, nothing): Slider to change the threshold
- cv2.getTrackbarPos(): Get current value of threshold
- cv2.threshold(img, threshold_value, 255, cv2.THRESH_BINARY) : Apply threshold
- cv2.imshow(): Display the thresholded image
- cv2.waitKey(1): Loop until ESC
Explanation:
- Moving the trackbar instantly updates the threshold applied to the image.
- This demonstrates real-time image processing with OpenCV GUI.
cv2.namedWindow('Trackbar Window')
cv2.createTrackbar('Threshold', 'Trackbar Window', 0, 255, nothing)

while True:
    threshold_value = cv2.getTrackbarPos('Threshold', 'Trackbar Window')
    _, thresh_img = cv2.threshold(img, threshold_value, 255, cv2.THRESH_BINARY)
    cv2.imshow('Trackbar Window', thresh_img)

    if cv2.waitKey(1) & 0xFF == 27:  # ESC key
        break

cv2.destroyAllWindows()
OUTPUT IMAGE:
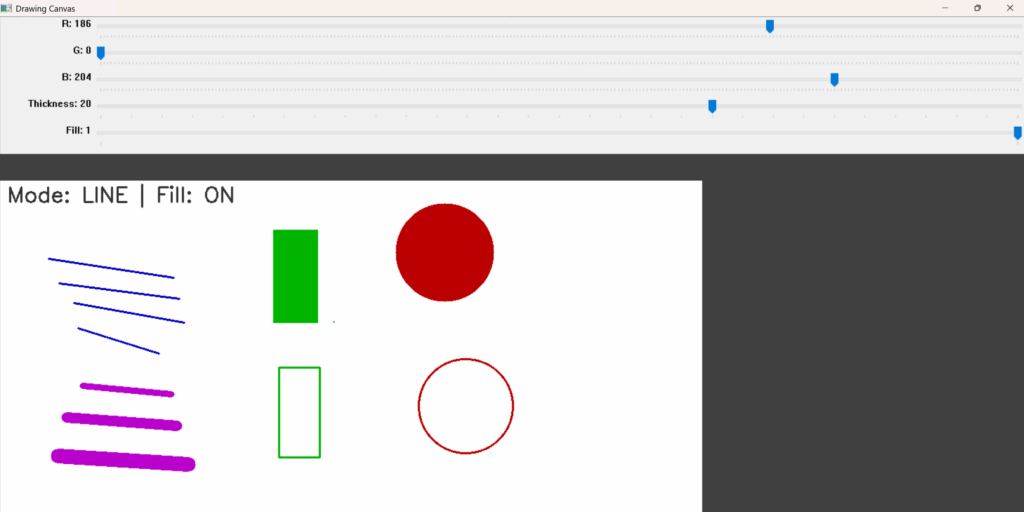
2. Code: Drawing Canvas with Mouse events & Trackbars
This code implements a mini paint program.
OpenCV GUI Functions Used:
- cv2.namedWindow(‘Drawing Canvas’) : Create the main window
- cv2.createTrackbar(‘R’, ‘Drawing Canvas’, 0, 255, nothing) : Trackbars for RGB colors
- cv2.setMouseCallback(‘Drawing Canvas’, draw_shape) : Track mouse events
- cv2.imshow(‘Drawing Canvas’, canvas) : Show the canvas
- cv2.waitKey(1) : Capture keyboard input in a loop
- cv2.putText() : Display the current mode and fill status
- cv2.imwrite() : Save the image
How it works:
- Trackbars set color, thickness, and fill.
- Mouse events handle drawing:
- EVENT_LBUTTONDOWN: start drawing and save undo state
- EVENT_MOUSEMOVE: show shape while dragging
- EVENT_LBUTTONUP: finalize shape
- Keyboard shortcuts:
- r, c, l, e: change tool
- z: undo, y: redo
- x: clear canvas
- s: save
- ESC: exit
This is a full-featured GUI painting application using OpenCV.
def draw_shape(event, x, y, flags, param):
    global start_x, start_y, drawing, mode, canvas, undo_stack

    r = cv2.getTrackbarPos('R', 'Drawing Canvas')
    g = cv2.getTrackbarPos('G', 'Drawing Canvas')
    b = cv2.getTrackbarPos('B', 'Drawing Canvas')
    thickness = cv2.getTrackbarPos('Thickness', 'Drawing Canvas')
    fill = cv2.getTrackbarPos('Fill', 'Drawing Canvas') == 1

    color = (b, g, r)
    actual_thickness = -1 if fill and mode in ['rectangle', 'circle'] else thickness

    if event == cv2.EVENT_LBUTTONDOWN:
        drawing = True
        start_x, start_y = x, y
        undo_stack.append(canvas.copy())

    elif event == cv2.EVENT_MOUSEMOVE and drawing:
        temp_canvas = canvas.copy()
        if mode == 'rectangle':
            cv2.rectangle(temp_canvas, (start_x, start_y), (x, y), color, actual_thickness)
        elif mode == 'circle':
            radius = int(((x - start_x)**2 + (y - start_y)**2)**0.5)
            cv2.circle(temp_canvas, (start_x, start_y), radius, color, actual_thickness)
        elif mode == 'line':
            cv2.line(temp_canvas, (start_x, start_y), (x, y), color, thickness)
        elif mode == 'eraser':
            cv2.line(temp_canvas, (start_x, start_y), (x, y), (255, 255, 255), thickness)
        cv2.imshow('Drawing Canvas', temp_canvas)

    elif event == cv2.EVENT_LBUTTONUP:
        drawing = False
        if mode == 'rectangle':
            cv2.rectangle(canvas, (start_x, start_y), (x, y), color, actual_thickness)
        elif mode == 'circle':
            radius = int(((x - start_x)**2 + (y - start_y)**2)**0.5)
            cv2.circle(canvas, (start_x, start_y), radius, color, actual_thickness)
        elif mode == 'line':
            cv2.line(canvas, (start_x, start_y), (x, y), color, thickness)
        elif mode == 'eraser':
            cv2.line(canvas, (start_x, start_y), (x, y), (255, 255, 255), thickness)
OUTPUT IMAGE:
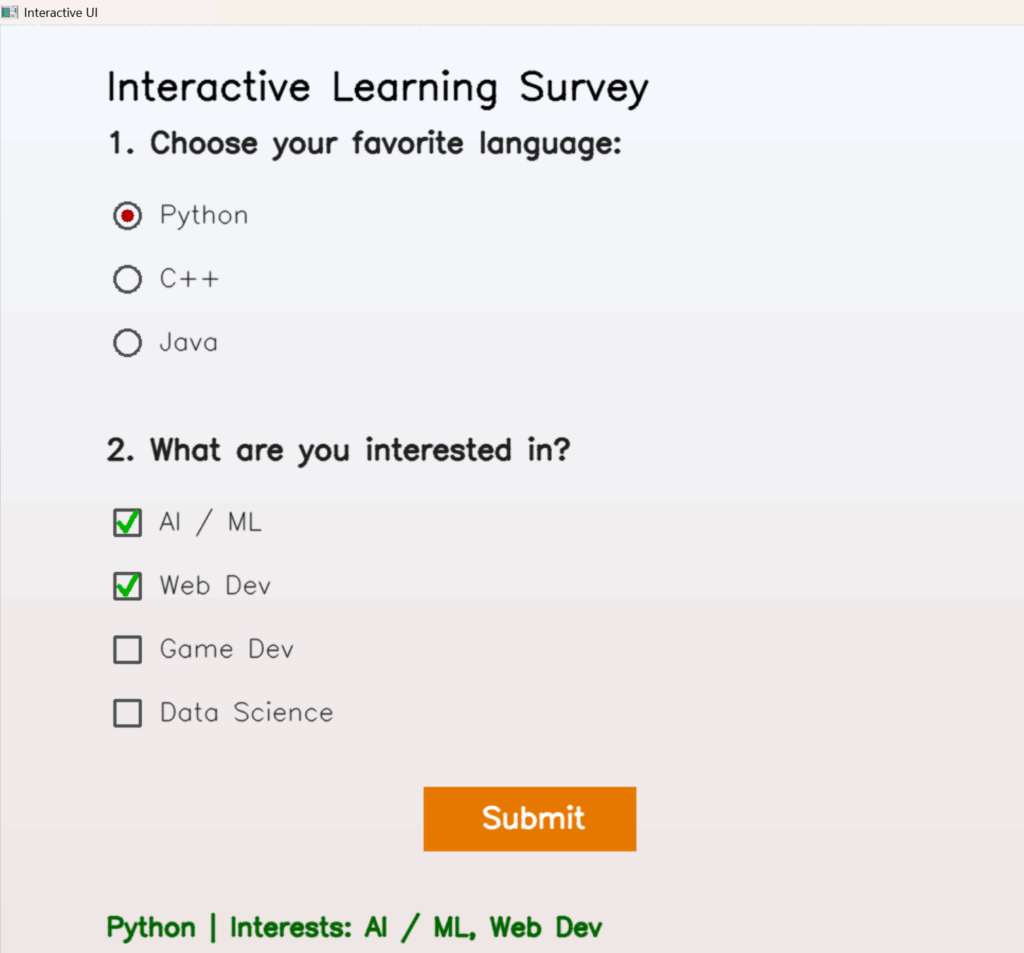
3. Code: Radio Buttons and Checkboxes UI
The code features: radio buttons for language selection, checkboxes for selecting interests, and a submit button that displays the selected choices.
OpenCV GUI Functions Used:
- cv2.namedWindow( cv2.WINDOW_AUTOSIZE) : Main UI window
- cv2.setMouseCallback(): Handle clicks
- cv2.putText(): Draw labels
- cv2.rectangle(): Draw buttons and checkboxes
- cv2.circle(): Draw radio buttons
- cv2.imshow(): Display the UI
How it works:
- UI is drawn manually using rectangles/circles/text on a numpy array (img).
- Mouse clicks detect positions and update state (selected language/interests).
- The submit button displays the message at the bottom.
This manual GUI system demonstrates that OpenCV can be used to build intuitive apps, not just for image processing.


def draw_ui():
    draw_gradient_background()
    draw_text("Interactive Learning Survey", (margin_x, 70), 1.2, (0, 0, 0), bold=True)

    # Radio Buttons
    y = margin_y
    draw_text("1. Choose your favorite language:", (margin_x, y), 0.9, bold=True)
    y += line_gap
    for lang in languages:
        draw_radio(margin_x + 20, y, lang, selected_language == lang)
        y += line_gap

    # Checkboxes
    y += section_gap - 20
    draw_text("2. What are you interested in?", (margin_x, y), 0.9, bold=True)
    y += line_gap
    for interest in interests:
        draw_checkbox(margin_x + 20, y, interest, interest in selected_interests)
        y += line_gap

    # Submit Button
    btn_w, btn_h = 200, 60
    btn_x, btn_y = WIDTH // 2 - btn_w // 2, HEIGHT - 180
    cv2.rectangle(img, (btn_x, btn_y), (btn_x + btn_w, btn_h), BTN_COLOR, -1)
    draw_text("Submit", (btn_x + 55, btn_y + 38), 0.9, (255, 255, 255), bold=True)

    # Output message
    if message:
        draw_text(message, (margin_x, HEIGHT - 40), 0.8, (0, 100, 0), bold=True)

    return btn_x, btn_y, btn_w, btn_h


def mouse_callback(event, x, y, flags, param):
    global selected_language, selected_interests, message

    if event == cv2.EVENT_LBUTTONDOWN:

        # Handle Radio Button Clicks
        y_pos = margin_y + line_gap
        for lang in languages:
            if (margin_x + 20 - 15) <= x <= (margin_x + 20 + 15) and (y_pos - 15) <= y <= (y_pos + 15):
                selected_language = lang
            y_pos += line_gap

        # Handle Checkboxes
        y_pos = margin_y + (len(languages) + 2) * line_gap + 50
        for interest in interests:
            if (margin_x + 20 - 15) <= x <= (margin_x + 20 + 15) and (y_pos - 15) <= y <= (y_pos + 15):
                if interest in selected_interests:
                    selected_interests.remove(interest)
                else:
                    selected_interests.append(interest)
            y_pos += line_gap

        # Handle Submit Button
        btn_x, btn_y, btn_w, btn_h = WIDTH // 2 - 100, HEIGHT - 180, 200, 60
        if btn_x <= x <= btn_x + btn_w and btn_y <= y <= btn_y + btn_h:
            if not selected_language:
                message = "Please select a language first!"
            else:
                interests_text = ", ".join(selected_interests) if selected_interests else "None"
                message = f"{selected_language} | Interests: {interests_text}"
OUTPUT IMAGE:
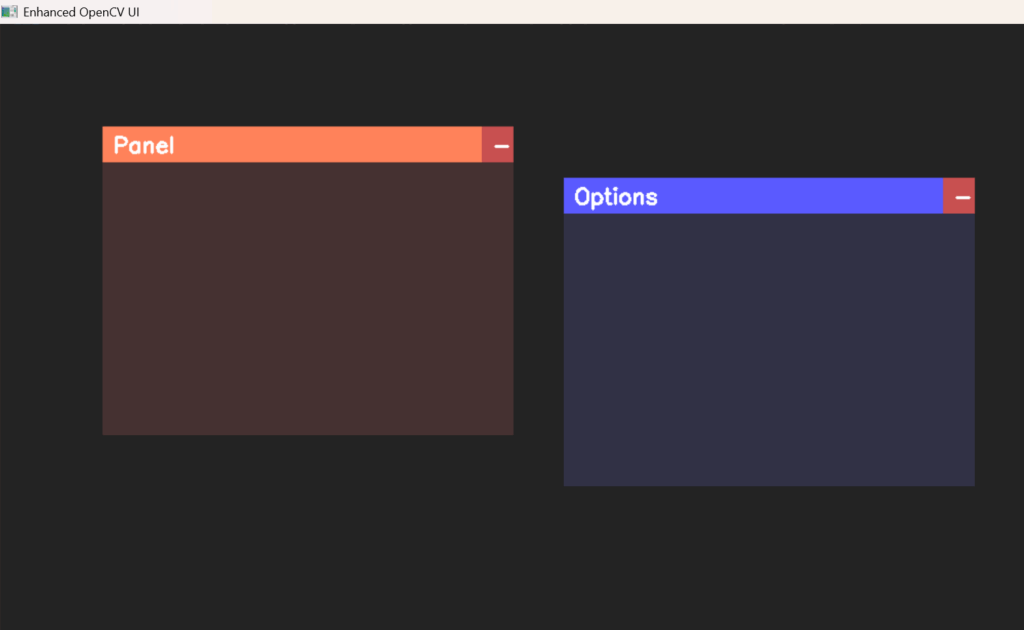
4. Code: EnhancedWindow Class (Custom Floating Panels)
This code implements draggable, minimizable windows in OpenCV.
OpenCV GUI Functions Used:
- cv2.namedWindow(window_name) : Main window
- cv2.setMouseCallback(window_name, mouse_callback) : Handle dragging and buttons
- cv2.rectangle(): Draw window frame and content area
- cv2.putText(): Draw title and symbols (+/-)
- cv2.imshow(window_name, frame) : Display frame
- cv2.waitKey(): Loop until ESC
How it works:
- Mouse down inside the window: start dragging
- Mouse up : stop dragging
- The minimize button toggles the visibility of the content area
- Window positions are clamped inside the main frame
This is a custom GUI window system built entirely with OpenCV.
class EnhancedWindow:
    def __init__(self, x, y, width, height, title, color=(60, 60, 60), title_color=(100, 100, 255)):
        self.x = x
        self.y = y
        self.width = width
        self.height = height
        self.title = title
        self.color = color
        self.title_color = title_color
        self.minimized = False
        self.dragging = False
        self.offset_x = 0
        self.offset_y = 0
        self.title_bar_height = 35

    def inside(self, mx, my):
        return self.x <= mx <= self.x + self.width and self.y <= my <= self.y + self.height

    def handle_mouse(self, event, mx, my, flags):
        # Minimize button area
        minimize_btn_area = (self.x + self.width - 30, self.y,
                             self.x + self.width, self.y + self.title_bar_height)

        if event == cv2.EVENT_LBUTTONDOWN:
            # Click minimize/maximize
            if minimize_btn_area[0] <= mx <= minimize_btn_area[2] and minimize_btn_area[1] <= my <= minimize_btn_area[3]:
                self.minimized = not self.minimized
            # Start dragging
            elif self.inside(mx, my):
                self.dragging = True
                self.offset_x = mx - self.x
                self.offset_y = my - self.y

        elif event == cv2.EVENT_LBUTTONUP:
            self.dragging = False

        elif event == cv2.EVENT_MOUSEMOVE and self.dragging:
            # Update window position
            self.x = mx - self.offset_x
            self.y = my - self.offset_y

    def draw(self, frame):
        # Keep inside screen bounds
        h, w = frame.shape[:2]
        self.x = np.clip(self.x, 0, w - self.width)
        self.y = np.clip(self.y, 0, h - self.title_bar_height)

        # Title bar
        cv2.rectangle(frame, (self.x, self.y),
                      (self.x + self.width, self.y + self.title_bar_height),
                      self.title_color, -1)

        # Minimize/Expand button
        cv2.rectangle(frame, (self.x + self.width - 30, self.y),
                      (self.x + self.width, self.y + self.title_bar_height),
                      (80, 80, 200), -1)

        # Symbol
        btn_symbol = '+' if self.minimized else '-'
        cv2.putText(frame, btn_symbol, (self.x + self.width - 20, self.y + 25),
                    cv2.FONT_HERSHEY_SIMPLEX, 0.7, (255, 255, 255), 2)

        # Title text
        cv2.putText(frame, self.title, (self.x + 10, self.y + 25),
                    cv2.FONT_HERSHEY_SIMPLEX, 0.7, (255, 255, 255), 2)

        # Content area (only if expanded)
        if not self.minimized:
            cv2.rectangle(frame,
                          (self.x, self.y + self.title_bar_height),
                          (self.x + self.width, self.y + self.height),
                          self.color, -1)
OUTPUT IMAGE:
C++ Implementation of OpenCV GUI
After exploring OpenCV’s GUI functionality in Python, let’s now move on to its C++ implementations. To run these examples in C++, ensure your system is configured correctly with OpenCV.
Install and configure your compiler
Full C++ code samples for all the sections are available in the download link.
Beyond HighGUI: Using PyQt and Other GUI Frameworks
While OpenCV HighGUI is excellent for quick visualization and debugging, it’s limited when building full-featured or polished applications. To create advanced interfaces, developers often combine OpenCV with external libraries like PyQt, Tkinter, or DearPyGui.
Using PyQt, we can embed OpenCV video streams inside modern UI windows, add buttons, sliders, and menus, or manage multi-threaded camera feeds without freezing. This enables the development of real-time tools such as face recognition apps, annotation interfaces, and live filter dashboards.
Other frameworks, like Tkinter for simplicity, DearPyGui for GPU-accelerated dashboards, or Streamlit/Gradio for web-based apps, also extend OpenCV’s interactivity far beyond what HighGUI alone can offer.
In short, HighGUI is ideal for quick demos, but pairing it with PyQt or similar toolkits unlocks professional-grade, computer vision applications.
Summary
We explored how OpenCV HighGUI moves computer vision beyond static image processing into truly interactive visual experiences. We started with the basics, such as imshow, trackbars, and mouse callbacks, and then we built them into practical mini-applications, including a live threshold controller, a drawing canvas with color sliders, a responsive survey form, and even draggable custom windows. All of these were recreated in C++ as well.
These demos highlight how HighGUI can go far beyond debugging, enabling creative, real-time interactions directly within OpenCV. And by extending it with frameworks like PyQt, Tkinter, or DearPyGui, we can move from quick prototypes to modern, full-featured computer vision applications.

5K+ Learners
Join Free VLM Bootcamp3 Hours of Learning