

OpenCV.js enables real-time webcam filters in the browser, allowing advanced computer vision effects without installations or native dependencies. From face blurring to artistic effects, it offers powerful visual processing. Powered by WebAssembly, OpenCV.js delivers near-native performance for smooth, complex transformations. This blog covers building live webcam filters with OpenCV.js, from setup to advanced effects, all in JavaScript and WebAssembly, making professional-grade vision accessible online.
Table of contents
1. What is OpenCV.js?
1.1 OpenCV + WebAssembly
OpenCV.js is the JavaScript/WebAssembly port of the OpenCV library. By compiling OpenCV into WebAssembly, it enables operations such as image filtering, matrix math, and video capture to run directly in the browser without requiring native binaries or plugins.
1.2 Why use OpenCV.js in the browser?
Before OpenCV.js, most computer vision tasks had to run on a backend using Python or C++ OpenCV, causing latency and making real-time interaction difficult. In-browser options like JSFeat or HAAR.js were limited, and older plugin-based methods were insecure or deprecated.
With OpenCV.js, real-time image and video processing runs directly in the browser on any device, integrates smoothly with HTML/Canvas for interactive UI elements, and supports webcam filters, face detection, and other creative visual effects without extra installations.
1.3 Key capabilities & limitations
Capabilities: Supports image filtering, matrix operations, webcam capture, basic deep-model inference, UI interactions, and Canvas rendering.
Limitations: Performance varies by device and browser; large models may load slowly; some native OpenCV features are missing; and WebAssembly can struggle on low-end hardware.
With the fundamentals in place, let’s move on to implementation and begin creating real-time webcam filters with OpenCV.js.
2. JavaScript & OpenCV.js Engine
2.1. Accessing the Webcam
The app begins by initializing the webcam using the Web Media API: The browser requests webcam permission and streams the camera feed into the <video> element, which begins autoplaying as soon as access is granted.
const stream = await navigator.mediaDevices.getUserMedia({
    video: { width: W, height: H },
    audio: false
});
video.srcObject = stream;
video.playsInline = true;
video.muted = true;
await video.play();
2.2. Waiting for OpenCV Runtime
Before we start using any OpenCV functionality, the WebAssembly backend must be fully initialized. OpenCV.js takes a few seconds to compile its low-level modules inside the browser. Only once this callback fires, we can safely use OpenCV functions like cv.imread() or cv.cvtColor(). OpenCV.js loads and compiles its WASM modules; the Haar cascade is loaded into the virtual file system, the webcam starts, and frame processing begins immediately.
cv['onRuntimeInitialized'] = async () => {
    console.log("OpenCV ready!");
    await loadHaarCascade();
    startCamera();
    requestAnimationFrame(processFrame);
};
2.3. Loading the Haar cascade Model (Face Blur)
The face detection feature uses a Haar cascade XML file containing pre-trained data for recognizing facial patterns. This file is first downloaded using fetch() and then stored in OpenCV’s in-memory filesystem using cv.FS_createDataFile(). Then, CascadeClassifier.load() loads the model, enabling real-time face detection in the webcam stream.
This enables offline, fully in-browser face detection without external servers.
async function loadHaarCascade() {
        console.log("Loading Haarcascade...");
        faceCascade = new cv.CascadeClassifier();

        let response = await fetch("haarcascade_frontalface_default.xml");
        let data = await response.text();

        cv.FS_createDataFile("/", "haarcascade_frontalface_default.xml", data, true, false);

        faceCascade.load("haarcascade_frontalface_default.xml");
        console.log("Haarcascade loaded!");
    }
3. Filter Implementations – Deep Dive
Each filter is modular and customizable. Let’s look at how they work.
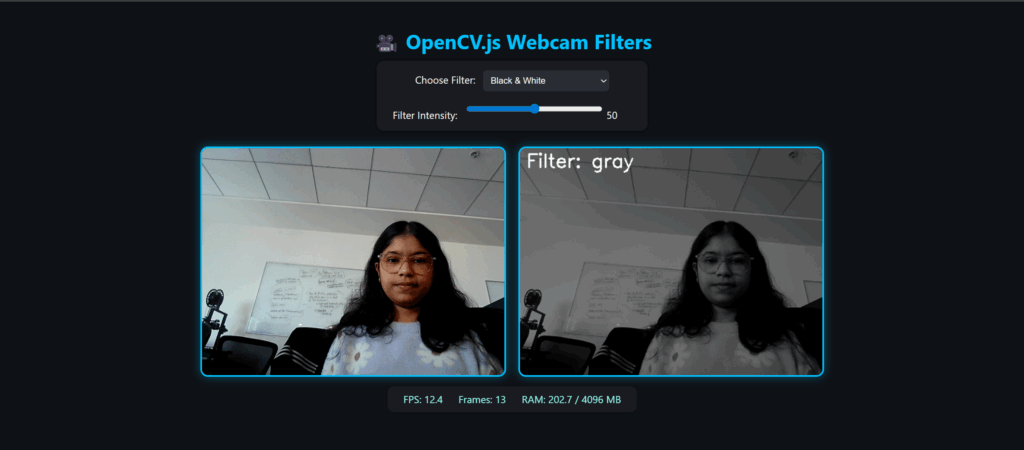
3.1 Grayscale Filter
function grayFilter(src, dst) {
        const intensity = parseInt(intensitySlider.value);
        cv.cvtColor(src, gray, cv.COLOR_RGBA2GRAY);
        gray.convertTo(gray, -1, 1.0 - intensity / 120.0, 0);
        cv.cvtColor(gray, dst, cv.COLOR_GRAY2RGBA);
    }
The grayscale effect works by converting the incoming color frame into shades of gray using OpenCV’s cvtColor().
Output Image
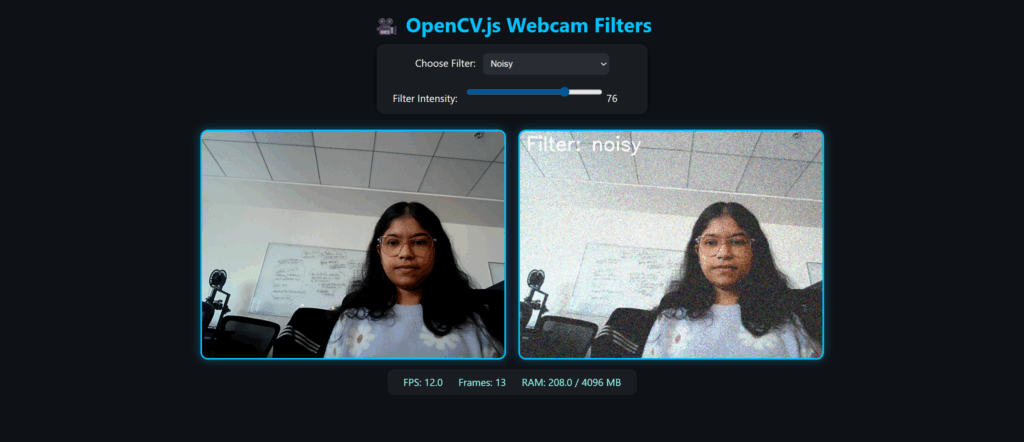
3.2 Noise Filter
function addNoise(src, dst) {
        const intensity = parseInt(intensitySlider.value);
        const amount = Math.min(255, intensity * 3);

        const noiseArr = new Uint8ClampedArray(src.rows * src.cols * 4);
        for (let i = 0; i < noiseArr.length; i++) {
            noiseArr[i] = Math.floor(Math.random() * amount);
        }

        const noiseMat = cv.matFromArray(src.rows, src.cols, cv.CV_8UC4, noiseArr);
        cv.addWeighted(src, 1.0, noiseMat, 0.5, 0, dst);
        noiseMat.delete();
    }
The noise filter creates a grainy, textured effect by generating a random noise matrix and blending it with the live video frame. The noise strength depends on the selected intensity. After converting the noise array into an OpenCV matrix, it’s mixed with the original frame using cv.addWeighted() to produce a film-like or glitch-style overlay.
Output Image
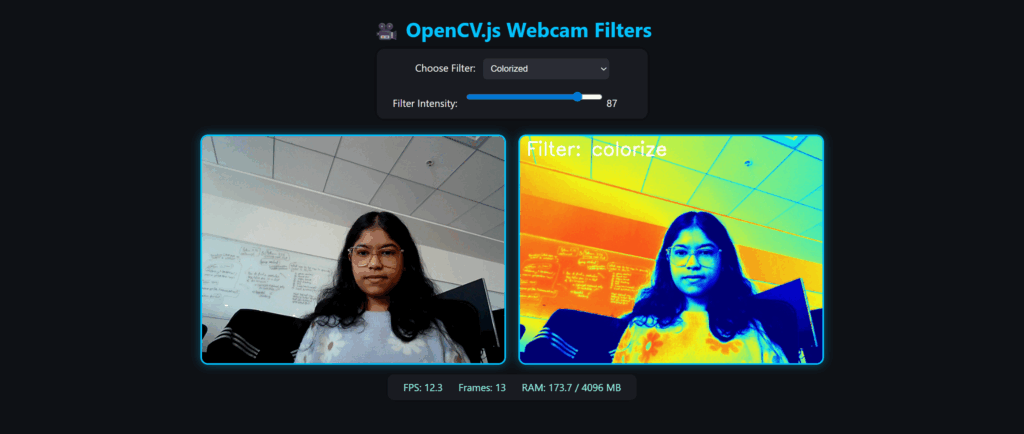
3.3 Colorize Filter
function colorize(src, dst) {
        cv.cvtColor(src, gray, cv.COLOR_RGBA2GRAY);
        cv.applyColorMap(gray, color, cv.COLORMAP_JET);

        const intensity = parseInt(intensitySlider.value) / 100.0;
        cv.cvtColor(src, bgr, cv.COLOR_RGBA2BGR);
        cv.addWeighted(bgr, 1 - intensity, color, intensity, 0, color);
        cv.cvtColor(color, dst, cv.COLOR_BGR2RGBA);
    }
The Colorize filter gives the video a heat-map or thermal effect by blending the original frame with a color-mapped version of its grayscale intensity. After converting the frame to grayscale, OpenCV’s COLORMAP_JET assigns colors from blue to red based on brightness. Finally, addWeighted() mixes this heatmap with the original image to produce a vivid, real-time pseudo-colored effect.


Output Image
3.4 Haar Cascade Face Blur
function applyHaarFaceBlur(src, dst) {
        cv.cvtColor(src, gray, cv.COLOR_RGBA2GRAY);
        // Run Haar only every N frames
        if (detectCounter % DETECT_INTERVAL === 0) {
            let faces = new cv.RectVector();
            let minSize = new cv.Size(30, 30);

            faceCascade.detectMultiScale(gray, faces, 1.1, 4, 0, minSize);
            // Save faces to cache
            faceCache = [];
            for (let i = 0; i < faces.size(); i++) {
                faceCache.push(faces.get(i));
            }
            faces.delete();
        }

        detectCounter++;
        src.copyTo(dst);
        const intensity = parseInt(intensitySlider.value);
        let k = Math.floor(intensity * 0.6) + 5;
        if (k % 2 === 0) k++;

        for(let face of faceCache) {
            let rect = new cv.Rect(face.x, face.y, face.width, face.height);

            let roiSrc = dst.roi(rect);
            let roiBlur = new cv.Mat();
            let mask = new cv.Mat.zeros(face.height, face.width, cv.CV_32FC1);
            cv.GaussianBlur(roiSrc, roiBlur, new cv.Size(k, k), 0);
            // Create a FEATHERED elliptical mask
            let cx = face.width / 2;
            let cy = face.height / 2;
            let ax = (face.width / 2) * ellipseScale;
            let ay = (face.height / 2) * ellipseScale;

            for (let y = 0; y < face.height; y++) {
                for (let x = 0; x < face.width; x++) {

                    let dx = (x - cx) / ax;
                    let dy = (y - cy) / ay;
                    let d = dx * dx + dy * dy;

                    let alpha = 0;

                    if (d < 1.0) {
                        alpha = 1.0 - d;
                    }

                    mask.floatPtr(y, x)[0] = alpha;
                }
            }
            let maskRGBA = new cv.Mat();
            cv.cvtColor(mask, maskRGBA, cv.COLOR_GRAY2RGBA);
            let blended = new cv.Mat();
            blended.create(roiSrc.rows, roiSrc.cols, cv.CV_8UC4);

            for (let y = 0; y < blended.rows; y++) {
                for (let x = 0; x < blended.cols; x++) {
                    let a = mask.floatAt(y, x);

                    for (let c = 0; c < 4; c++) {
                        let origVal = roiSrc.ucharPtr(y, x)[c];
                        let blurVal = roiBlur.ucharPtr(y, x)[c];
                        blended.ucharPtr(y, x)[c] = origVal * (1 - a) + blurVal * a;
                    }
                }
            }

            blended.copyTo(roiSrc);

            // cleanup
            roiSrc.delete();
            roiBlur.delete();
            mask.delete();
            maskRGBA.delete();
            blended.delete();
        }
    }
The Haar Face Blur filter performs real-time face anonymization by detecting faces using a Haar cascade classifier and applying a smooth, feathered blur only inside the detected regions.
Workflow:
The filter detects faces every few frames in grayscale, caches those detections, and applies a Gaussian blur only to the identified face regions based on the intensity slider. A smooth elliptical alpha mask shapes the blur naturally, and the blurred ROI is blended back into the frame for a clean, soft effect.

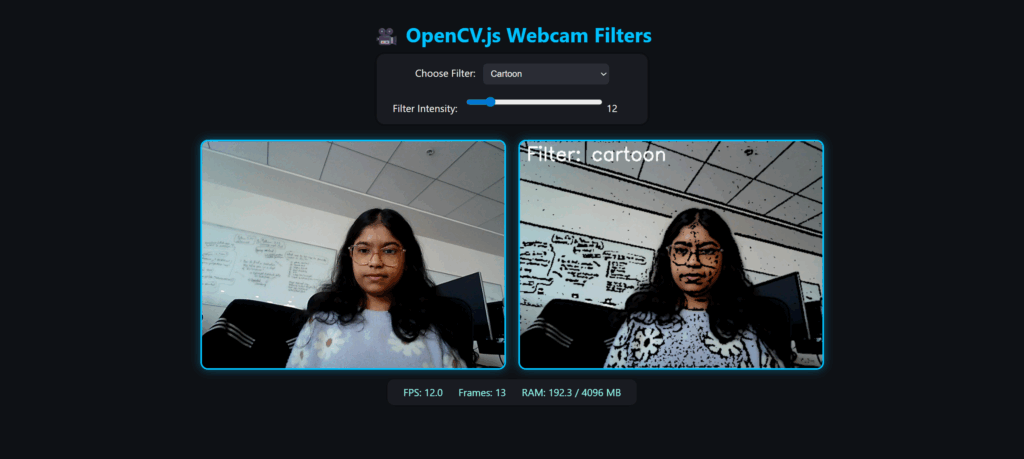
3.5 Cartoon Filter
function cartoon(src, dst) {
        const intensity = parseInt(intensitySlider.value);
        const k = Math.max(3, (Math.floor(intensity / 10) * 2 + 1));

        cv.cvtColor(src, gray, cv.COLOR_RGBA2GRAY);
        cv.medianBlur(gray, gray, k);
        cv.adaptiveThreshold(gray, edges, 255, cv.ADAPTIVE_THRESH_MEAN_C, cv.THRESH_BINARY, 9, intensity / 10);

        cv.GaussianBlur(src, color, new cv.Size(k, k), 0);
        cv.cvtColor(edges, edges, cv.COLOR_GRAY2RGBA);
        cv.bitwise_and(color, edges, dst);
    }
The Cartoon filter gives our live webcam feed a hand-drawn, comic-style look by simplifying colors and highlighting edges.
The filter converts the frame to grayscale, applies a median blur to smooth it, and uses adaptive thresholding to extract bold, cartoon-style edges. A Gaussian blur softens the color frame, and the edges are blended with the smoothed colors to create a clean, comic-book effect.
Output Image
3.6 Posterize Filter
  function posterize(src, dst) {
        const intensity = parseInt(intensitySlider.value);
        const levels = Math.max(2, Math.floor(intensity / 25) + 2);
        const step = 255.0 / (levels - 1);

        const lut = new cv.Mat(1, 256, cv.CV_8U);
        for (let i = 0; i < 256; i++) {
            lut.ucharPtr(0, i)[0] = Math.round(i / step) * step;
        }

        cv.LUT(src, lut, dst);
        lut.delete();
    }
The Posterize filter creates a bold, stylized effect by reducing the number of color tones in the image. It works by dividing the 0–255 color range into a small number of tone levels and mapping each pixel to the nearest one using a lookup table. This compresses smooth gradients into solid color blocks, giving the video a clean, flat, poster-like or pop-art appearance.
Output Image

3.7 How to Run the Webcam Filters in Your Browser
Place all necessary files in one folder. Then choose any one of the following methods to start a local server:
Method 1: Using Live Server (VS Code)
Open the folder in VS Code → Right-click index.html → Select “Open with Live Server” → Allow webcam permission in the browser.
Method 2: Using Terminal
Open the terminal inside the folder and run:
python -m http.server 8000
Then visit http://localhost:8000 in your browser and allow webcam access.
4. Performance, Memory & Optimization
Running real-time webcam filters in OpenCV.js relies on browser performance, hardware capabilities, and efficient memory management. WebAssembly provides near-native speed, so lightweight filters like Colorize and Posterize often exceed 50–60 FPS, while heavier ones, such as Cartoon, run slower due to the multiple processing steps involved. Using moderate resolutions (e.g., 640×480), deleting temporary cv.Mat objects and using faster browsers like Chrome or Edge helps maintain smooth performance.
5. Browser Support & Permissions
OpenCV.js works seamlessly on modern browsers that support WebAssembly and WebRTC camera APIs.
Chrome and Edge provide full support with the best performance. Firefox works but may show slightly slower frame rates. Safari has limited support due to weaker WebAssembly performance, while Opera runs well since it uses the Chrome engine.
6. Conclusion
OpenCV.js makes it possible to build fast, interactive webcam filters entirely in the browser, combining the power of OpenCV with the speed of WebAssembly. With real-time performance, easy deployment, and full cross-platform compatibility, it provides a clean and efficient way to experiment with computer vision and create engaging visual effects on the web.
7. References
- OpenCV.js Documentation – Learn more about the JavaScript bindings.
- WebAssembly Performance Tips – Optimize browser-based computation.
- LearnOpenCV.com Tutorials – Deep dive into computer vision with OpenCV.
- GitHub: opencv/opencv – Contribute or explore the latest source code.

5K+ Learners
Join Free VLM Bootcamp3 Hours of Learning