Image annotation is a crucial step in computer vision that involves adding meaningful information—such as shapes, labels, or markers—to an image. This process is widely used in applications like object detection, image labeling, dataset preparation, and visual storytelling. Whether it’s drawing a bounding box around a face or labeling specific objects in a scene, annotation helps machines and humans better understand visual content. OpenCV, a versatile and open-source computer vision library, offers simple and powerful tools for image annotation in both Python and C++. In this article, we will demonstrate how to annotate images using OpenCV by drawing circles, rectangles, lines, ellipses, and adding text in both programming languages.
Import cv2
Before using any OpenCV functions, we must first import the library. This is the essential first step to access all OpenCV functionalities.
Python
# import the cv2 library
import cv2
C++
//Include Libraries
//OpenCV's cv::Mat acts like NumPy arrays for image processing.

#include<opencv2/opencv.hpp>
#include<iostream>
We are assuming that you have already installed OpenCV on your device.
If not please refer the relevant links below:
Example Image
Functions and Syntaxes
In image processing, image annotations are graphical elements like lines, shapes, or marks added to images to highlight areas of interest. OpenCV provides simple functions to draw these annotations efficiently in both Python and C++. Below are the most commonly used drawing primitives and how they work.
Line
Draw a straight line between two points in an image. This is commonly used to indicate connections, boundaries, or directions.
Python
cv2.line(image, pt1, pt2, color, thickness)
C++
cv::line(image, pt1, pt2, color, thickness);
It accepts the below arguments:
- image: Source image.
- pt1, pt2: Starting and ending points (tuples or cv::Point).
- color: Line color (BGR format).
- thickness: Line thickness in pixels.
Circle
Draws a circle centered at a given coordinate with a specified radius. Circles are useful for marking specific points of interest, like keypoints or object centers.
Python
cv2.circle(image, center, radius, color, thickness)
C++
cv::circle(image, center, radius, color, thickness);
It accepts the below arguments:
- center: Coordinates of the circle’s center.
- radius: Radius of the circle.
- color: Circle color (BGR).
- thickness: Thickness of the circle outline (-1 for filled).
Rectangle
Draws a rectangle defined by two opposite corner points. Often used for bounding boxes around objects or regions of interest.
Python
cv2.rectangle(image, pt1, pt2, color, thickness)
C++
cv::rectangle(image, pt1, pt2, color, thickness);
It accepts the below arguments:
- pt1, pt2: Opposite corners of the rectangle.
- color: Rectangle color (BGR).
- thickness: Border thickness (-1 for filled rectangle).
Ellipse
Draws an ellipse inscribed in a rotated rectangle with specified arc angles. Ellipses are ideal for marking rounded shapes or showing orientation.
Python
cv2.ellipse(image, center, axes, angle, startAngle, endAngle, color, thickness)
C++
cv::ellipse(image, center, axes, angle, startAngle, endAngle, color, thickness);
It accepts the below arguments:
- center: Center of the ellipse.
- axes: Length of the major and minor axes.
- angle: Rotation angle of the ellipse in degrees.
- startAngle, endAngle: Start and end angle of the arc.
- color: Ellipse color (BGR).
- thickness: Outline thickness (-1 for filled).
Image Annotations
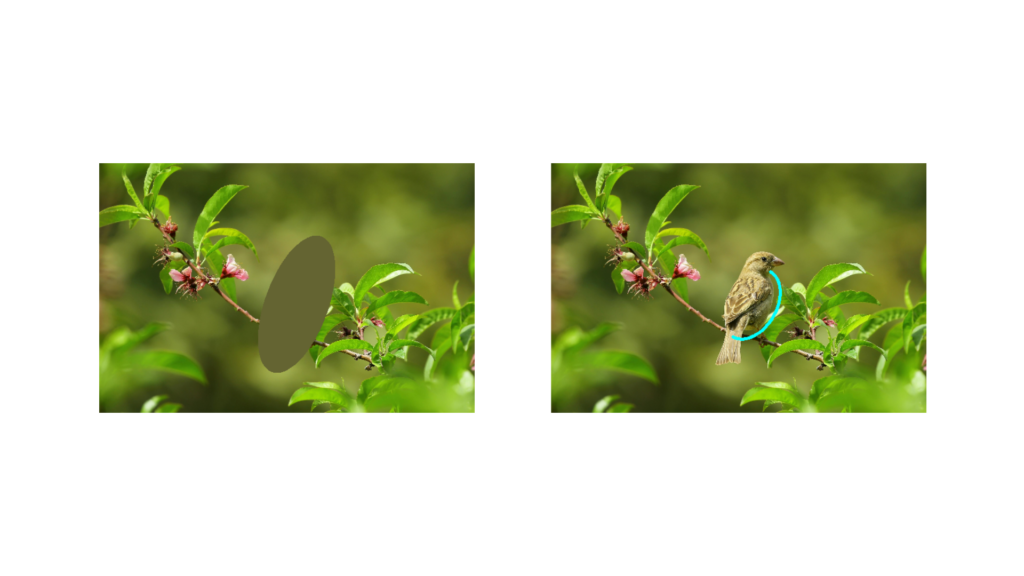
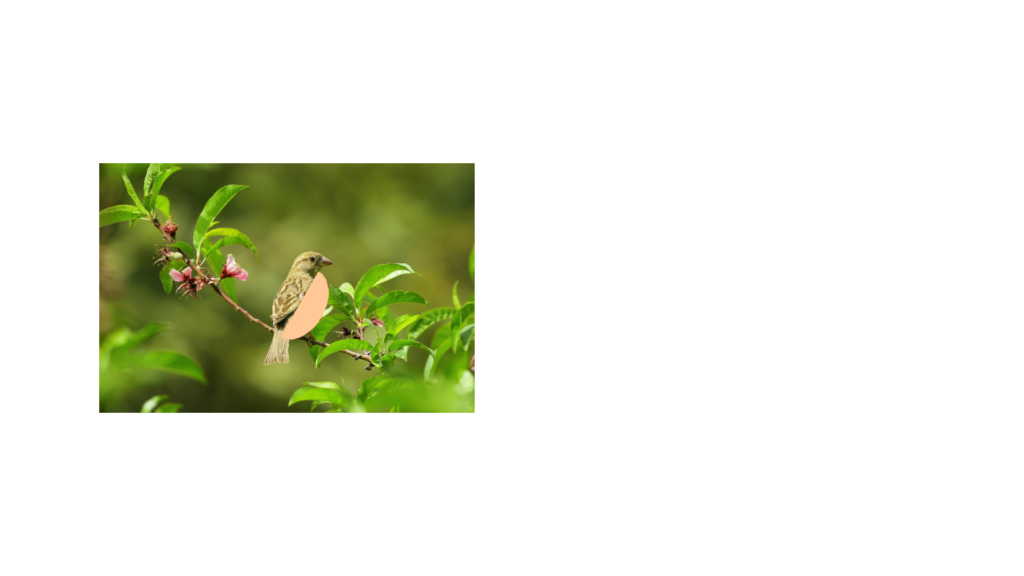
In this section, we use the example image to draw various annotation elements — lines, circles, rectangles, and ellipses — with different styles and parameters. The syntax for each function is similar between Python and C++, with only minor language-specific differences.
Python
import cv2
import numpy as np

# Load the image
image = cv2.imread("C:/Users/ssabb/Downloads/annotation.jpg")

# Resize the image while preserving aspect ratio
original_height, original_width = image.shape[:2]

new_width = 600
aspect_ratio = new_width / original_width
new_height = int(original_height * aspect_ratio)
image = cv2.resize(image, (new_width, new_height))

# Line
line = image.copy()
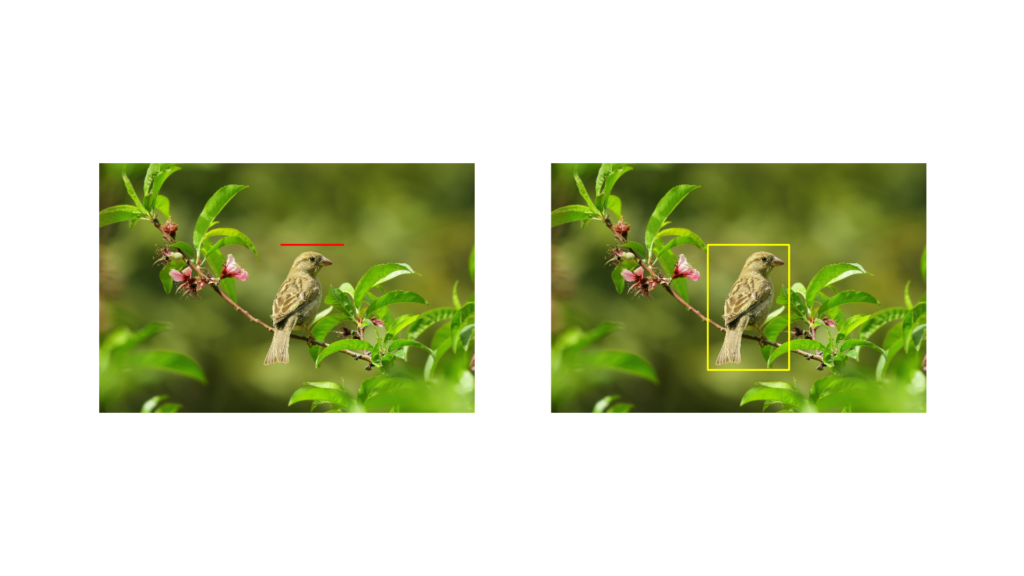
cv2.line(line, (290, 130), (390, 130), (0, 0, 255), 2)
cv2.imshow("Line Annotation", line)

# Normal Circle
circle1 = image.copy()
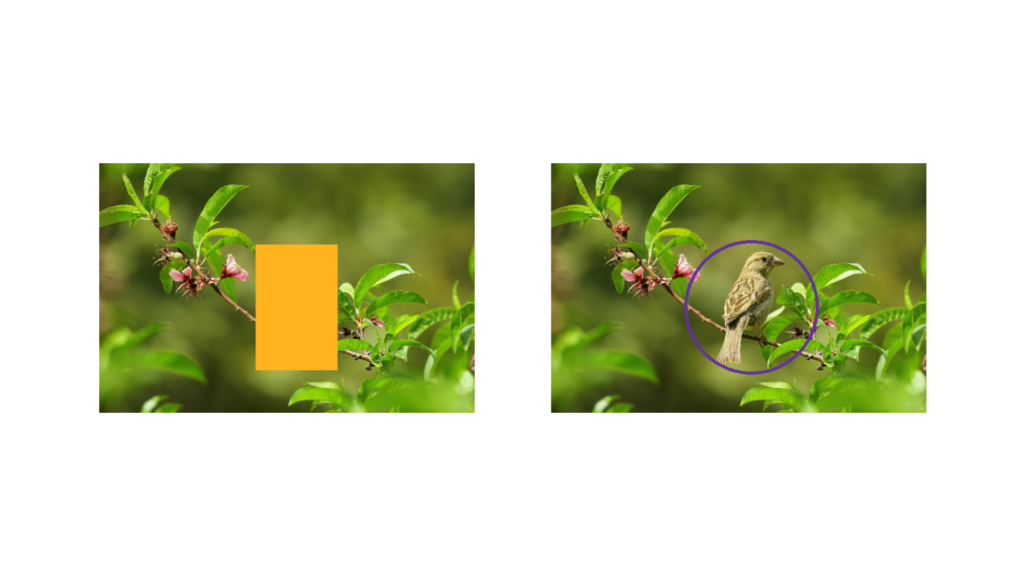
cv2.circle(circle1, (320, 230), 105, (160, 50, 100), 3)
cv2.imshow("Circle Annotation", circle1)

# Filled Circle
circle2 = image.copy()
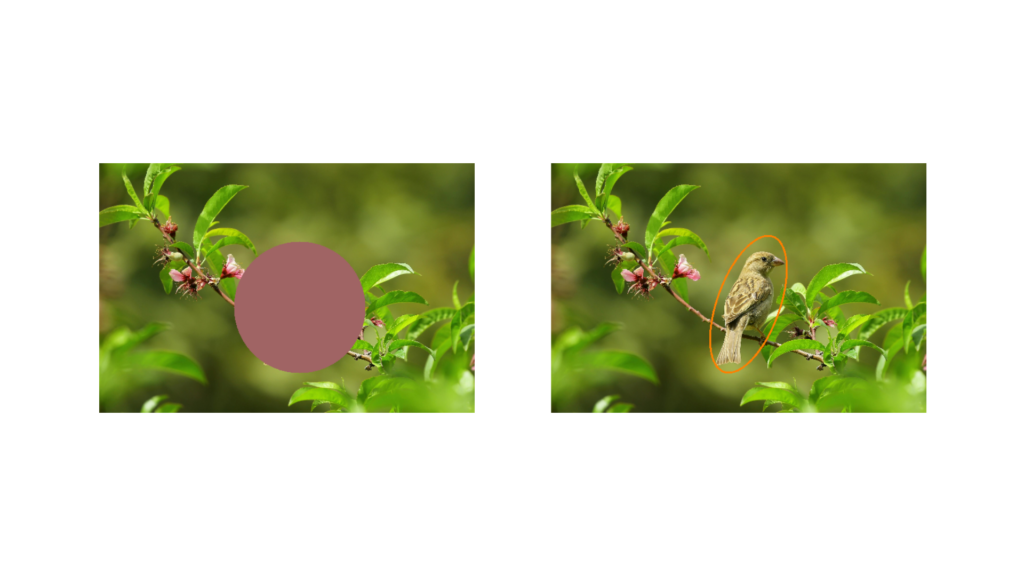
cv2.circle(circle2, (320, 230), 105, (100, 100, 160), -1)
cv2.imshow("Filled Circle", circle2)

# Normal Rectangle
rect1 = image.copy()
cv2.rectangle(rect1, (250, 130), (380, 330), (0, 255, 255), 2)
cv2.imshow("Rectangle", rect1)

# Filled Rectangle
rect2 = image.copy()
cv2.rectangle(rect2, (250, 130), (380, 330), (30, 180, 255), -1)
cv2.imshow("Filled Rect", rect2)

# Full Ellipse
ell1 = image.copy()
cv2.ellipse(ell1, (315, 225), (115, 50), 110, 0, 360, (0, 128, 255), 2)
cv2.imshow("Ellipse", ell1)

# Half Ellipse (arc)
ell2 = image.copy()
cv2.ellipse(ell2, (320, 225), (60, 40), 300, 0, 180, (255, 255, 0), 3)
cv2.imshow("Half Ellipse", ell2)

# Filled Ellipse
ell3 = image.copy()
cv2.ellipse(ell3, (315, 225), (115, 50), 110, 0, 360, (50, 100, 100), -1)
cv2.imshow("Filled Ellipse", ell3)

# Half-Filled Ellipse (semi arc)
ell4 = image.copy()
cv2.ellipse(ell4, (320, 225), (60, 40), 300, 0, 180, (150, 200, 255), -1)
cv2.imshow("Half-Filled Ellipse", ell4)

cv2.waitKey(0)
cv2.destroyAllWindows()
C++
#include <opencv2/opencv.hpp>
using namespace cv;

int main() {

    // Load image
    Mat image = imread("C:/Users/ssabb/Downloads/annotation.jpg");

    // Resize image while preserving aspect ratio
    int new_width = 600;
    int original_width = image.cols;
    int original_height = image.rows;
    float aspect_ratio = static_cast<float>(new_width) / original_width;
    int new_height = static_cast<int>(original_height * aspect_ratio);
    resize(image, image, Size(new_width, new_height));

    // Line
    Mat line = image.clone();
    line(line, Point(290, 130), Point(390, 130), Scalar(0, 0, 255), 2);
    imshow("Line Annotation", line);

    // Normal Circle
    Mat circle1 = image.clone();
    circle(circle1, Point(320, 230), 105, Scalar(160, 50, 100), 3);
    imshow("Circle Annotation", circle1);

    // Filled Circle
    Mat circle2 = image.clone();
    circle(circle2, Point(320, 230), 105, Scalar(100, 100, 160), FILLED);
    imshow("Filled Circle", circle2);

    // Normal Rectangle
    Mat rect1 = image.clone();
    rectangle(rect1, Point(250, 130), Point(380, 330), Scalar(0, 255, 255), 2);
    imshow("Rectangle", rect1);

    // Filled Rectangle
    Mat rect2 = image.clone();
    rectangle(rect2, Point(250, 130), Point(380, 330), Scalar(30, 180, 255), FILLED);
    imshow("Filled Rect", rect2);

    // Full Ellipse
    Mat ell1 = image.clone();
    ellipse(ell1, Point(315, 225), Size(115, 50), 110, 0, 360, Scalar(0, 128, 255), 2);
    imshow("Ellipse", ell1);

    // Half Ellipse
    Mat ell2 = image.clone();
    ellipse(ell2, Point(320, 225), Size(60, 40), 300, 0, 180, Scalar(255, 255, 0), 3);
    imshow("Half Ellipse", ell2);

    // Filled Ellipse
    Mat ell3 = image.clone();
    ellipse(ell3, Point(315, 225), Size(115, 50), 110, 0, 360, Scalar(50, 100, 100), FILLED);
    imshow("Filled Ellipse", ell3);

    // Half-Filled Ellipse
    Mat ell4 = image.clone();
    ellipse(ell4, Point(320, 225), Size(60, 40), 300, 0, 180, Scalar(150, 200, 255), FILLED);
    imshow("Half-Filled Ellipse", ell4);
    waitKey(0);
    destroyAllWindows();
    return 0;
}
- For each annotation, we make a clone of the resized image using image.copy() in Python or image.clone() in C++ to keep the base image intact.
- The cv2.line() / line() function draws a straight line between two points with a specified thickness and color in BGR format.
- Similarly, cv2.circle() / circle() takes the center, radius, and thickness (or -1 / FILLED for filled circles) to draw either hollow or filled circles.
- cv2.rectangle() / rectangle() defines two corner points and draws a rectangle accordingly, also using -1 / FILLED for solid rectangles.
- The cv2.ellipse() / ellipse() function is more versatile — it requires a center point, axis lengths (major and minor), rotation angle, start and end angle, and thickness or fill. By setting angles from 0 to 360, we get a full ellipse; for a half ellipse, the range is reduced (e.g., 0 to 180). Filled versions are obtained by using a negative thickness in Python or FILLED in C++.
Note: The coordinate points and sizes used for these annotations were determined purely through trial and error. Each shape has been positioned and sized manually so that it annotates around the sparrow in the image, giving a real-world example of image annotation.
Output
Adding Text
Adding text to images is a key aspect of image annotation, useful for labeling objects, adding instructions, or displaying coordinates. OpenCV provides the putText() function in both Python and C++ to overlay custom text onto images with control over font style, size, color, and positioning.
Python
cv2.putText(image, text, org, fontFace, fontScale, color, thickness, lineType)
C++
cv::putText(image, text, org, fontFace, fontScale, color, thickness, lineType);
It accepts the below arguments:
- image – The image on which the text will be drawn.
- text – The string to be drawn.
- org – Bottom-left corner of the text string in the image (x, y).
- fontFace – Font type (e.g., cv2.FONT_HERSHEY_SIMPLEX or cv::FONT_HERSHEY_SIMPLEX).
- fontScale – Font scale factor that multiplies the base size of the font.
- color – Text color in BGR format, e.g., (255, 255, 255) for white.
- thickness – Thickness of the lines used to draw the text.
- lineType – Type of the line (e.g., cv2.LINE_AA or cv::LINE_AA for anti-aliased).
Now let us implement the putText() on the image using different font sizes and fonts.
Python
import cv2
import numpy as np

# Load the image
image = cv2.imread("C:/Users/ssabb/Downloads/annotation.jpg")

# Resize while preserving aspect ratio
original_height, original_width = image.shape[:2]
new_width = 600
aspect_ratio = new_width / original_width
new_height = int(original_height * aspect_ratio)
image = cv2.resize(image, (new_width, new_height))

# Add text using different font styles
cv2.putText(image, "Hey you! Had fun annotating me?", (30, 40), cv2.FONT_HERSHEY_SIMPLEX, 0.5, (255, 0, 0), 2, cv2.LINE_AA)
cv2.putText(image, "Wanna master deep learning?", (30, 90), cv2.FONT_HERSHEY_PLAIN, 1, (0, 255, 0), 2, cv2.LINE_AA)
cv2.putText(image, "Join the PyTorch Bootcamp!", (30, 140), cv2.FONT_HERSHEY_DUPLEX, 0.8, (0, 0, 255), 2, cv2.LINE_AA)
cv2.putText(image, "Or maybe you're a TensorFlow fan?", (30, 190), cv2.FONT_HERSHEY_COMPLEX, 0.5, (255, 255, 0), 2, cv2.LINE_AA)
cv2.putText(image, "Hop in the TensorFlow Keras Course!", (30, 240), cv2.FONT_HERSHEY_TRIPLEX, 0.7, (255, 0, 255), 2, cv2.LINE_AA)
cv2.putText(image, "Want to see the world clearly?", (30, 290), cv2.FONT_HERSHEY_COMPLEX_SMALL, 0.8, (0, 255, 255), 1, cv2.LINE_AA)
cv2.putText(image, "Start the OpenCV Course!", (30, 340), cv2.FONT_HERSHEY_SCRIPT_SIMPLEX, 1, (100, 100, 255), 2, cv2.LINE_AA)
cv2.putText(image, "see you!!", (30, 390), cv2.FONT_HERSHEY_SCRIPT_COMPLEX, 0.7, (150, 150, 150), 2, cv2.LINE_AA)

# Display
cv2.imshow("Text Annotations", image)
cv2.waitKey(0)
cv2.destroyAllWindows()
C++
#include <opencv2/opencv.hpp>

int main() {
    cv::Mat image = cv::imread("C:/Users/ssabb/Downloads/annotation.jpg");

    // Resize the image while preserving aspect ratio
    int newWidth = 600;
    double aspectRatio = (double)newWidth / image.cols;
    int newHeight = static_cast<int>(image.rows * aspectRatio);
    cv::resize(image, image, cv::Size(newWidth, newHeight));

    // Add text using different font styles
    cv::putText(image, "Hey you!", cv::Point(30, 50), cv::FONT_HERSHEY_SIMPLEX, 1, cv::Scalar(255, 0, 0), 2, cv::LINE_AA);
    cv::putText(image, "Wanna master deep learning?", cv::Point(30, 100), cv::FONT_HERSHEY_PLAIN, 1.5, cv::Scalar(0, 255, 0), 2, cv::LINE_AA);
    cv::putText(image, "Join the PyTorch Bootcamp!", cv::Point(30, 150), cv::FONT_HERSHEY_DUPLEX, 1, cv::Scalar(0, 0, 255), 2, cv::LINE_AA);
    cv::putText(image, "Or maybe you're a TensorFlow fan?", cv::Point(30, 200), cv::FONT_HERSHEY_COMPLEX, 1, cv::Scalar(255, 255, 0), 2, cv::LINE_AA);
    cv::putText(image, "Want to see the world clearly?", cv::Point(30, 250), cv::FONT_HERSHEY_TRIPLEX, 1, cv::Scalar(255, 0, 255), 2, cv::LINE_AA);
    cv::putText(image, "Start the OpenCV Course!", cv::Point(30, 300), cv::FONT_HERSHEY_COMPLEX_SMALL, 1, cv::Scalar(0, 255, 255), 1, cv::LINE_AA);
    cv::putText(image, "New to coding?", cv::Point(30, 350), cv::FONT_HERSHEY_SCRIPT_SIMPLEX, 1, cv::Scalar(100, 100, 255), 2, cv::LINE_AA);
    cv::putText(image, "The Python for Beginners Course is for you!", cv::Point(30, 400), cv::FONT_HERSHEY_SCRIPT_COMPLEX, 1, cv::Scalar(150, 150, 150), 2, cv::LINE_AA);
    cv::imshow("Text Annotations", image);

    cv::waitKey(0);
    return 0;
}
Here we used multiple FONT_HERSHEY_* fonts to show the variety available in OpenCV. (x, y) coordinates control where the text appears. Negative or too-small y values might clip text at the top. All coordinates, sizes, and styles are chosen experimentally to match the image dimensions and ensure visibility.
Output
Summary
In this article, we explored how to annotate images using OpenCV with fundamental drawing functions. We covered how to draw lines, circles, rectangles, and ellipses, including both normal and filled versions. Each shape was demonstrated with complete code in both Python and C++, along with a clear explanation of parameters like position, size, color, and thickness.
Through these foundational tools, you now have everything you need to build your own annotation tools or overlay visual information on images, making OpenCV a powerful asset for image labeling, data preparation, or even fun creative tasks.





5K+ Learners
Join Free VLM Bootcamp3 Hours of Learning