
OpenCV is widely used for image and video processing. Unlike static images, videos consist of multiple frames played in sequence, requiring careful handling of frame rates and smooth processing. This adds complexity, demanding efficient computation and dynamic frame management.
Reading a video file requires processing each frame individually, and then displaying or storing it as needed. OpenCV provides the VideoCapture() function for this purpose, allowing users to load video files and access webcam streams in real-time. On the other hand, writing a video file requires assembling a sequence of processed frames and encoding them into a specific format. This is achieved using VideoWriter(), which enables users to save frames as a video file with customizable resolution, frame rate, and encoding options.
In this article, we will take a deep dive into how OpenCV handles video streams, breaking down the syntax, methods, and techniques for reading and writing video files efficiently. We will provide examples in both Python and C++ to ensure a comprehensive understanding.
Table of Contents
Import cv2
Before using any OpenCV functions, we must first import the library. This is the essential first step to access all OpenCV functionalities.
Python
# import the cv2 library
import cv2
C++
//Include Libraries
//Include Libraries
#include<opencv2/opencv.hpp>
#include<iostream>
We are assuming that you have already installed OpenCV on your device.
If not please refer the relevant links below:
OpenCV Function to Read and Write Videos
- VideoCapture() – This function is used to read video files, capture frames from a webcam, or process video streams frame by frame.
- VideoWriter() – This function is used to write and save video files by encoding a sequence of frames into a specified format.
Example Video
Reading a Video in OpenCV
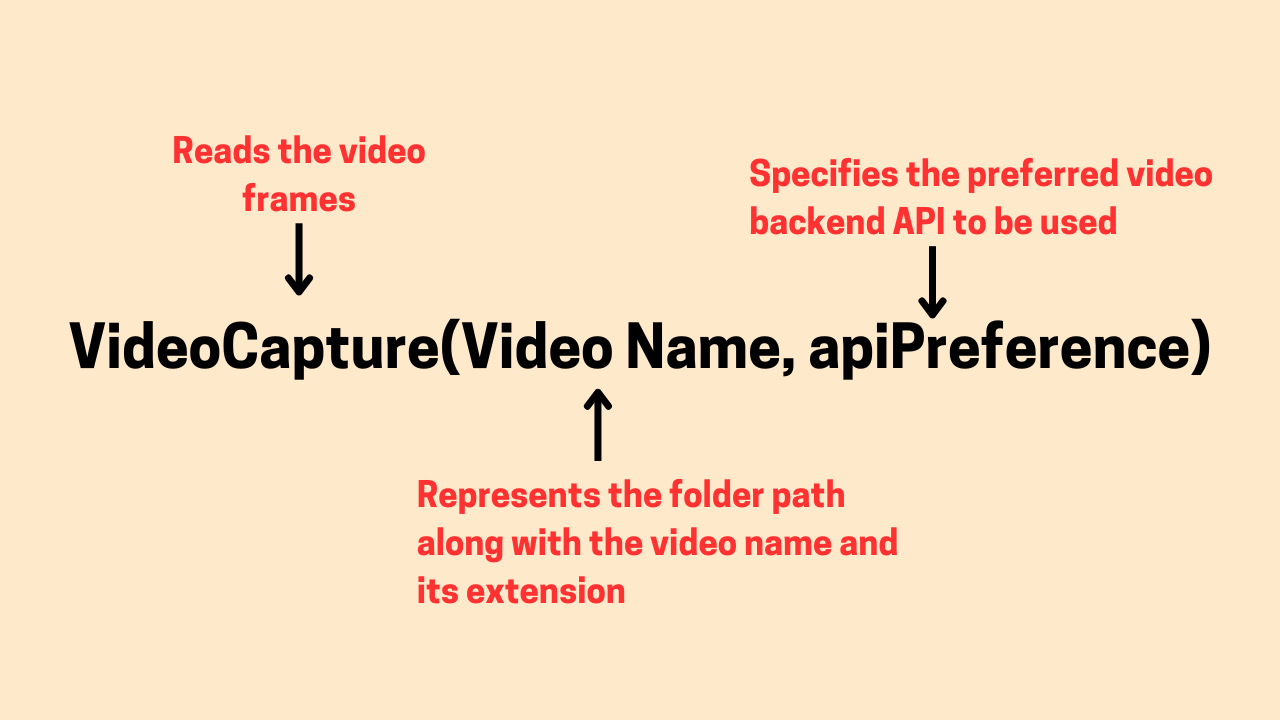
The VideoCapture class accepts a video file path or a webcam stream, with an optional parameter to specify the backend API for better compatibility.
It accepts two arguments:
- Video Name (Required, filename or device index):
- If a string (e.g., “video.mp4” or “C:/path/to/video.avi”), it refers to the path of the video file to be read.
- If an integer (e.g., 0, 1), it refers to the webcam index. 0 usually represents the default camera, while 1 or higher can be used for external cameras.
- apiPreference (optional, backend API preference):
- Specifies the preferred video backend API to be used (e.g., cv2.CAP_FFMPEG, cv2.CAP_DSHOW, cv2.CAP_V4L2).
- If omitted, OpenCV automatically selects the best available backend.
- Useful when multiple APIs are available, and you want to force OpenCV to use a specific one for better compatibility.
| Video Name | Meaning |
| File path | Specifies the path to a video file (e.g., “video.mp4”) for reading |
| 0 | Opens the default webcam (built-in or first external camera) |
| >0 | Opens additional cameras (e.g., 1 for the second camera, 2 for the third, etc) |
Read a Video from a File
It is straightforward to use the VideoCapture() class in both Python and C++.
Python Syntax
cap = cv2.VideoCapture("C:/Users/ssabb/Downloads/Hashira.mp4")
C++ Syntax
cv::VideoCapture cap("C:/Users/ssabb/Downloads/Hashira.mp4");
In the above code block, “C:/Users/ssabb/Downloads/Hashira.mp4” is the file path to the video that needs to be read.
The cap variable is the VideoCapture object that will be used to extract frames from the video. Once the video is opened successfully, we can use cap.read() to retrieve frames sequentially.
Python Code for Reading a Video File in OpenCV
import cv2

# Open the video file
cap = cv2.VideoCapture("C:/Users/ssabb/Downloads/Hashira.mp4")

# Check if the video was opened successfully
if not cap.isOpened():
    print("Error: Could not open video file.")
else:
    print("Video file opened successfully!")

# Read the first frame to confirm reading
ret, frame = cap.read()

if ret:

    # Display the frame using imshow
    cv2.imshow("First Frame", frame)
    cv2.waitKey(0)  # Wait for a key press to close the window
    cv2.destroyAllWindows()  # Close the window
else:
    print("Error: Could not read the frame.")

# Release the video capture object
cap.release()
C++ Code for Reading a Video File in OpenCV
#include <opencv2/opencv.hpp>
#include <iostream>

int main() {

    // Open the video file
    cv::VideoCapture cap("C:/Users/ssabb/Downloads/Hashira.mp4");

    // Check if the video was opened successfully
    if (!cap.isOpened()) {
        std::cout << "Error: Could not open video file." << std::endl;
        return -1;
    } else {
        std::cout << "Video file opened successfully!" << std::endl;
    }

    // Read the first frame to confirm reading
    cv::Mat frame;
    bool ret = cap.read(frame);

    if (ret) {

        // Display the frame using imshow
        cv::imshow("First Frame", frame);
        cv::waitKey(0);  // Wait for a key press to close the window
        cv::destroyAllWindows();  // Close the window
    } else {
        std::cout << "Error: Could not read the frame." << std::endl;
    }

    // Release the video capture object
    cap.release();
    return 0;
}
Here are some key syntax elements used in the above code block:
The code first opens the video file using VideoCapture(). It checks if the file was opened successfully using isOpened(). The first frame is read using cap.read(), and a confirmation message is printed based on whether the frame was retrieved.
ret: The ret variable is a boolean value that indicates whether the frame was successfully captured. It returns True if the frame was read correctly and False if there was an issue.
frame: The frame variable contains the actual image (frame) that was read from the video file or image sequence. It’s returned as a NumPy array in Python or as a cv::Mat object in C++. This array holds the pixel values that represent the frame, which can then be processed, displayed, or manipulated further in the program.
After reading the first frame with cap.read(), the frame is displayed using imshow(). The waitKey(0) function pauses the execution and waits for the user to press any key. Once a key is pressed, destroyAllWindows() closes the window. The cap.release() function ensures that system resources are freed after the operation.
Visualizing the output
Read a Video from the Webcam
To capture a live video stream from a webcam, we use the VideoCapture() function with the appropriate camera index. The default webcam is usually assigned the index 0, while additional connected cameras are indexed as 1, 2, etc.
Python Syntax
cap = cv2.VideoCapture(0)
C++ Syntax
cv::VideoCapture cap(0);
0 – This refers to the default webcam on the system. If an external camera is connected, you can specify 1, 2, etc., to access different devices. Almost forgot—there’s a 3… not for another camera, but for registering in the OpenCV Bootcamp. Because mastering OpenCV is just as important as choosing the right camera!
Python Code for Reading a Video from a Webcam in OpenCV
import cv2

# Open the default webcam (0)
cap = cv2.VideoCapture(0)

# Check if the webcam was opened successfully
if not cap.isOpened():
    print("Error: Could not access the webcam.")
else:
    print("Webcam accessed successfully!")

# Read the first frame to confirm capturing
ret, frame = cap.read()

if ret:

    # Display the frame using imshow
    cv2.imshow("Captured Frame", frame)
    cv2.waitKey(0)  # Wait for a key press to close the window
    cv2.destroyAllWindows()  # Close the window
else:
    print("Error: Could not capture a frame.")

# Release the webcam
cap.release()
C++ Code for Reading a Video from a Webcam in OpenCV
#include <opencv2/opencv.hpp>
#include <iostream>

int main() {

    // Open the default webcam (0)
    cv::VideoCapture cap(0);

    // Check if the webcam was opened successfully
    if (!cap.isOpened()) {
        std::cout << "Error: Could not access the webcam." << std::endl;
        return -1;
    } else {
        std::cout << "Webcam accessed successfully!" << std::endl;
    }

    // Read the first frame to confirm capturing
    cv::Mat frame;
    bool ret = cap.read(frame);

    if (ret) {

        // Display the frame using imshow
        cv::imshow("Captured Frame", frame);
        cv::waitKey(0);  // Wait for a key press to close the window
        cv::destroyAllWindows();  // Close the window
    } else {
        std::cout << "Error: Could not capture a frame." << std::endl;
    }

    // Release the webcam
    cap.release();
    return 0;
}
After opening the webcam using VideoCapture(0), the first frame is captured using cap.read(). If successful, the frame is displayed using imshow(), and the program waits for a key press with waitKey(0) before closing the window with destroyAllWindows(). The cap.release() function ensures the webcam resource is freed after execution.
Visualizing the output

Read an Image-Sequence
Instead of reading a video from a single video file, we can process a sequence of images as individual frames to construct a video. This approach is commonly used in applications where frames are stored as separate image files, such as time-lapse photography, scientific imaging, or computer graphics rendering.
The filenames must follow a numerical or alphabetical pattern so they can be read in order.
Python Syntax
cap = cv2.VideoCapture("C:/Users/ssabb/Downloads/frames/frame_%04d.png")
C++ Syntax
cv::VideoCapture cap("C:/Users/ssabb/Downloads/frames/frame_%04d.png");
“C:/Users/ssabb/Downloads/frames/frame_%04d.png” – This is the file path pattern for the image sequence, where %04d means the filenames should be numbered (e.g., frame_0001.png, frame_0002.png, and so on.).


Python Code for Reading an Image-Sequence in OpenCV
import cv2

# Open the image sequence
cap = cv2.VideoCapture("C:/Users/ssabb/Downloads/frames/frame_%04d.png")

# Check if the sequence was opened successfully
if not cap.isOpened():
    print("Error: Could not open image sequence.")
else:
    print("Image sequence opened successfully!")

# Read the first frame to confirm reading
ret, frame = cap.read()

if ret:

    # Display the first frame using imshow
    cv2.imshow("Captured Frame", frame)
    cv2.waitKey(0)  # Wait for a key press to close the window
    cv2.destroyAllWindows()  # Close the window
else:
    print("Error: Could not read a frame from the sequence.")

# Release the capture object
cap.release()
C++ Code for Reading an Image-Sequence in OpenCV
#include <opencv2/opencv.hpp>
#include <iostream>

int main() {

    // Open the image sequence
    cv::VideoCapture cap("C:/Users/ssabb/Downloads/frames/frame_%04d.png");

    // Check if the sequence was opened successfully
    if (!cap.isOpened()) {
        std::cout << "Error: Could not open image sequence." << std::endl;
        return -1;
    } else {
        std::cout << "Image sequence opened successfully!" << std::endl;
    }

    // Read the first frame to confirm reading
    cv::Mat frame;
    bool ret = cap.read(frame);

    if (ret) {

        // Display the first frame using imshow
        cv::imshow("Captured Frame", frame);
        cv::waitKey(0);  // Wait for a key press to close the window
        cv::destroyAllWindows();  // Close the window
    } else {
        std::cout << "Error: Could not read a frame from the sequence." << std::endl;
    }

    // Release the capture object
    cap.release();
    return 0;
}
We use VideoCapture() to load an image sequence where %04d allows OpenCV to recognize the sequentially numbered image files (e.g., frame_0001.png, frame_0002.png, etc.). The cap.release() function ensures that resources are freed after execution.
Visualizing the output
Python Code for Displaying the Entire Video
import cv2

# Open the video file
cap = cv2.VideoCapture("C:/Users/ssabb/Downloads/Hashira2.mp4")

# Check if the video was opened successfully
if not cap.isOpened():
    print("Error: Could not open video file.")
else:
    print("Video file opened successfully!")

# Get video properties (e.g., frame count and frame width)
frame_count = int(cap.get(cv2.CAP_PROP_FRAME_COUNT))  # Get total number of frames in the video
fps = cap.get(cv2.CAP_PROP_FPS)  # Get frames per second (FPS)
print(f"Total frames: {frame_count}, FPS: {fps}")

# Read and display each frame of the video
while True:
    ret, frame = cap.read()
    if not ret:
        print("End of video or error occurred.")
        break

    # Display the frame
    cv2.imshow("Video Frame", frame)

    # Wait for 1ms for key press to continue or exit if 'q' is pressed
    if cv2.waitKey(1) & 0xFF == ord('q'):
        break

# Release the video capture object and close any OpenCV windows
cap.release()
cv2.destroyAllWindows()
C++ Code for Displaying the Entire Video
#include <opencv2/opencv.hpp>
#include <iostream>

int main() {

    // Open the video file
    cv::VideoCapture cap("C:/Users/ssabb/Downloads/Hashira.mp4");

    // Check if the video was opened successfully
    if (!cap.isOpened()) {
        std::cout << "Error: Could not open video file." << std::endl;
        return -1;
    } else {
        std::cout << "Video file opened successfully!" << std::endl;
    }

    // Get video properties (e.g., frame count and frame width)
    int frame_count = static_cast<int>(cap.get(cv::CAP_PROP_FRAME_COUNT));  // Get total number of frames
    double fps = cap.get(cv::CAP_PROP_FPS);  // Get frames per second (FPS)
    std::cout << "Total frames: " << frame_count << ", FPS: " << fps << std::endl;

    // Read and display each frame of the video
    while (true) {
        cv::Mat frame;
        bool ret = cap.read(frame);
        if (!ret) {
            std::cout << "End of video or error occurred." << std::endl;
            break;
        }

        // Display the frame
        cv::imshow("Video Frame", frame);

        // Wait for 1ms and check if 'q' is pressed to exit
        char key = cv::waitKey(1);
        if (key == 'q') {
            break;
        }
    }

    // Release the video capture object and close any OpenCV windows
    cap.release();
    cv::destroyAllWindows();
    return 0;
}
Below are some essential syntax elements from the above code block:
Inside a while loop, each frame of the video is read with cap.read(). If the frame is successfully retrieved, it is displayed using imshow(). The loop continues displaying frames until there are no more frames to read or if the user presses the ‘q’ key (this is checked using waitKey()). The & 0xFF in Python ensures we are checking the lower byte of the returned key value.
Once the video ends or ‘q’ is pressed, we release the video capture object with cap.release() and close all OpenCV windows using destroyAllWindows().
The .get() method in OpenCV is used to retrieve various properties or metadata about a video, such as the number of frames (CAP_PROP_FRAME_COUNT), the frame width (CAP_PROP_FRAME_WIDTH), frame height (CAP_PROP_FRAME_HEIGHT), and more.
Common Uses of get()
- CAP_PROP_FRAME_COUNT: To get the total number of frames in the video.
- CAP_PROP_FPS: To get the frames per second (FPS) of the video.
- CAP_PROP_FRAME_WIDTH and CAP_PROP_FRAME_HEIGHT: To get the dimensions of each frame (width and height).
This process can be used in the same way for webcam video streams. Simply replace the video file path with 0 to access the default webcam. The process will be identical for reading frames, displaying them, and managing the video stream.
Visualizing the output
Possible Errors while Reading the Video
Error: Could Not Read a Frame
When reading frames using cap.read(), if the frame can’t be read, OpenCV throws an error or returns False.
[mov,mp4,m4a,3gp,3g2,mj2 @ 0000021ac3923080] moov atom not found
Cause
- This can occur when the camera is not delivering frames correctly.
- It can also happen if the video source file becomes unavailable during processing or corrupted.
Fix
- Always check the ret variable (for Python) or the return value of cap.read() to verify that the frame was successfully read.
- Handle end-of-file conditions by breaking out of the loop when ret is False.
Error: Could Not Access the Webcam
If you can’t access the webcam (usually because it’s in use by another program or there’s a hardware issue), OpenCV will report an error.
[ WARN:0@6.765] global cap_msmf.cpp:476 `anonymous-namespace’::SourceReaderCB::OnReadSample videoio(MSMF): OnReadSample() is called with error status: -1072875772
[ WARN:0@6.777] global cap_msmf.cpp:488 `anonymous-namespace’::SourceReaderCB::OnReadSample videoio(MSMF): async ReadSample() call is failed with error status: -1072875772
[ WARN:1@6.784] global cap_msmf.cpp:1795 CvCapture_MSMF::grabFrame videoio(MSMF): can’t grab frame. Error: -1072875772
Error: Could not capture a frame.
Cause
- The webcam might already be in use by another application (e.g., Zoom, Skype).
- The camera index might be incorrect (e.g., using 0 for a non-existent webcam).
Fix
- Make sure no other software is using the webcam.
- Check that the correct camera index (usually 0 for the default camera) is used.
Writing a Video in OpenCV
Writing a video means taking frames (captured from a video, generated, or processed) and saving them as a video file. OpenCV provides the cv2.VideoWriter class in Python and cv::VideoWriter in C++ for this purpose.
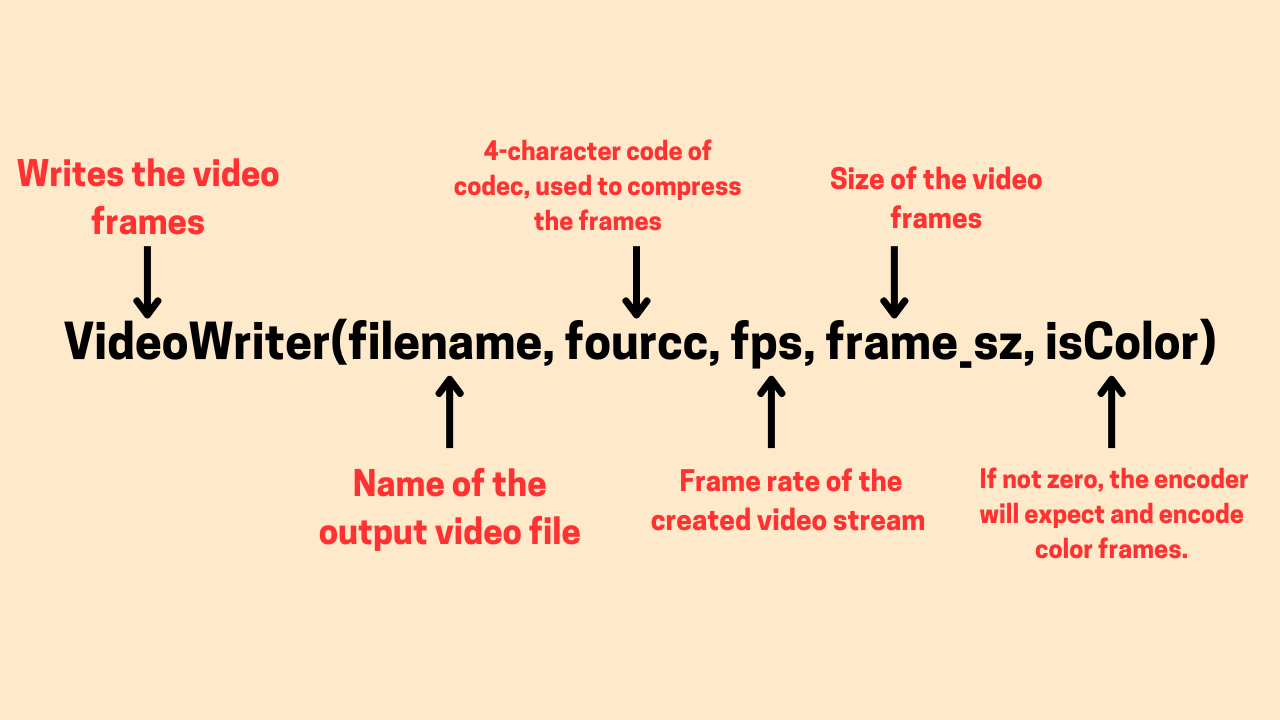
Python syntax
cv2.VideoWriter(filename, fourcc, fps, frame_size, isColor)
C++ syntax
cv::VideoWriter(filename, fourcc, fps, frame_size, isColor)
It accepts four arguments:
- filename: Name of the output video file (e.g., “output.mp4”).
- fourcc: FourCC (Four Character Code) codec (e.g., “XVID”, “MJPG”, “MP4V”, “X264”).
- fps: Frames per second (e.g., 30.0).
- frame_size: Tuple specifying the frame width and height (e.g., (640, 480)).
- isColor: Boolean (True for color, False for grayscale).
Python Code for Writing a Video in OpenCV
import cv2

# Open the video file
cap = cv2.VideoCapture("C:/Users/ssabb/Downloads/input.mp4")

# Check if the video was opened successfully
if not cap.isOpened():
    print("Error: Could not open video file.")
    exit()

# Get frame width and height
frame_width = int(cap.get(cv2.CAP_PROP_FRAME_WIDTH))
frame_height = int(cap.get(cv2.CAP_PROP_FRAME_HEIGHT))

# Define the codec and create VideoWriter object
fourcc = cv2.VideoWriter_fourcc(*"XVID")
out = cv2.VideoWriter("output.avi", fourcc, 30.0, (frame_width, frame_height))
while True:
    ret, frame = cap.read()
    if not ret:
        print("End of video or error occurred.")
        break

    # Write the frame to the output video file
    out.write(frame)

    # Display the frame
    cv2.imshow("Frame", frame)
    if cv2.waitKey(1) & 0xFF == ord('q'):
        break

# Release everything
cap.release()
out.release()
cv2.destroyAllWindows()
C++ Code for Writing a Video in OpenCV
#include <opencv2/opencv.hpp>
#include <iostream>
int main() {

    // Open the video file
    cv::VideoCapture cap("C:/Users/ssabb/Downloads/input.mp4");

    // Check if the video was opened successfully
    if (!cap.isOpened()) {
        std::cout << "Error: Could not open video file." << std::endl;
        return -1;
    }

    // Get frame width and height
    int frame_width = static_cast<int>(cap.get(cv::CAP_PROP_FRAME_WIDTH));
    int frame_height = static_cast<int>(cap.get(cv::CAP_PROP_FRAME_HEIGHT));

    // Define the codec and create VideoWriter object
    cv::VideoWriter out("output.avi", cv::VideoWriter::fourcc('X', 'V', 'I', 'D'), 30.0, cv::Size(frame_width, frame_height));
    cv::Mat frame;
    while (true) {
        bool ret = cap.read(frame);
        if (!ret) {
            std::cout << "End of video or error occurred." << std::endl;
            break;
        }

        // Write the frame to the output video file
        out.write(frame);

        // Display the frame
        cv::imshow("Frame", frame);
        if (cv::waitKey(1) == 'q') {
            break;
        }
    }

    // Release everything
    cap.release();
    out.release();
    cv::destroyAllWindows();
    return 0;
}
To write a video in OpenCV, we first open the video file using cv2.VideoCapture() in Python or cv::VideoCapture in C++. After successfully opening the video, we retrieve its properties, such as frame width and height, using cv2.CAP_PROP_FRAME_WIDTH and cv2.CAP_PROP_FRAME_HEIGHT.
Next, we set up the video writer by defining the codec with cv2.VideoWriter_fourcc() in Python or cv::VideoWriter::fourcc() in C++, specifying the FPS and resolution. Inside a loop, we continuously read frames using cap.read(), write each frame to the output video using out.write(frame), and display it using cv2.imshow(). The loop continues until the video ends (ret == False) or the user presses the ‘q’ key to exit.
Finally, we release the video objects with cap.release() and out.release(), ensuring all resources are freed, and close all OpenCV windows using cv2.destroyAllWindows().
Visualizing the output
Possible Errors while writing a Video:
Could Not Write to Output File
Cause
- Incorrect codec or unsupported format.
- Output path does not have write permissions.
Fix
- Ensure codec is supported: Use “XVID” for AVI, “MP4V” for MP4.
- Run as administrator if writing to a protected directory.
Frame Size Mismatch
Cause
- The frame size does not match the one given in VideoWriter().
Fix
- Use the correct frame size from cap.get()
Summary
In this article, we explored how OpenCV handles video processing, covering both reading and writing videos efficiently.
- Reading Videos: OpenCV’s VideoCapture() function allows us to read video files, capture frames from a webcam, or process image sequences as videos.
- Writing Videos: The VideoWriter() function enables saving processed frames into a new video file with customizable resolution, frame rate, and encoding format.
- Practical Implementations: We provided Python and C++ code examples for reading videos from files, webcams, and image sequences, along with displaying videos frame by frame. Similarly, we demonstrated writing video output effectively.
- Error Handling: We highlighted common errors that may occur while reading and writing videos.
By understanding these fundamental video processing techniques, you can seamlessly integrate OpenCV into various computer vision applications, from real-time video analysis to automated video editing.


5K+ Learners
Join Free VLM Bootcamp3 Hours of Learning